FableVision Learning Spotlight Blog
Categories
- Animation-ish 42
- Books 21
- Civics! 2
- Classroom Spotlight 17
- Conferences and Events 20
- Creative Educator 3
- Creativity 25
- Distance Learning 13
- Dot Day 22
- FabClassroom 28
- FabFriday 19
- FabMaker Studio 66
- FabMaker Studio Classroom 13
- FableFive 7
- FableVision Games 3
- Free Educator Resources 36
- HUTCH 1
- Home Activities 5
- In the Classroom 34
- In the News 11
- International Dot Day 23
- Ish 1
- Library 1
- Mapping the World by Heart 7
- Paul Reynolds 10
- Peter H. Reynolds 54
- Professional Development 9
- STEM/STEAM 20
- Storybook Academy 2
- Teacher Spotlight 14
- The Dot 17
- The North Star 2
- Words and Their Stories 1
- Zoombinis 3

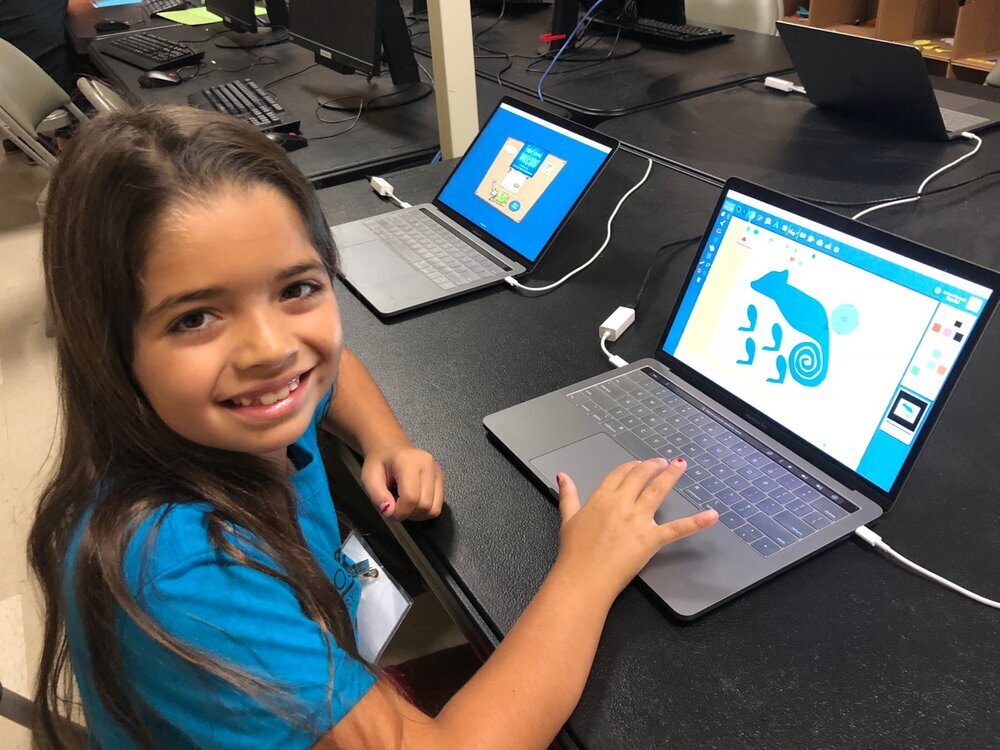
FabMaker Project: Our Table Challenge
The following blog post is by Peggy Healy Stearns, Lead Software Designer, FabMaker Studio.

Peter H. Reynolds’ new picture book for all ages, Our Table, tells the story of a young girl named Violet who notices that, as her dad, mom and brother spend more and more time on their devices, their once lively dining table is shrinking! Violet longs to bring her family back together and dreams up a project on which they can all collaborate –- designing and building a new table!
This timely story provides an opportunity for children to consider the importance of gathering with family and friends – and to engage in a meaningful engineering design process.
To get ready and set context for the challenge, after reading Our Table, discuss students’ memories dining with family and friends. What made those times special? Where did they eat? Was there anything special about their table?

Peter’s Creative Challenge!
Peter loves using his imagination to design and make things - drawings, paintings, sculptures, and paper mache animals! And so, Peter is excited to present a special maker challenge to your students: “Using FabMaker Studio, imagine, design and fabricate your own table and/or chairs to send to me!” Peter will select some finished projects to feature on the FableVision Learning websites and social media.
So, let’s get started! Have students work collaboratively to Ask, Imagine, Plan, Create, Test and Improve a paper or cardstock prototype.

Ask: What kind of table would you like? How big should it be? What shape? Does it matter how it looks? Use questions like these to define the criteria. Students may want to research images of tables and interview family members. Then outline constraints – e.g., the final prototype must be designed with FabMaker Studio and constructed with paper or cardstock.
Now it’s time to Imagine. Have students brainstorm and sketch different designs and consider each option based on the criteria they set earlier. A single design may not meet all the criteria. Which criteria are most important? Once students choose a favorite design, they’re ready for the next step.
Tell students to use a ruler to draw a Plan for their table and label dimensions.
Then have them use FabMaker Studio to Create their prototype. They can use the Chair design found in the FabMaker Ready-Made 3D projects. This starter project shows how Shapes can be combined to create a flat pattern that folds into a 3-dimensional object. Their tables might be constructed of a single flat net like the chair or made of multiple elements folded and constructed individually and then combined.
Encourage students to be inspired by Peter’s creativity. Suggest they use FabMaker’s color and texture tool -- or use plain white cardstock and color by hand.
If there’s time, ask students to consider how they would Test their prototype? Tell them to refer back to the criteria they set at the start. If their table’s not quite right, ask them how they would Improve their design.
You can adapt this activity to different grade levels by challenging students to use FabMaker Studio to design other 2D and 3D objects from the book. Younger students can weld shapes to create fruits and vegetables. More experienced makers may want to design bowls or glasses or even the vegetable cart.
Need more tips and tricks on how to use FabMaker Studio? Check out the Tutorials page.
Send your students’ designs to info@fablevisionlearning.com or use the #FabMakerChair in your social posts . We’ll feature the best designs on the FableVision Learning Spotlight Blog!

5 Ways To Celebrate International Dot Day

International Dot Day is a celebration of creativity, courage, and collaboration. It was celebrated for the first time in a single classroom in 2009 and has grown into a global event. Today, people from across the world participate in a dot-filled day of making your mark!
1. REGISTER
The first step to celebrating International Dot Day is to register for the celebration! In 2020 over 19 million people from 194 different countries participated. Click here to register for 2021!
2. READ THE DOT
A good way to start your celebration is to pick up a copy of The Dot by Peter H. Reynolds. This book was the catalyst for International Dot Day! You can get the book here.
3. GET INSPIRED
Here are some amazing projects from the past few years:

Dots Take Flight: This perfectly instagram-able display demonstrates the power of many dots together! First, decide on your display shape, keeping in mind the number of dots necessary for the display. Next, allow your students to create their dots. Finally, put the dots together and enjoy by taking a ton of photos! Find more about this particular display from @believeinstevens or using this link.
Dots Gone Bananas: This Dot Day activity harnesses the dots we see in nature! Give your students the opportunity to brainstorm and think of natural occurrences of dots! After, have them incorporate their found-in-nature dots into their dot day drawing! Find more about this particular display from @Juan Huerta or using this link.

Dot-Dot-Dot (Or To Be Continued): Challenge yourself to create a dot-inspired optical illusion! Our friends at the Moco Museum created this awesome endless dot dot display! While there is a limited amount of dot lanterns in the room, no one would ever know! Think about how you could create a dot display where there is more than what meets the eye! Find more about this particular display from @Moco Museum or using this link.

WWW-Dot-Sphere: This display transcends the 2D world and breaks into the 3D world. @stem4kids utilized the app QuiverVision, to turn their dots into a 3D sphere. This activity incorporates creativity and STEM into your dot day celebration! There are endless possibilities when you turn your dot into a sphere! Find more about this particular display from @stem4kids or using this link.
4. ANIMATE, FABRICATE AND SHARE THE STORY OF YOUR DOT!
FableVision Learning’s Animation-ish provides an opportunity to animate your dots! Activities on Animation-ish combine technology, animation, design, and more for a creativity packed experience! Learn more about Animation-ish and see examples of past projects here!

FabMaker Studio is the perfect tool for cultivating your inventive spirit! With this paper prototyping and fabrication software, flex your design muscles and create 2D, Pop-up, and 3D paper models inspired by The Dot. It’s easy to get your design mind rolling when you start small - you can always try again and again! Try fabricating dots that fold, roll, spin, or transform!
5. SHARE YOUR MARK
Dot Day is September 15th! Be sure to share your mark with the world. International Dot Day is about creativity and inspiration so be Post on Instagram and Facebook using the hashtags #InternationalDotDay and #MakeYourMark.

Creative Ways to Celebrate Earth Day

A spinning globe, a 3D Turtle, and a story of your world - there are many ways you and your students can celebrate the 50th Anniversary of Earth Day with FableVision Learning’s Creativity Maker Suite of online tools.
When Earth Day was started on April 22, 1970, the impact of the movement saw 20 million participants. This day is important to help raise awareness to show how much of an impact we really do have on the environment by every little move we make.
This year, as many of us are marking the day from in our homes, we compiled a few activities to get your little ones thinking about the environment around them.
Animation-ish
Animation-ish, is an easy-to-use online animation tool - that helps students show what they know! Weave Animation-ish into your distance learning activities with a few ideas:
Animate Different Cycles:
Encourage your students to animate as a way to explore different cycles. Using the tracing feature, students can easily animate the slow transitions that lead into new phases in any of these cycles. Whether it’s showing night shift to day or animating the parts of the water cycle, check out these examples below
What are some other natural earth cycles that your class has studied? We want to hear from you about YOUR favorite Earth Day animations.
FabMaker Studio
FabMaker Studio, is our digital design and fabrication tool created to get students prototyping with paper. For more tips and tricks on how to use a printer and a pair of scissors, click here.
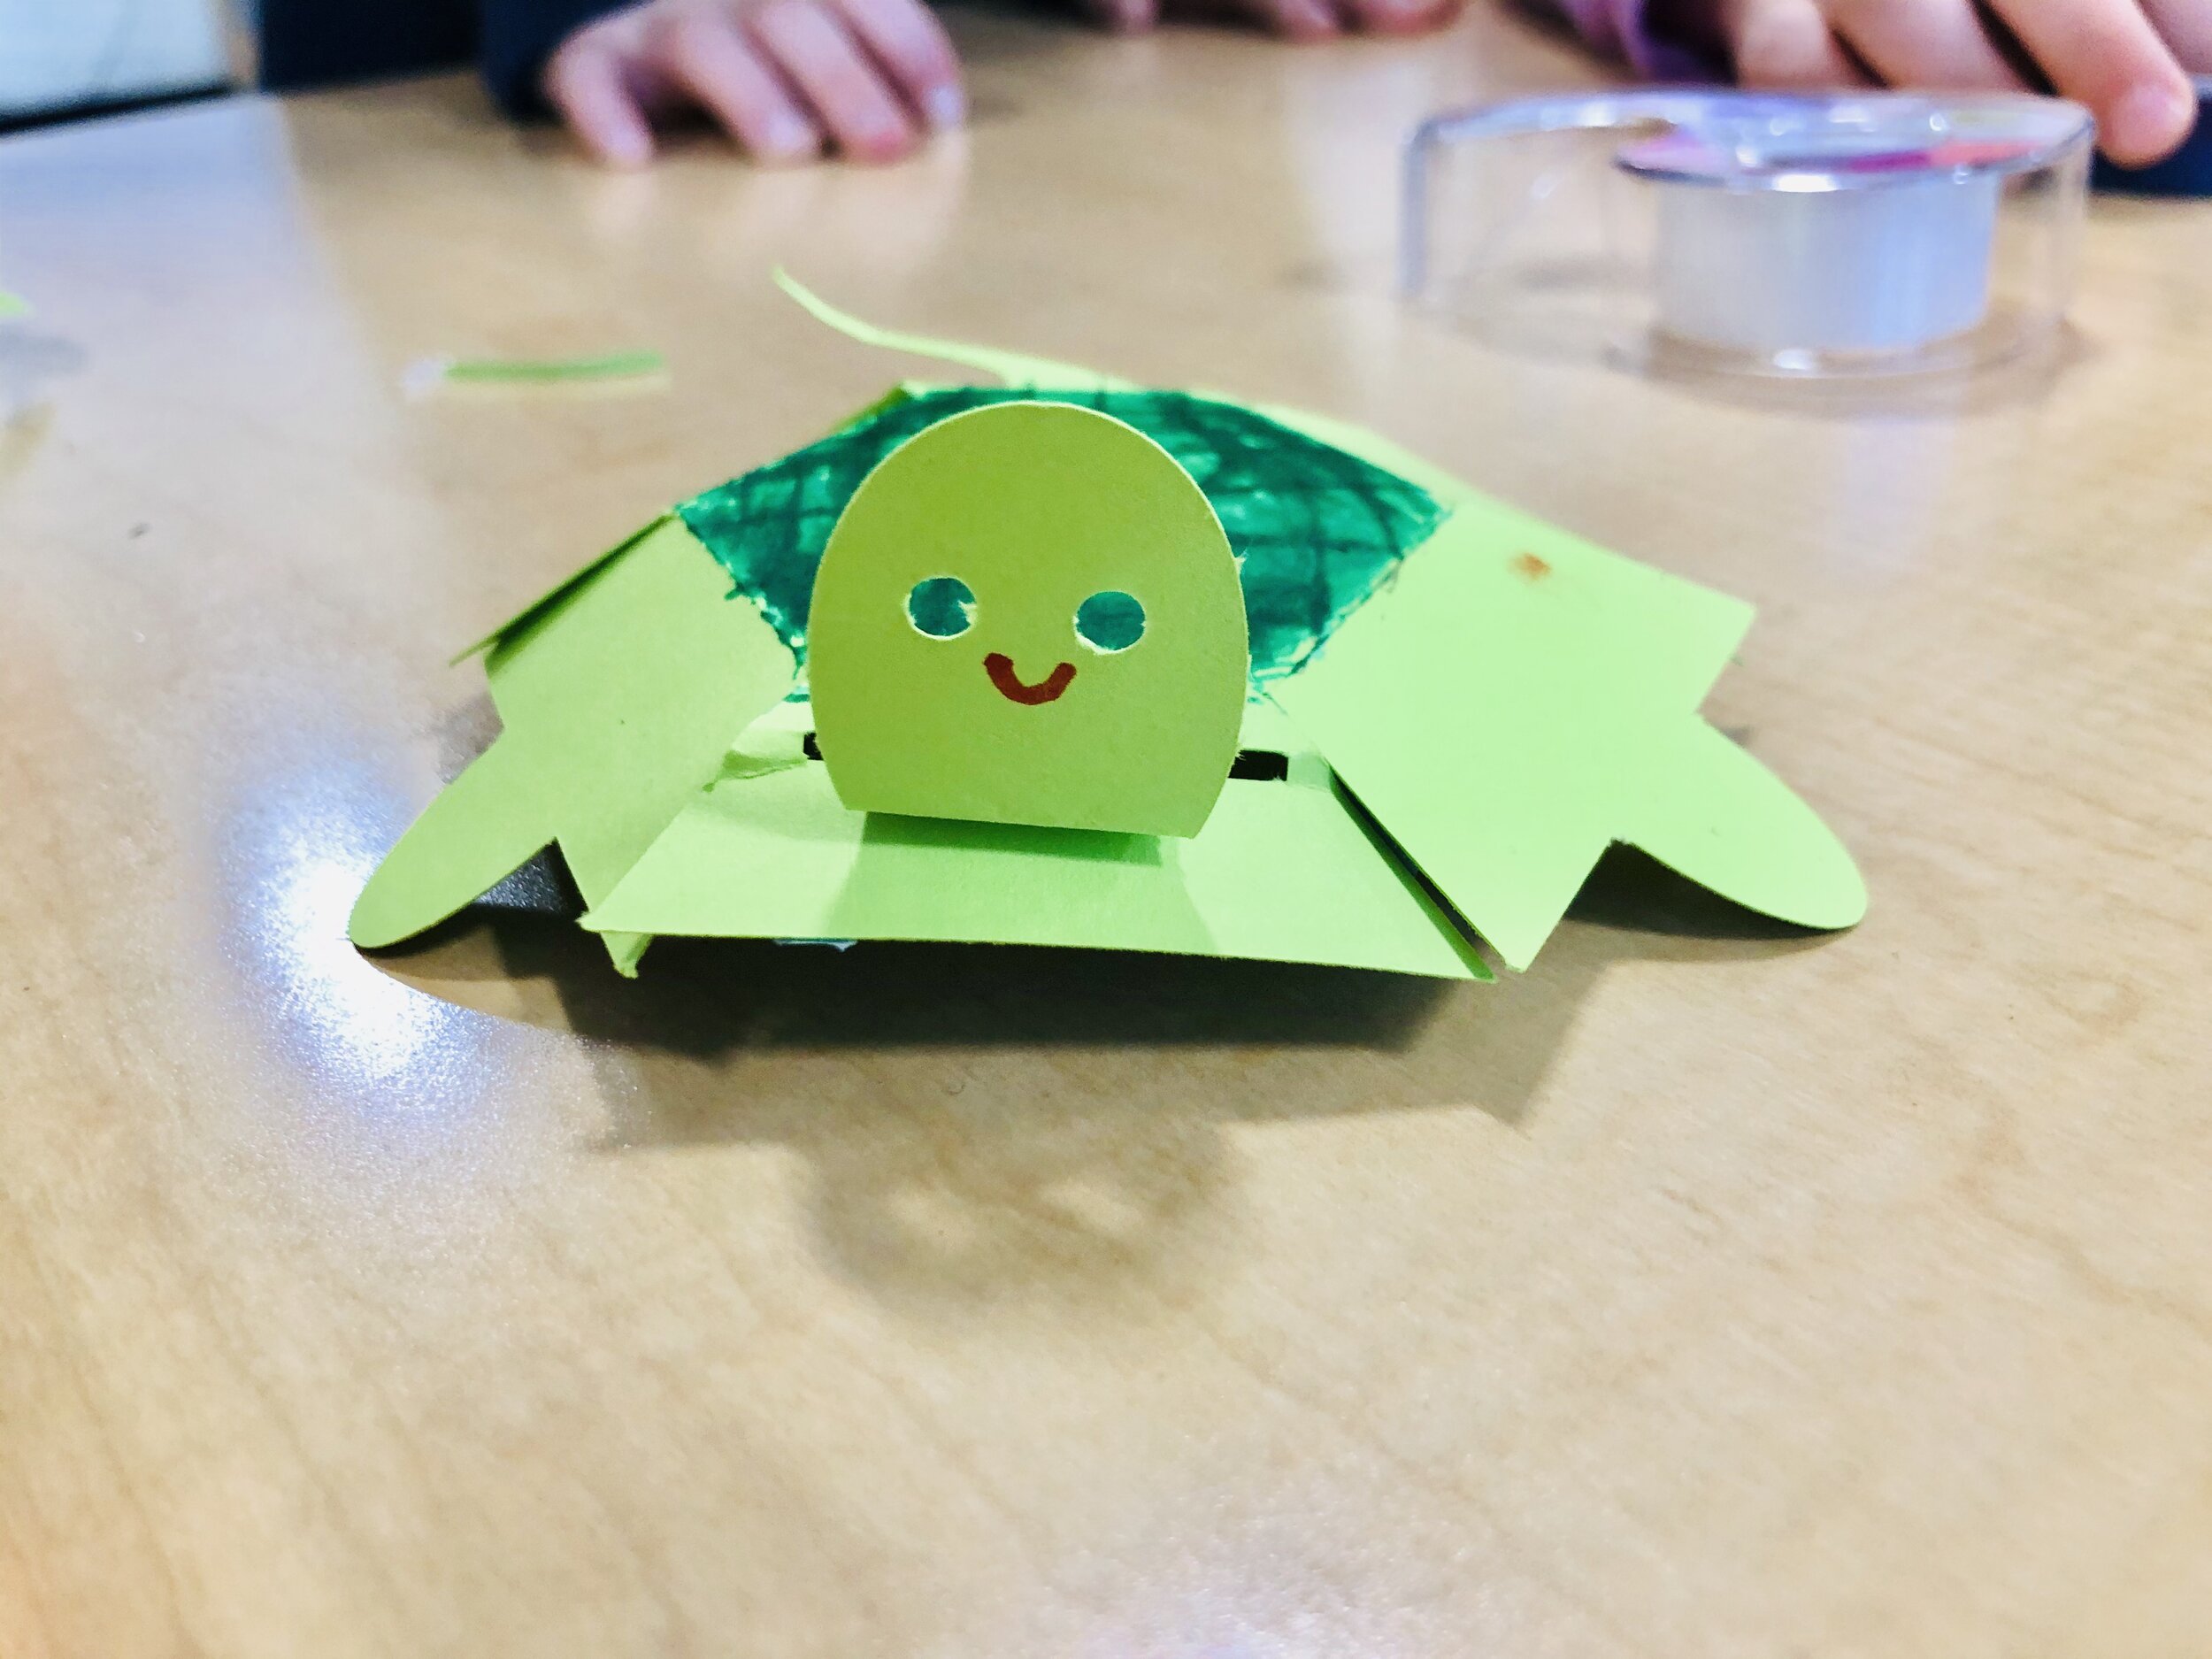
Go Green with Greenie the Turtle!
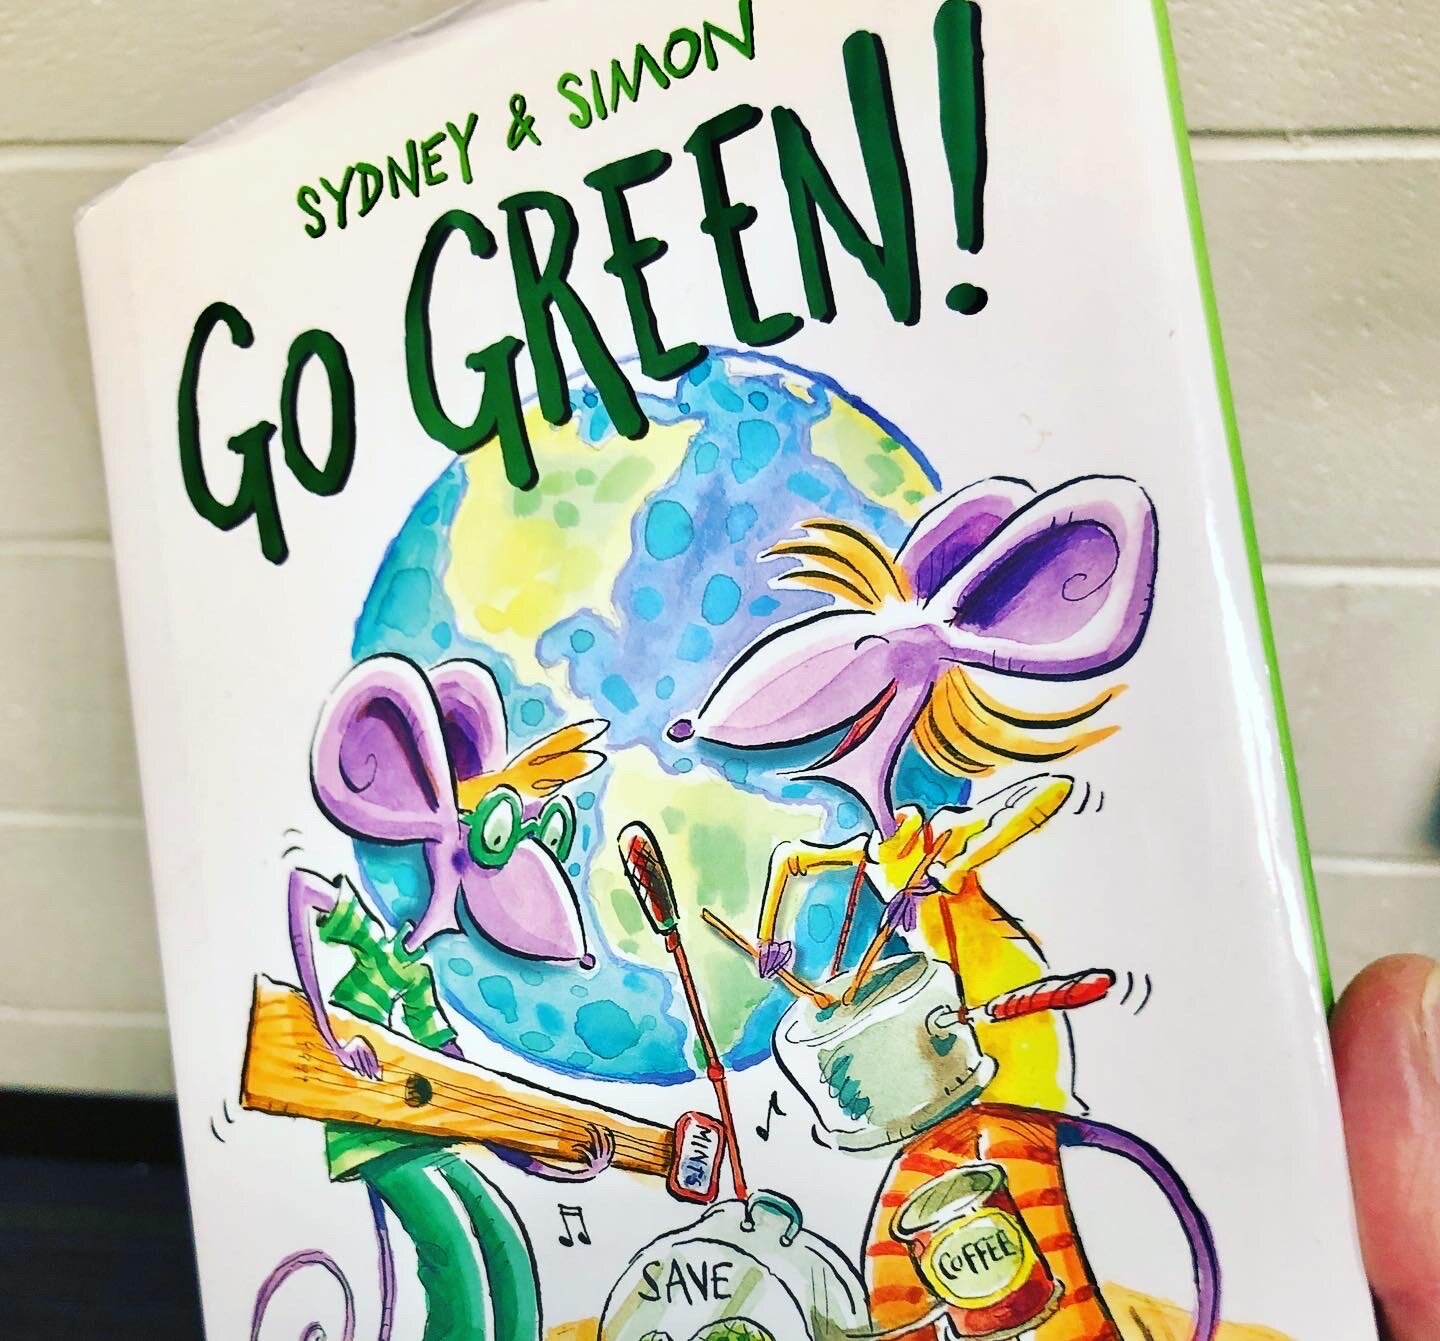
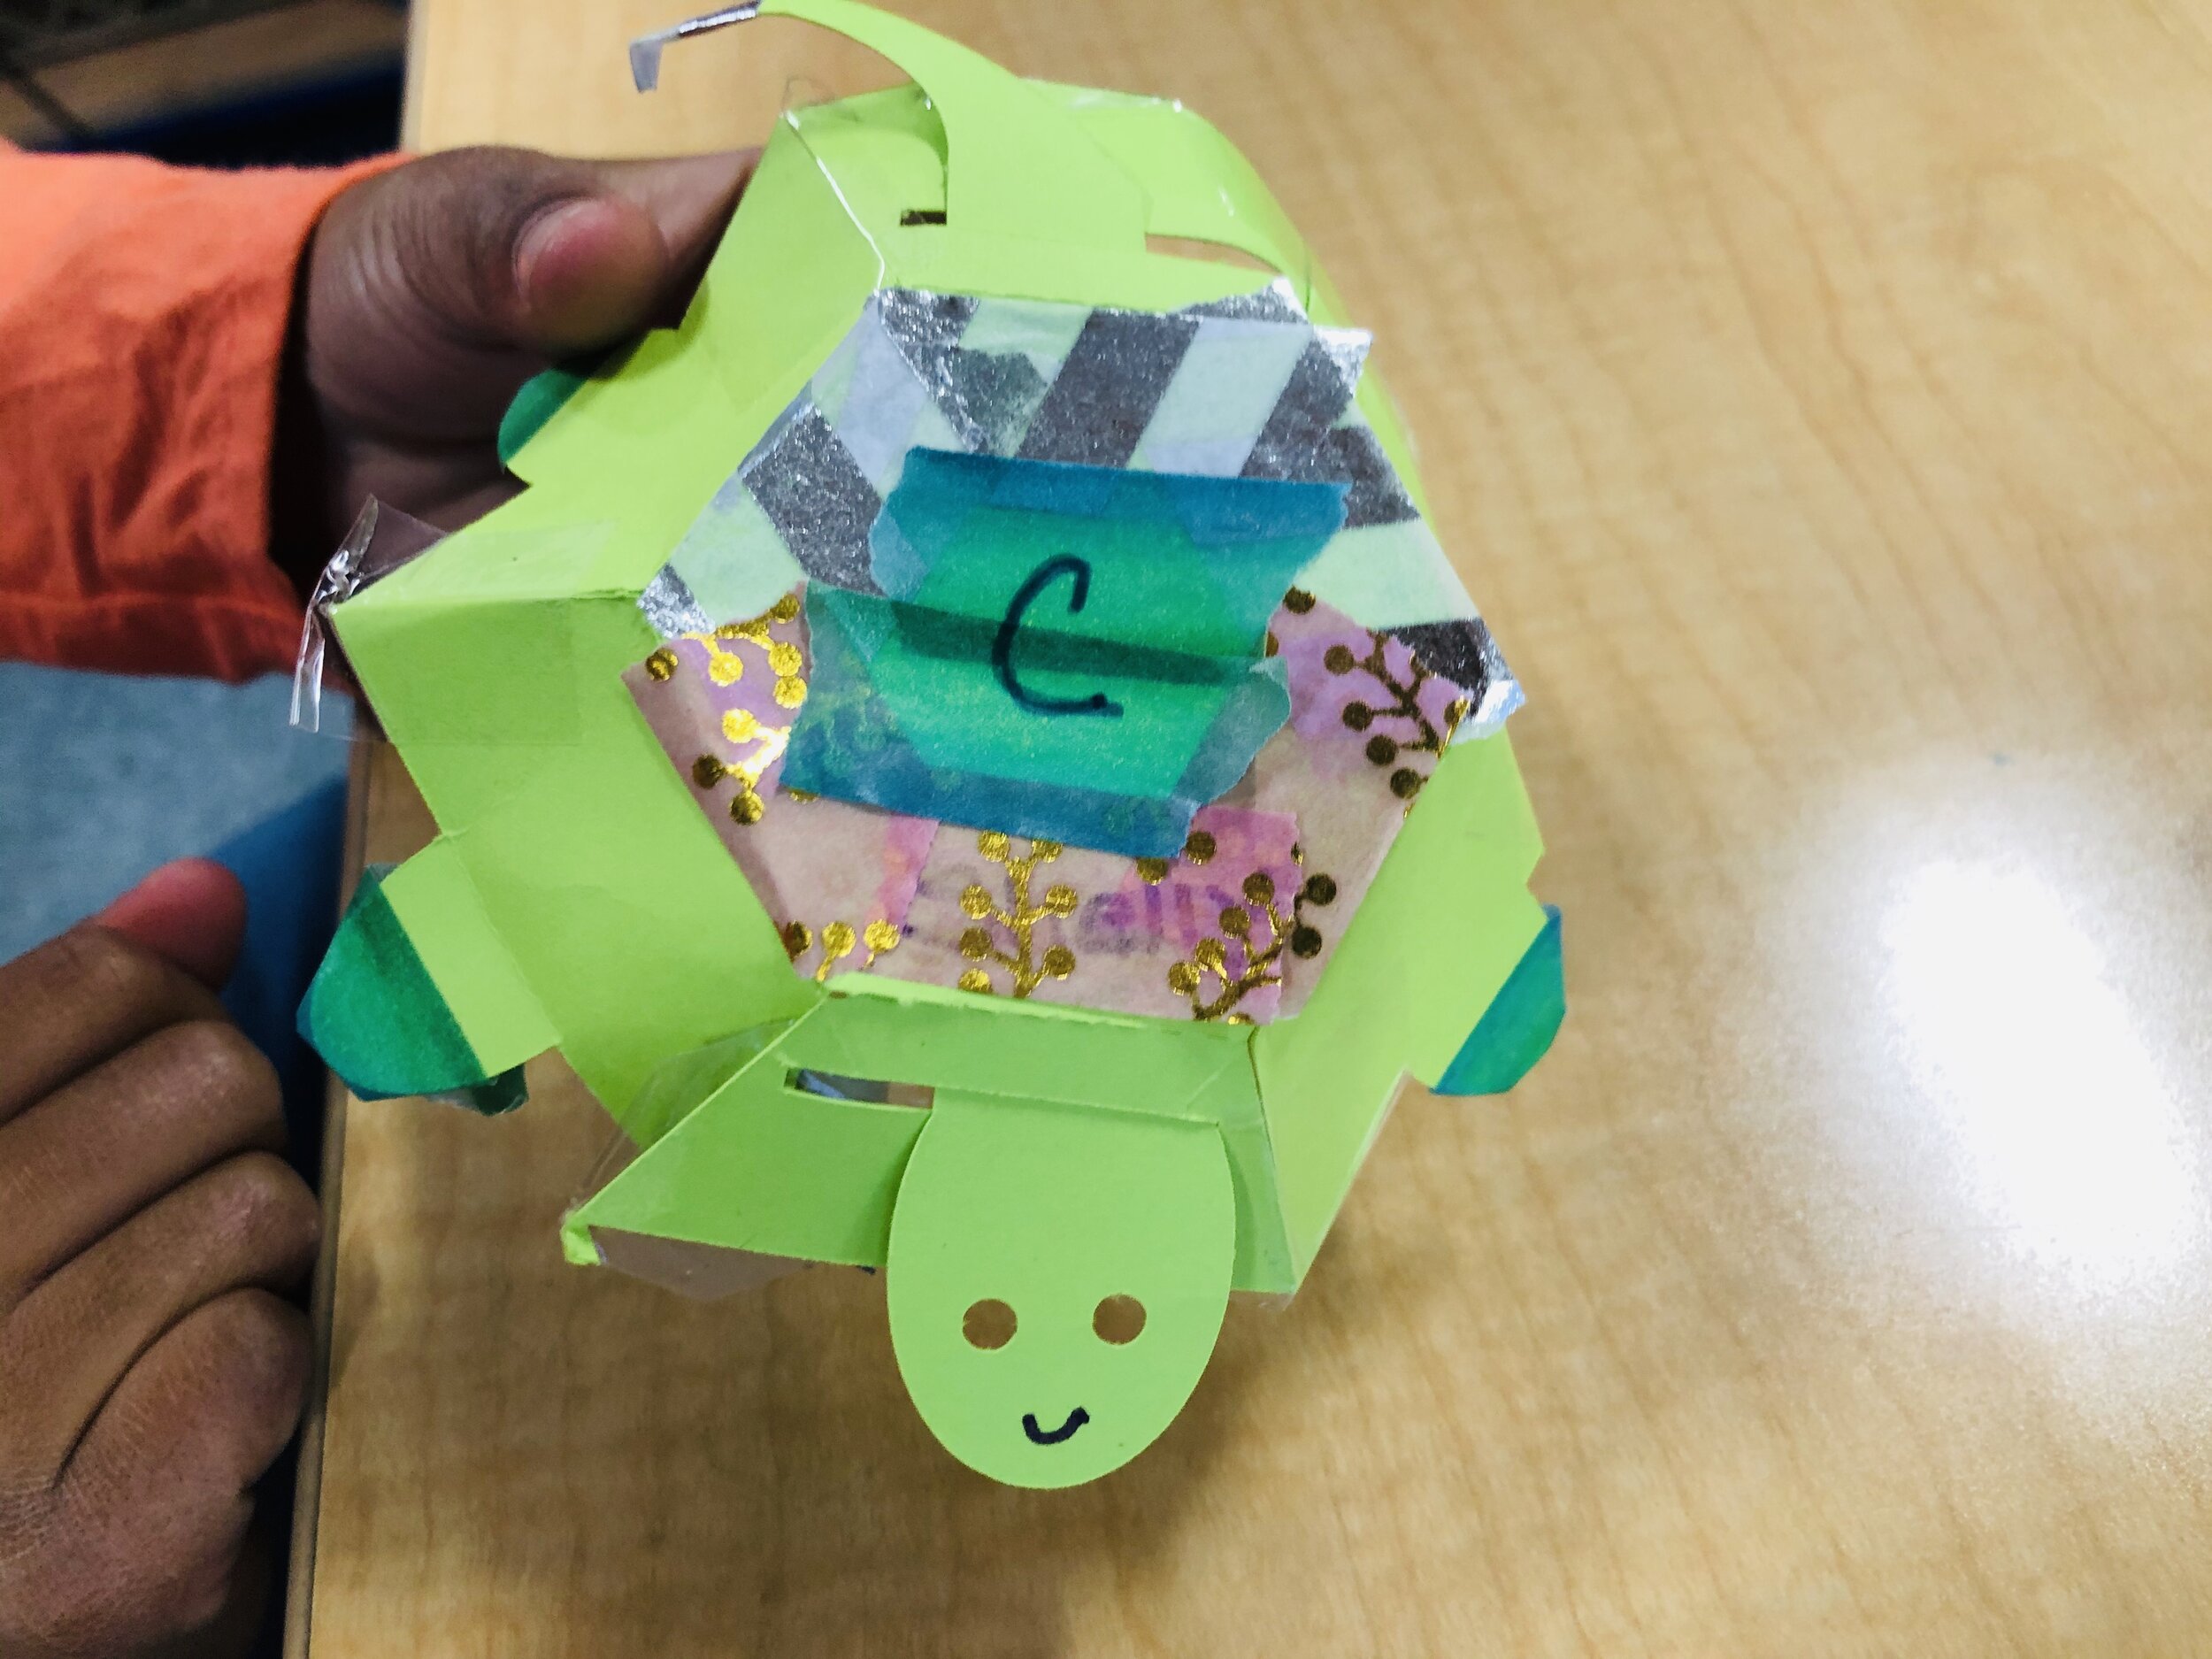
This FabMaker Studio activity is inspired by the book “Go Green!” from the Sydney & Simon series (Paul Reynolds and Peter H. Reynolds, Charlesbridge Publishing) and is a great way to explore ocean wildlife.
In the book, Sydney and Simon learn about a turtle named Greenie who got sick from too much plastic in the ocean. This discovery leads them to find ways to reduce their waste and be more eco-conscious.
In FabMaker Studio, encourage your students to weld together shapes to create a turtle. For an added challenge - limit the creation to two shapes. Want to do deeper? In the FabMaker Studio Ready-Made projects, students can print a 3D turtle project to design and modify. This project provides an opportunity for you to talk to your students about turtles and other wildlife while also exploring the STEM skills of fabrication.
BONUS IDEAS:
Using the scraps of paper leftover from the project, create lily pads, or leaves for your paper turtle.
Explore the shapes in FabMaker Studio to create fish friends for your turtles (or print them out using our 2D ready-mades)
Do your students learn about recycling? What other oceanic creatures has your class studied? Greenie would love to have more fabricated friends, let us know if your students create any other animals in FabMaker Studio, we’d love to check them out.
How will you be celebrating Earth Day? Share it with the FableVision Learning team via Twitter @FableLearn, or via email: info@fablevisionlearning.com

Celebrate International Day of Math with FableVision: Where Creativity Counts

You may not realize it, but you use math every single day! From cooking dinner to telling time, your brain is constantly busting equations. That’s why we are going to celebrate math this Pi Day, March 14.
Fast Fact: In 2019, United Nations Educational, Scientific and Cultural Organization (UNESCO), declared March 14 as the International Day of Mathematics. Since 3.14 is also the beginning of pi, it is double the celebration!
Check out some of the ways we are celebrating this year.
Explore Game-based Learning with Math
Studies have shown that game-based learning can improve skills in STEM, math, literacy and more. This is why we are so excited to share these two researched-based online games designed to give educators an unique opportunity to teach through gameplay. The two games we’ll be playing are Zoombinis and Cyberchase Fractions Quest!
Zoombinis
Students travel across the Zoombinis landscape ast they solve a series of 12 puzzles that encourage computational thinking (CT). Through pattern recognition, abstraction, problem decomposition and algebraic thinking, your learners will lay the foundation for CT while leading the little blue guys to safety.
Grade level: 3-8
Cyberchase Fractions Quest
Take your learners on an epic journey across the universe to save the Cybersquad by solving equations. Whether it’s dividing leaves into parachutes for chameleons or estimating fractions on the Estimatron-5000 number line, students practice their fractions in various contexts. After traveling planet to planet, your learners will be expert fraction busters!
Grade level: 3-5
FabMaker Studio
Math isn’t just solving equations, it’s also using your creativity! FabMaker Studio, our digital fabrication and design software allows your students to get creative while getting a hands on experience as being an engineer! Here are a few ideas to get you started:
Use shapes and lines to build 2D, 3D projects.
Create a pop-up card with a special shape to give to your friends.
Ready to Create: Download our FabMaker 3D pyramid design to get started.


Animation-ish
No matter what age your students are, Animation-ish is a great way to combine math and creativity. Educators can get in on the fun too by using their unique designs to teach new mathematical concepts and ideas.
In the second level of Animation-ish, students can create a flipbook filled with as many numbers of pi as they can remember, or practice their pythagorean theorem with an animation. Try making your own story with some fun shapes and numbers.
Enter the Poster Challenge
For 2021, International Day of Math has challenged classrooms to create a poster “that shows one way to make the world a little bit better using mathematics.” To learn more this challenge and how to register your classroom click here.
Click on the image below to download our design.

Bonus Project
We love to catch facts. Click on the image below to download and create a Math Catcher filled with fun math facts!
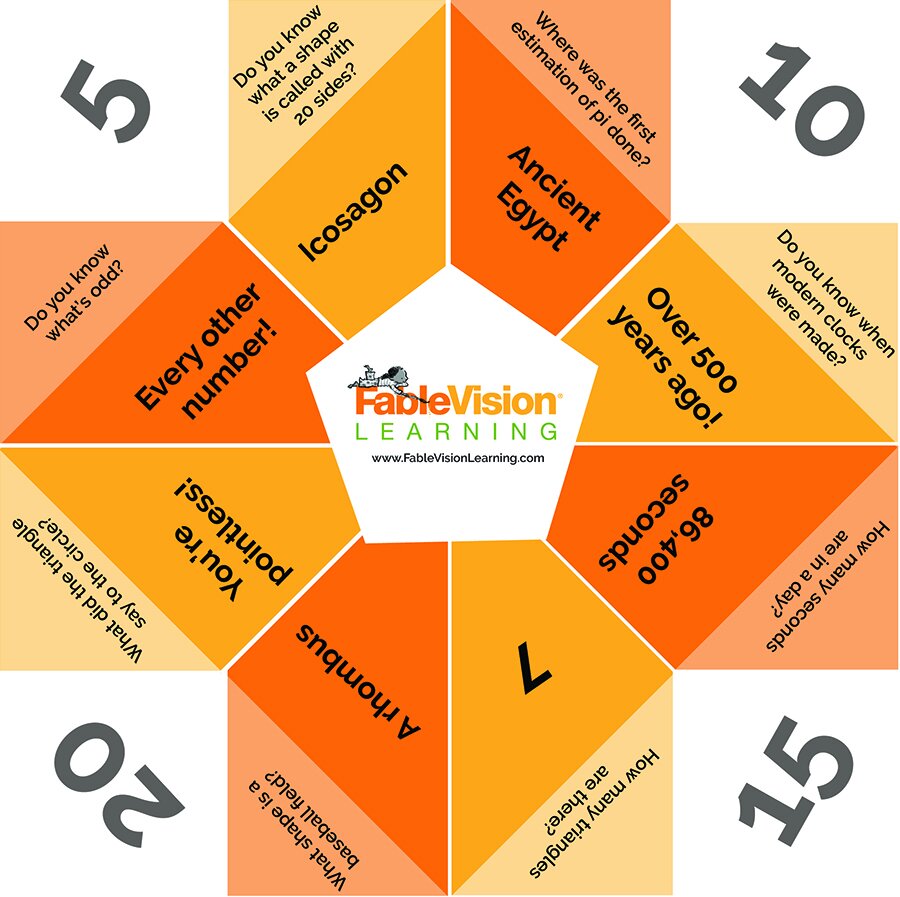
Share your International Day of Math creations with the FableVision Learning team via Twitter or Instagram @FableLearn, or via email: info@fablevisionlearning.com.

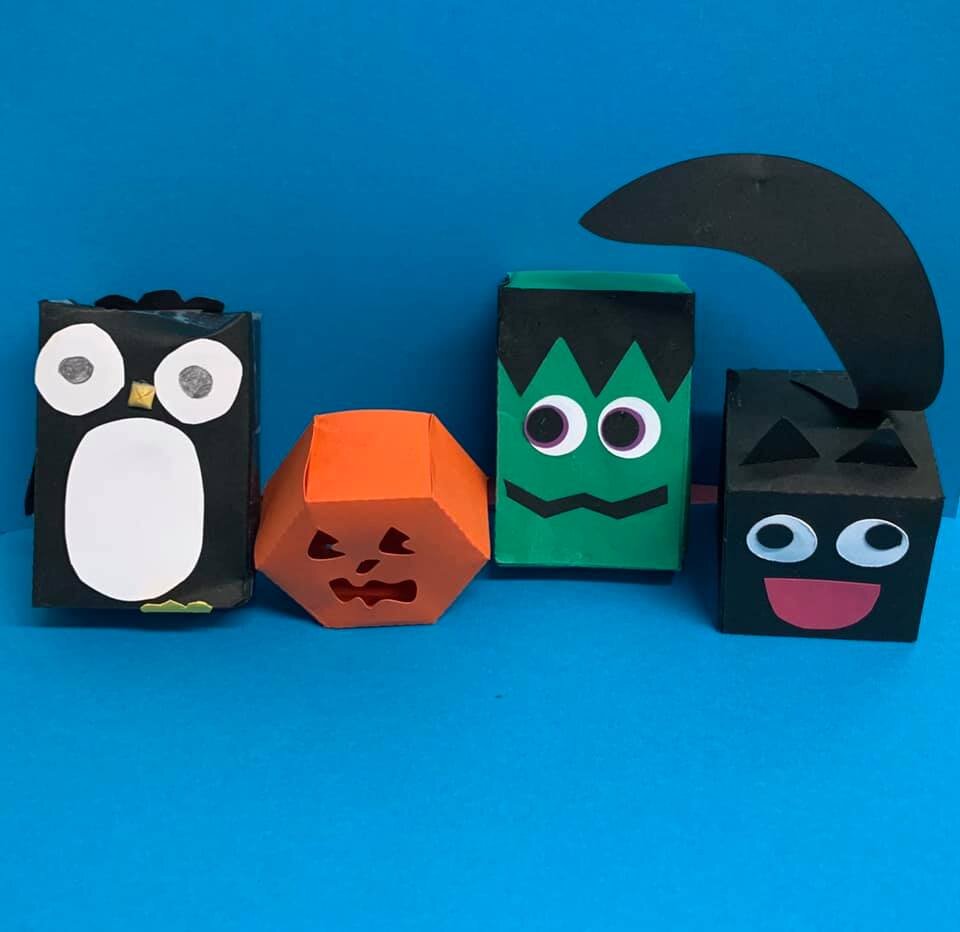
Creative Activities for Halloween
It is fall in New England. The leaves are turning shades of orange, yellow, and red and Jack-O’-Lanterns are popping up on doorsteps. This means Halloween is around the corner and at FableVision Learning we are getting creative with project ideas in made with our creativity tools. Here’s a few to get started.
Boo! Animated Pumpkins and Ghosts
Encourage your students to use Animation-ish to explore motion and story by creating a dancing ghost, or have your students animate their dream costume, or tell a joke on a pumpkin. What’s new: Animation-ish creations made in Flipbook-ish can be exported as a GIF.
About Animation-ish: Animation-ish is an easy-to-use online animation tool that helps students show what they know! Whether you are doing distance learning, hybrid teaching or on site classes, you can weave Animation-ish activities into your lessons.
Mystery Monsters Made With FabMaker Studio
If your students can imagine it, they can create with with FabMaker Studio. In the Mystery Monster Blog Post, Dr. Peggy Healy Stearns, Lead Designer for FabMaker Studio, shares her tricks and tips for using the web-based design and fabrication program to combine, weld and morph shapes into exciting creatures. What will your students create?
Create a 3D “Mystery Monster”
But Wait. there’s more!
Jack-O-Lantern
The 5th graders in Palm Beach County, FL combined their FabMaker paper prototyping with circuitry to light up their paper Jack-O-Lanterns. Want a quicker fix? If needed, Peggy recommends substituting circuitry with LED votives.
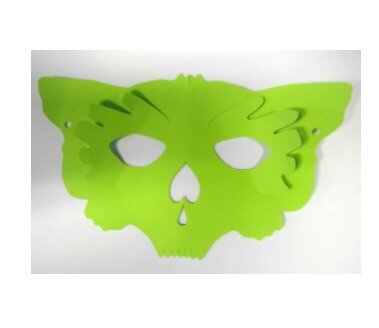
Masks
Halloween is a great time to explore some FabMaker Studio Ready-Mades. There is a library of masks available to choose from.
Or you and your students can create your very own from scratch.
BONUS: for a more advanced mask, add 3D elements.

Looking to make a socially distanced Halloween a little more fun? Use FabMaker to create candygrams to give to friends- or even a candy corn garland!
About FabMaker Studio: FabMaker Studio is our digital design and fabrication tool created to get students prototyping with paper. For more tips and tricks on how to use a printer and a pair of scissors, click here.
How will you be celebrating Halloween? Share it with the FableVision Learning team via Twitter or Instagram @FableLearn, or via email: info@fablevisionlearning.com

Engineer, Invent & Make: Getting Started with FabMaker Studio (VIDEO)
From solar-powered homes to magnetic turtles and pop-up book reports, schools/programs across the country are using FabMaker Studio to encourage invention, creation, and engineering - all with paper.
Not sure how to get started? No worries we’ve got you covered in 4 easy steps!
Step 1: Watch Andrea Calvin as She Shares Her Tips & Tricks

Step 2: Tune into the Tutorials & Blogs
From how to use shapes to exploring the reflection tool, Peggy Healy Stearns, lead designer for FabMaker Studio, guides you through the the ins and outs of the program through these Quick Tips tutorial videos. Another awesome resource can be found on our Spotlight Blog. There your will find step-by-step guides from Peggy Healy Stearns and ideas pulled from the classroom.
Step 3: Give it a Go
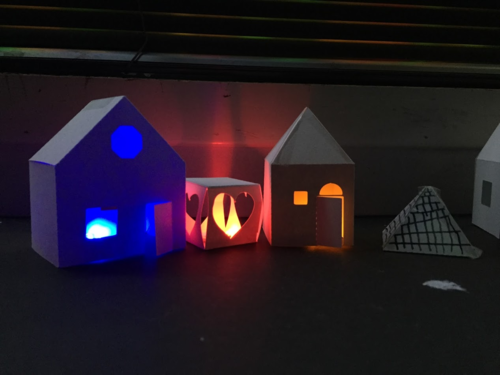
If you have an account, hop into FabMaker Studio and take it for a test drive. Open a Ready-Made Project and send it to to your printer (our favorite one to start with is the house). Once you built the starter project, take it apart and build from scratch. How will you modify your design?


Step 4: Join the Conversation
Have a question or a a FABawesome idea to share? Join the FabMaker Studio Facebook Group. We are all in this together.
Want to Learn More? Send us an email at info@fablevisionlearning.com

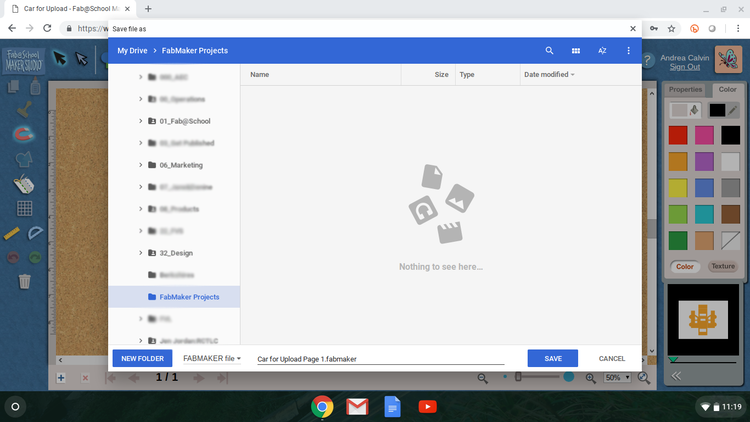
FabMaker Studio Tips: Saving Final Projects to Google Drive from a Chromebook
The FabMaker team is asked a lot: If I am using a Chromebook, how can I save a completed FabMaker project to fabricate later from a PC or MAC?
The answer has a few simple steps: You need to install drivers to send the final FabMaker project to the Silhouette Fabricator, you must use a PC or a MAC - but you can design FabMaker Studio projects on any device with an Internet connection - this includes Chromebooks. Most schools and maker spaces that use Chromebooks designate one PC or MAC as the fabrication center.
Users just need to save their files when designing on Chromebooks and then open them at the fabrication station.
Here are the simple steps to follow to save the final FabMaker projects to a shared Google folder on a Chromebook.
Create the Google Folder and share with your class.
Once the FabMaker Studio project is done and ready to send to a printer you will need to do two things:
Click the Folder Icon to save the working file (.xml). These files can be saved to a student’s Google Drive, online FabMaker files, or desktop. Saving this file means your student can go back and make changes.
Click the Fabrication icon to save the final FabMaker file (.fabmaker). This is the final file that will be sent to the fabricator.
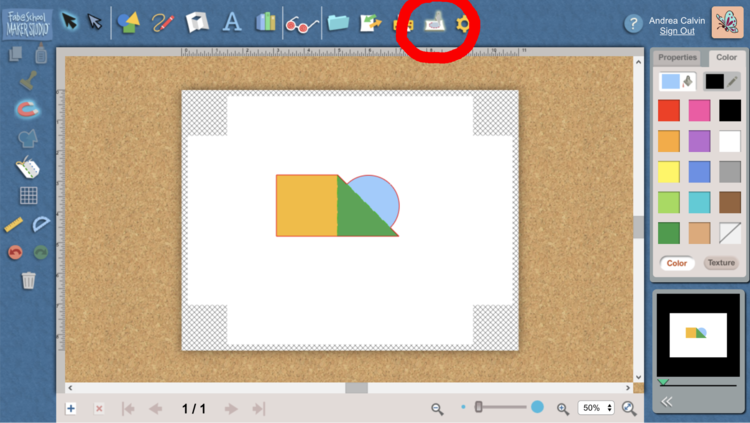
If working with a multi-page document, select the page to fabricate and click “Send to FabMaker App” to start download.
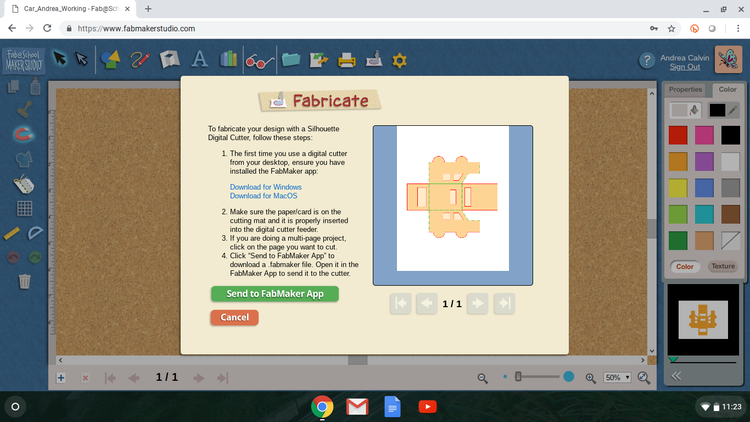
Download the .fabmaker file and save to the shared Google Folder.
On the PC or MAC, locate the shared Google Folder and download the files you would like to fabricate. Once downloaded, follow the Fabrication instructions to complete your project.

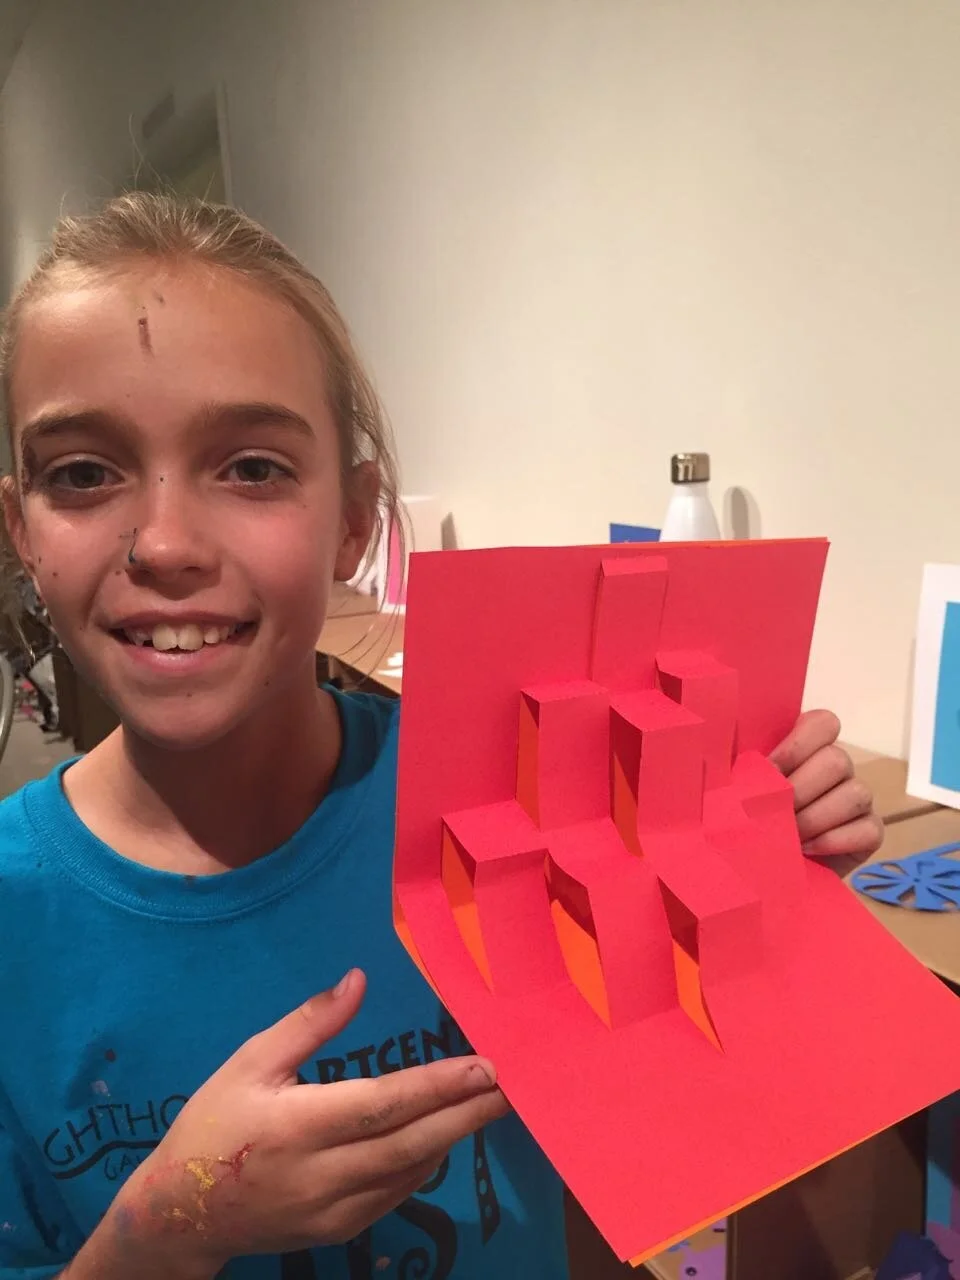
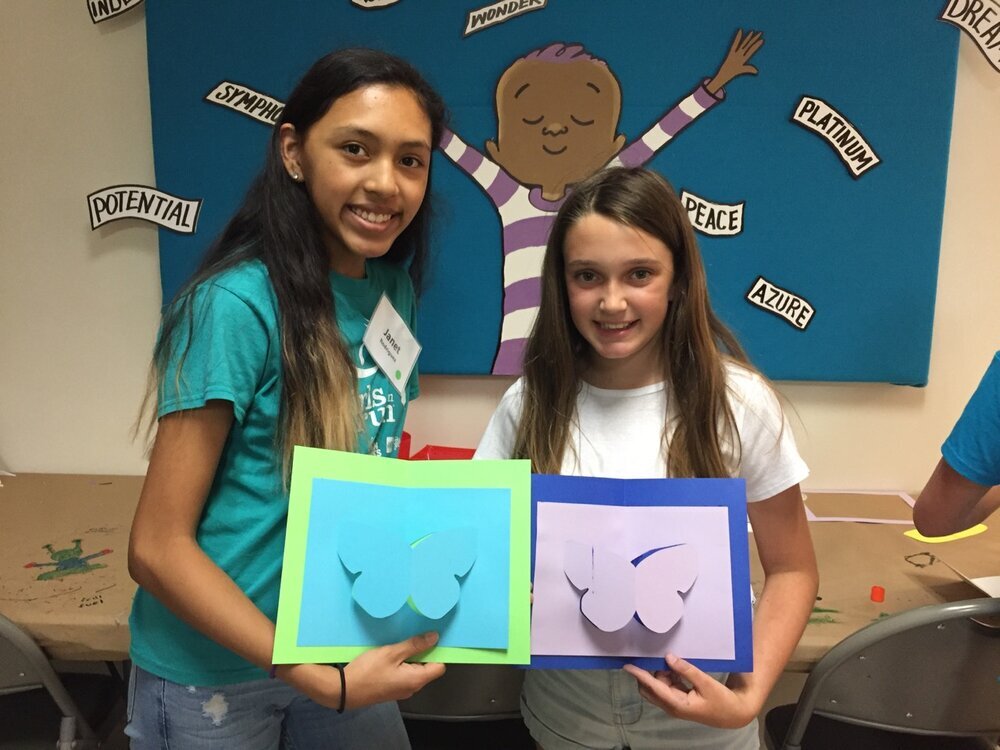
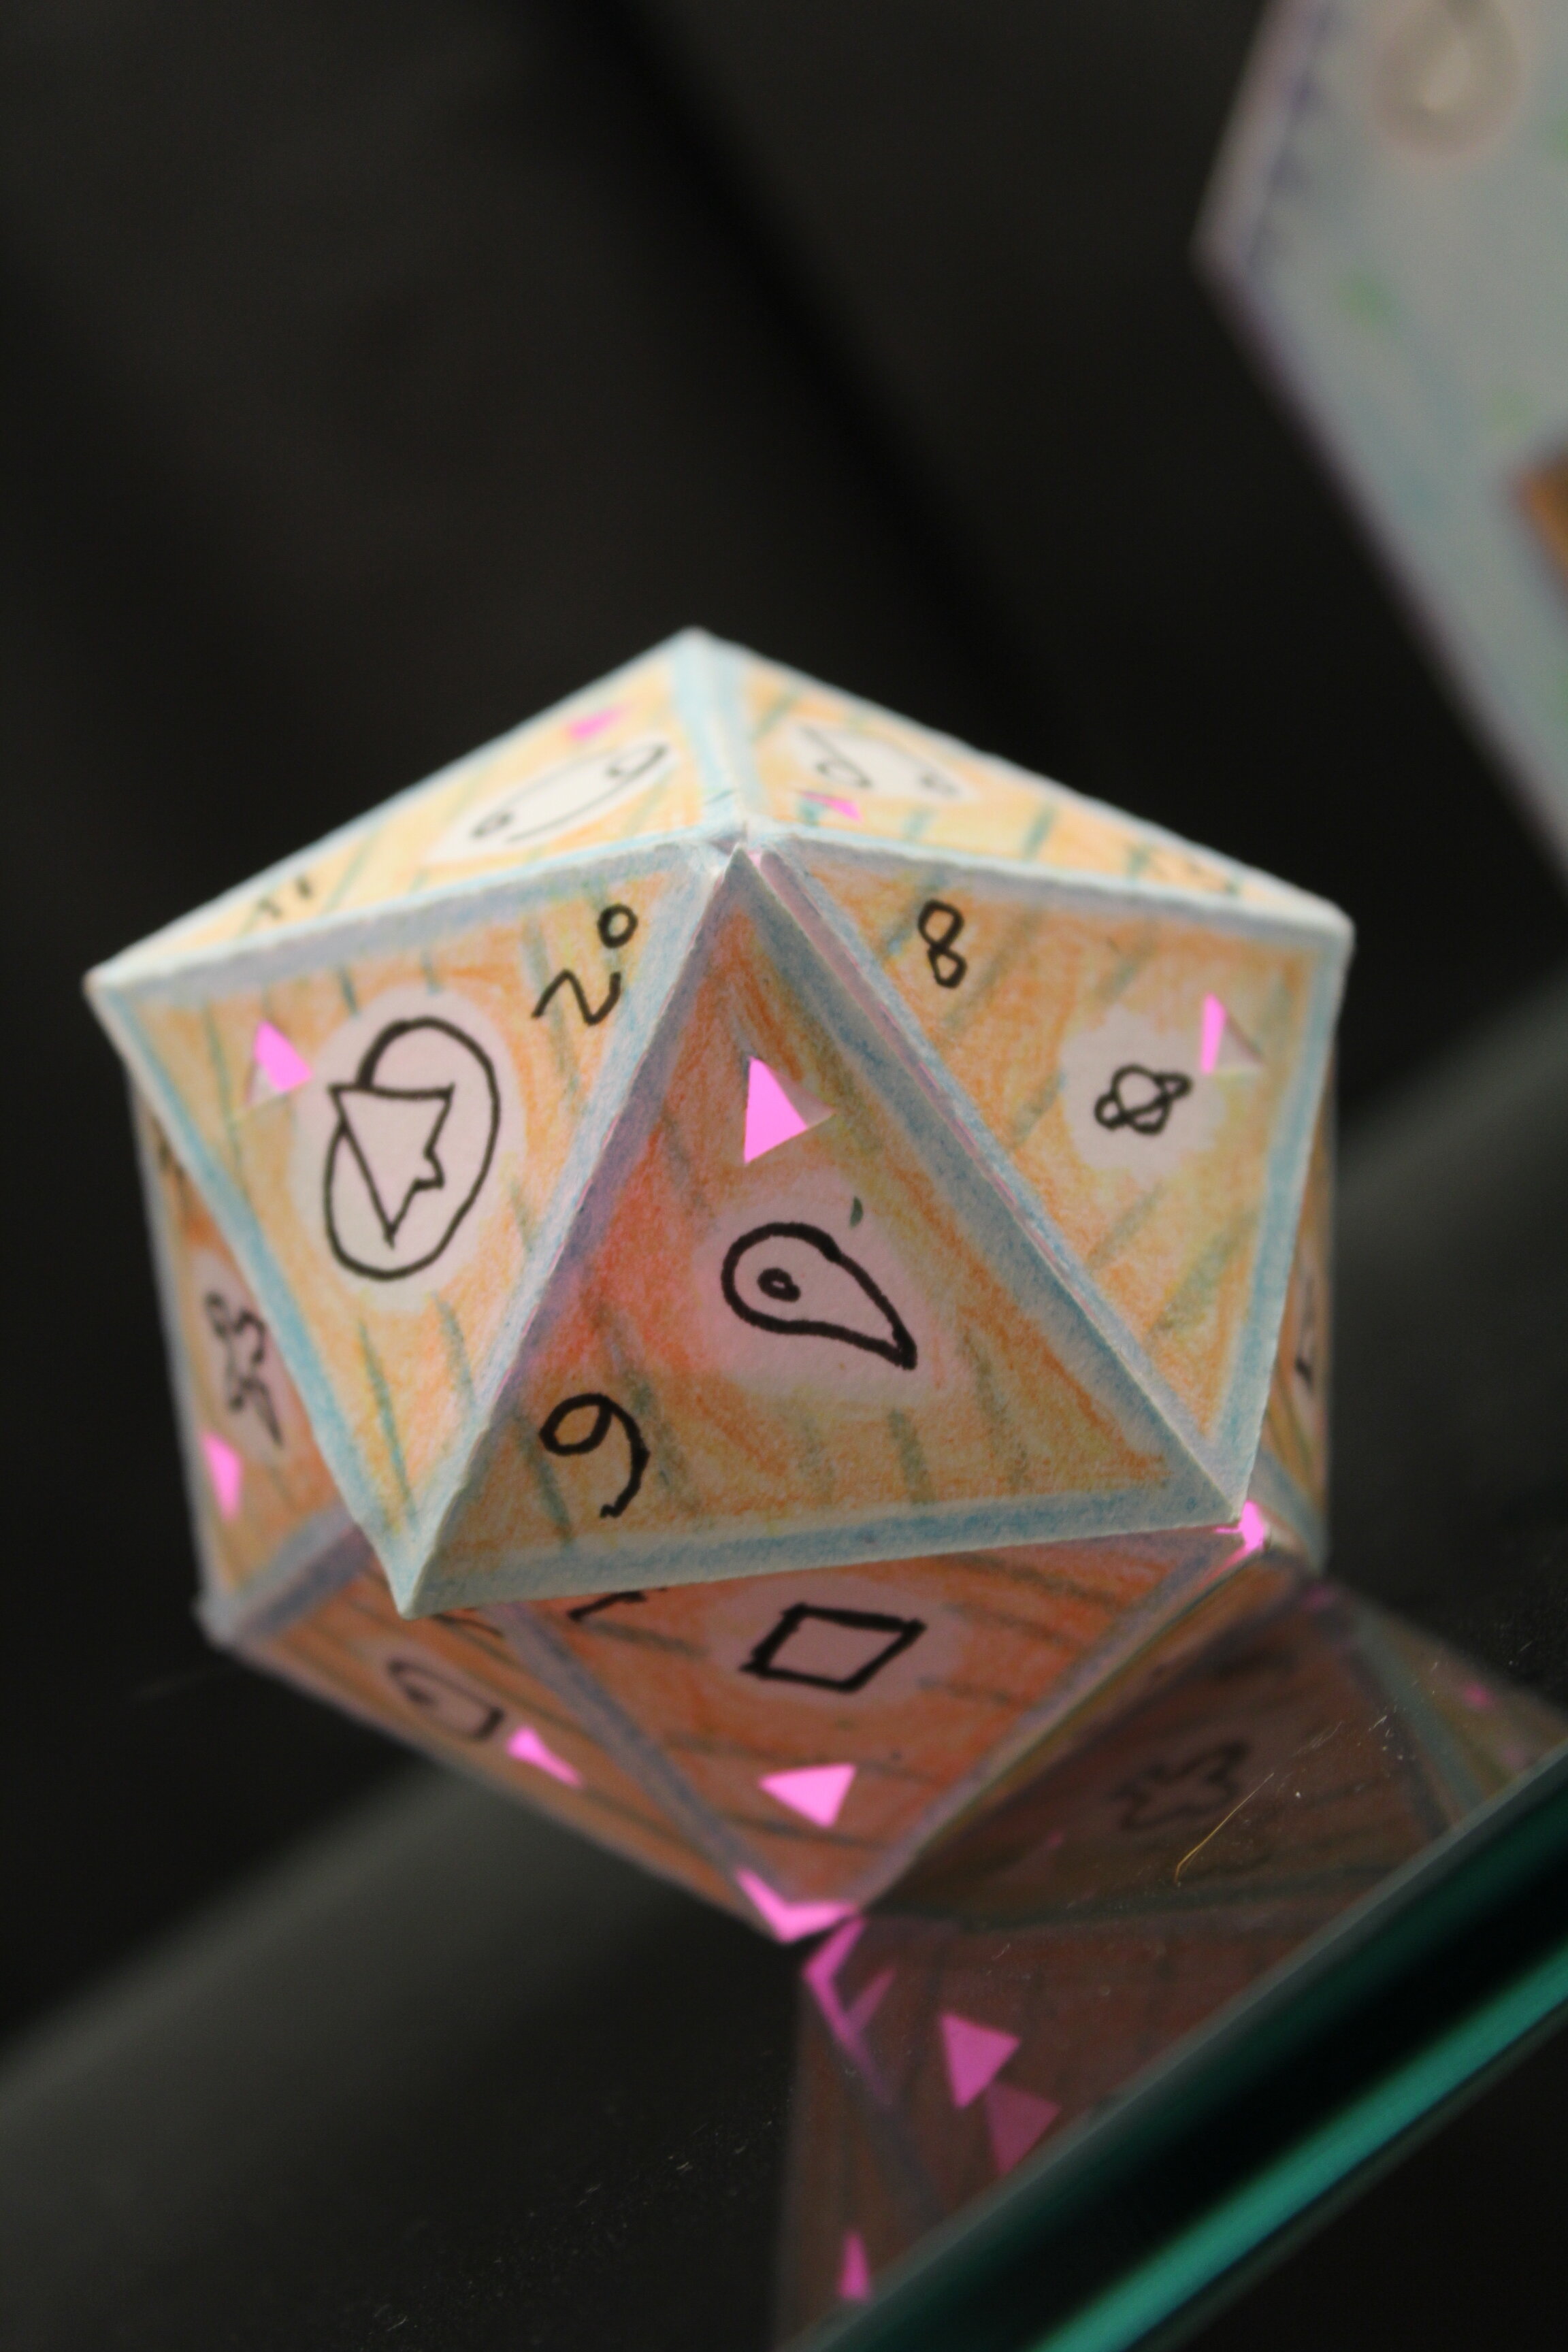
FabMaker Pop-ups: Math in the Palm of Your Hand!
The following blog post is by Peggy Healy Stearns, Lead Software Designer, FabMaker Studio.
Pop-ups are surprising and fun – and a great way to explore shapes, angles, triangles, parallel lines, symmetry and other math concepts. They also provide great opportunities for story telling and descriptive or other expository writing.
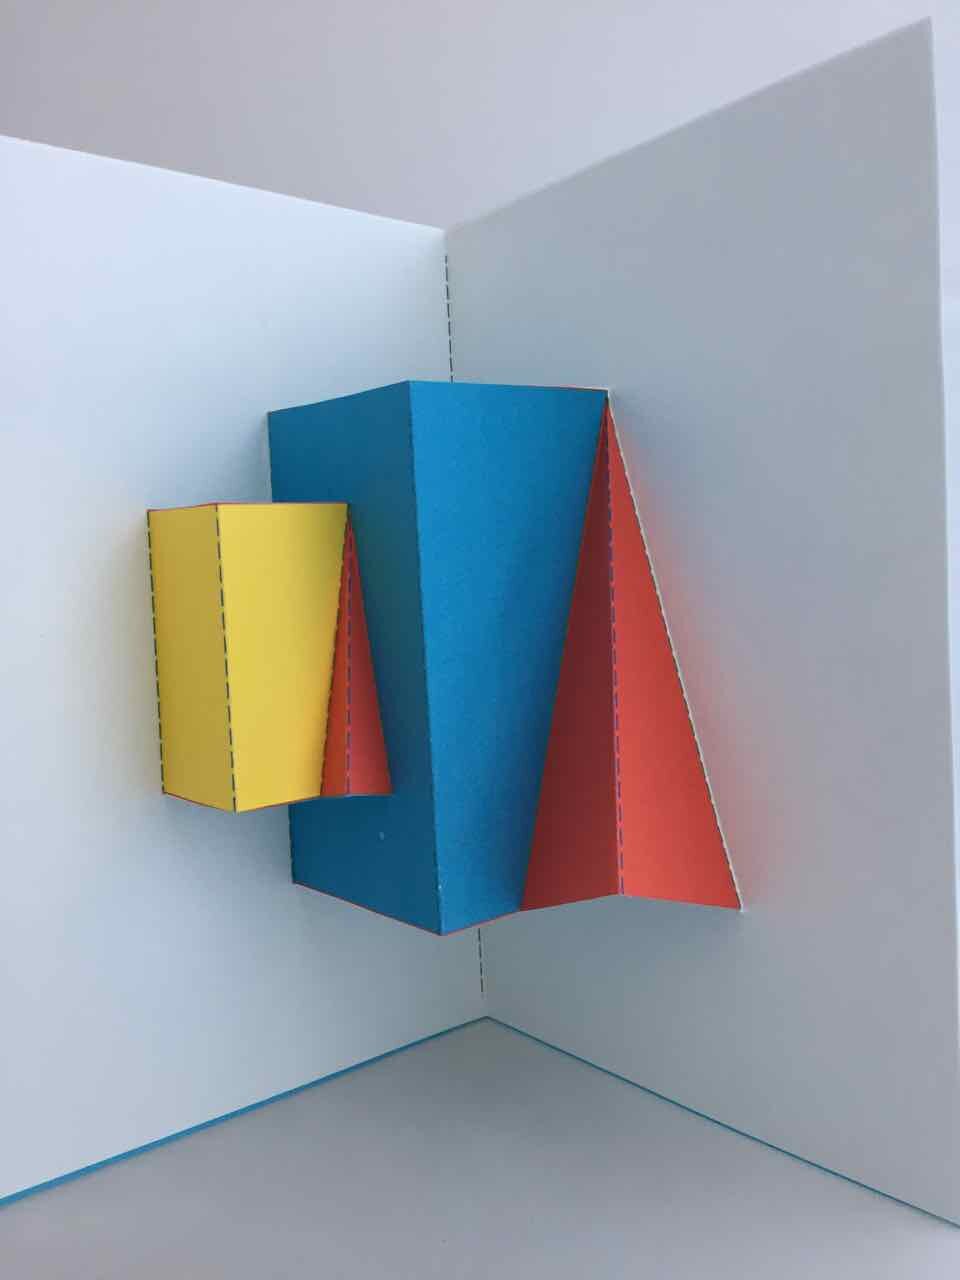


With FabMaker Studio, you can play with these cool constructions onscreen in both 2D and 3D view and then fabricate and explore them in the palm of your hands.
Watch this short video then follow the steps below.
Step 1: Open a Ready-Made Click here to go to FabMaker Studio. Sign in and go to Ready-Made Projects. Choose the tab for Pop-Ups. Wait for the projects to load and scroll down to select and open the Tree Pop Up.

Step 2: Explore When your file opens in the Edit screen, note the different shape pop-ups and the red cut and green fold lines. Go to 3D View in the lower right and click the Larger button (double arrow) to expand the 3D view. Drag the green slider to see the box open and close. Place your cursor in the black area and drag to change the view angle.

Step 3: Print Click the Print button at the top. On the Print Preview page, select Print Cut & Fold Lines. If you colored your pop-up, you may want to select Remove Color Fill. Then select Save to PDF and print your pop-up on standard printer paper or cardstock.
For more details on how to to use scissors to finish your project click here.

Step 4: Construct Fold your printed pop-up along the center fold with the print side out. Cut along the three red cut lines. Then fold the three pop-up elements to the side along the green lines. Open your page and pop out the elements. If you want, color your pop-up and mount it on another piece of paper or card stock.
Watch the following video with quick tips for customizing a pop-up, then move on to Step 5.
Step 5: Customize. Go back to FabMaker Studio and modify the Tree Pop-up or another readymade pop-up to design your own original creation.
Add color
Move elements
Resize elements
Add new elements
If you want to save your customized pop-up, select the File button at the top and choose Save. In the dialog, choose a location to save to, give your file a name, and select Save.
Step 6: Design. Ready to design your own pop-up from scratch? Here’s one more video to set you on your way!
Play around, have fun, and discover how learning and play come together with FabMaker Studio! FabMaker Studio is the first digital fabrication software tool developed specifically for use in the classroom. It is an easy-to-use, web-based program that invites students to experience STEM and STEAM learning in an engaging, personally meaningful way.
For more information, contact us at info@fablevisionlearning.com. We invite you to join the conversation on Facebook the FabMaker Teacher Group.

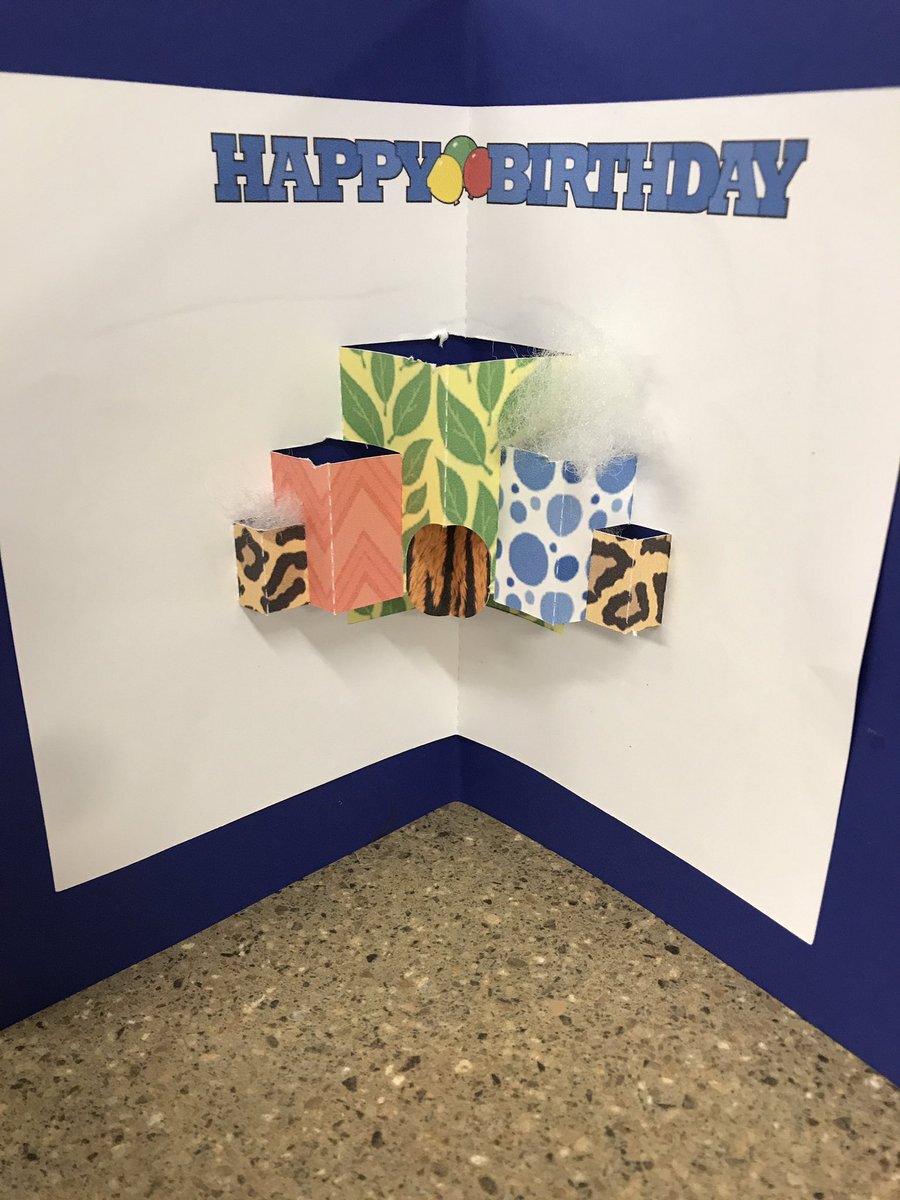
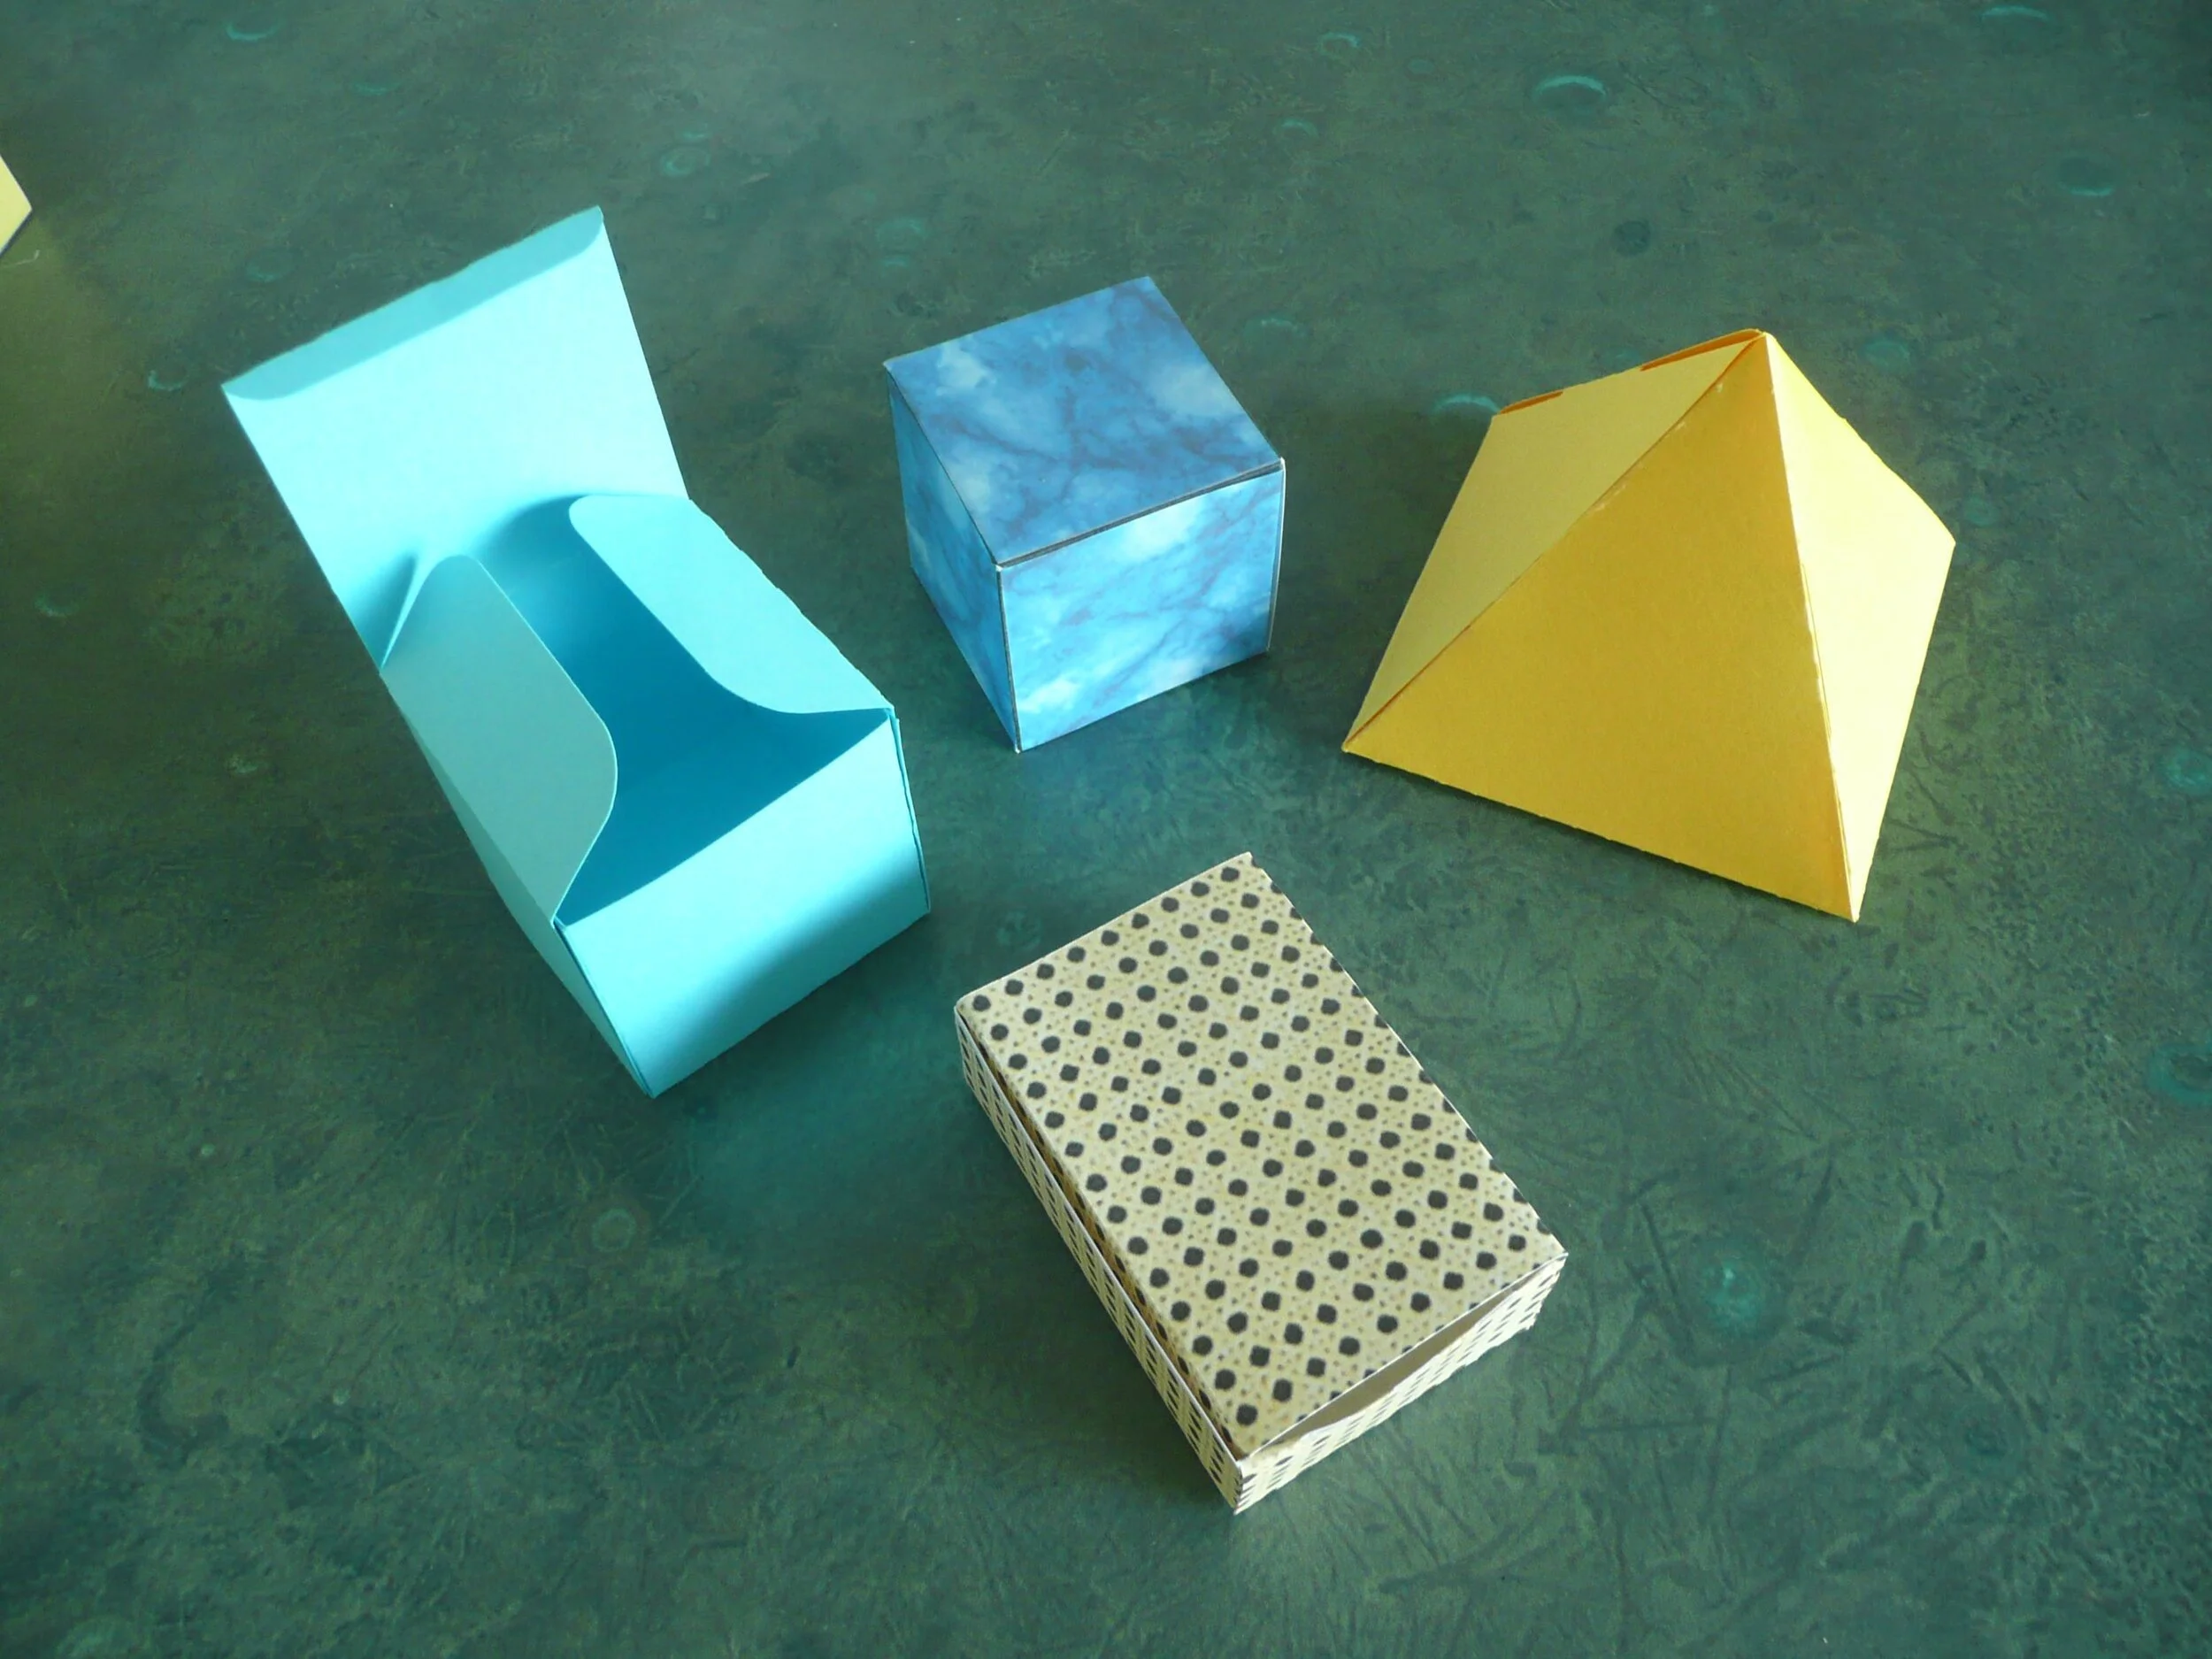
FabMaker Project Idea: Package What You Love

The following blog post is by Peggy Healy Stearns, Lead Software Designer, FabMaker Studio.
During Peter H. Reynolds Facebook Live reading of I Am Love, he shared a box designed to package “unconditional love.”
Is there something, real or imaginary, that you’d like to package and share with others? Follow these steps to design and construct your own boxes in FabMaker Studio
QuickStart Video #1 – Ready-Made Box
Watch this video, then follow the steps below.
How to create your custom FabMaker Box!
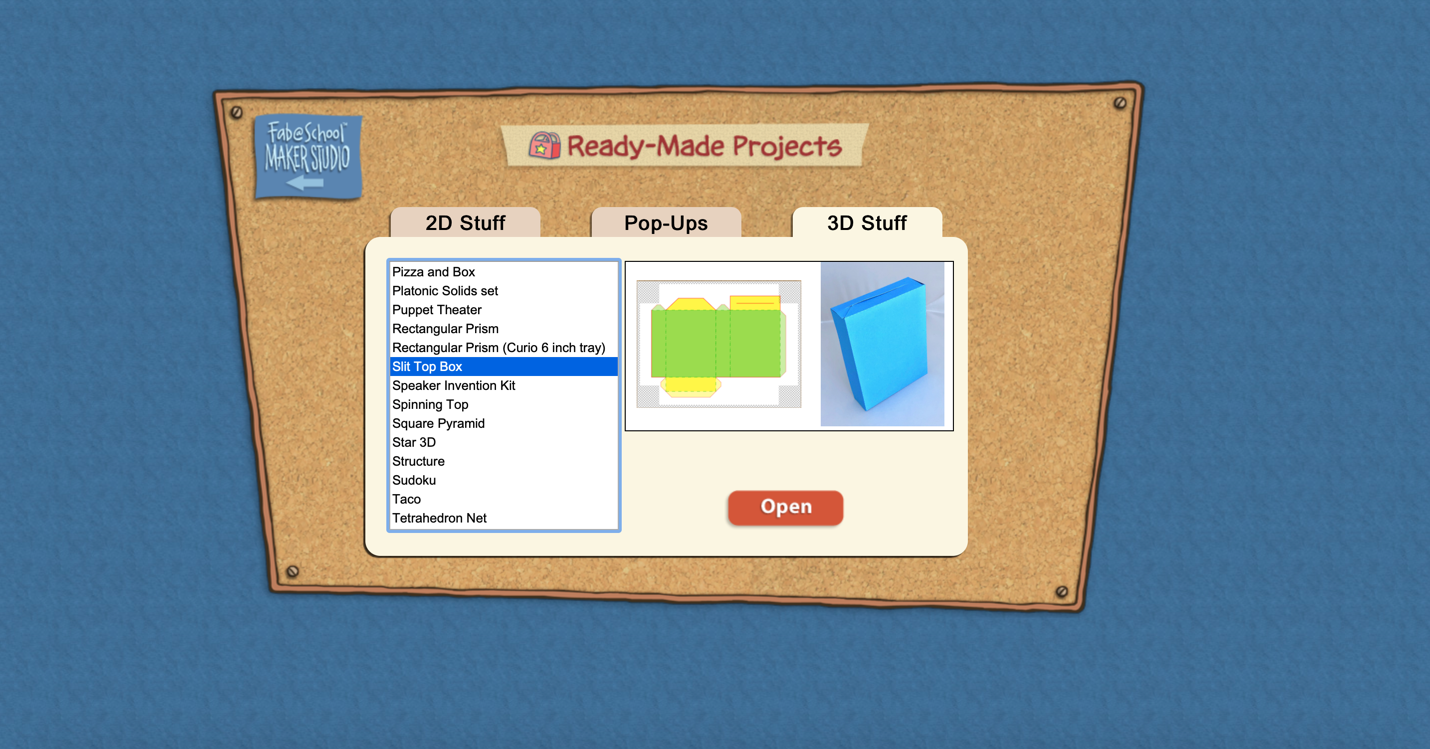
Step 1: Open a Ready-Made. Click here to go to FabMaker Studio. Sign in and go to Ready-Made Projects: 3D Stuff. Wait for the projects to load and open the Slit Top Box.
Step 2: Explore. When your file opens in the Edit screen, note the red cut lines and green fold lines. Go to 3D View in the lower right and click the larger button (double arrow) to expand the 3D view. Drag the green slider to see the box open and close. Place your cursor in the black area and drag to change the view angle.

Step 3: Print. Click the Print icon at the top. On the Print Preview page, select “Print Cut & Fold Lines” and “Remove Color Fill.” Then select Save to PDF and print your pattern.

Step 4: Construct. Use scissors to cut (or a Silhouette if you have one) to cut your pattern, then fold your box, but don’t glue it together yet. Identify the front, back, sides, top and bottom. Decide what you’d like to package and color your design. When you’re done, construct your box. Give your packaged treasure to someone or save it for inspiration.
Step 5: Design. Explore other package designs from FabMaker Studio’s Ready-Made 3D Stuff. Then use the following video as a guide to design your own box from scratch!

Using FabMaker Studio with Distance Learning
How many squares create a cube? This prompt sparks a variety of answers depending on the age. First graders usually answer four and often, we hear the number 12. With FabMaker (Fab@School) Studio, students can use shapes to digitally create 2D nets and with the 3D viewer tool immediately see how the finished project will fold. And this is just the beginning.
FabMaker Studio, our digital design and fabrication tool, opens the door to authentic learning and assessment. And as a web-based tool, FabMaker Studio can easily be folded into distance learning as they explore the Engineering Design Process. To encourage your students to think through their designs and document the process, we’ve created a handy project journal.
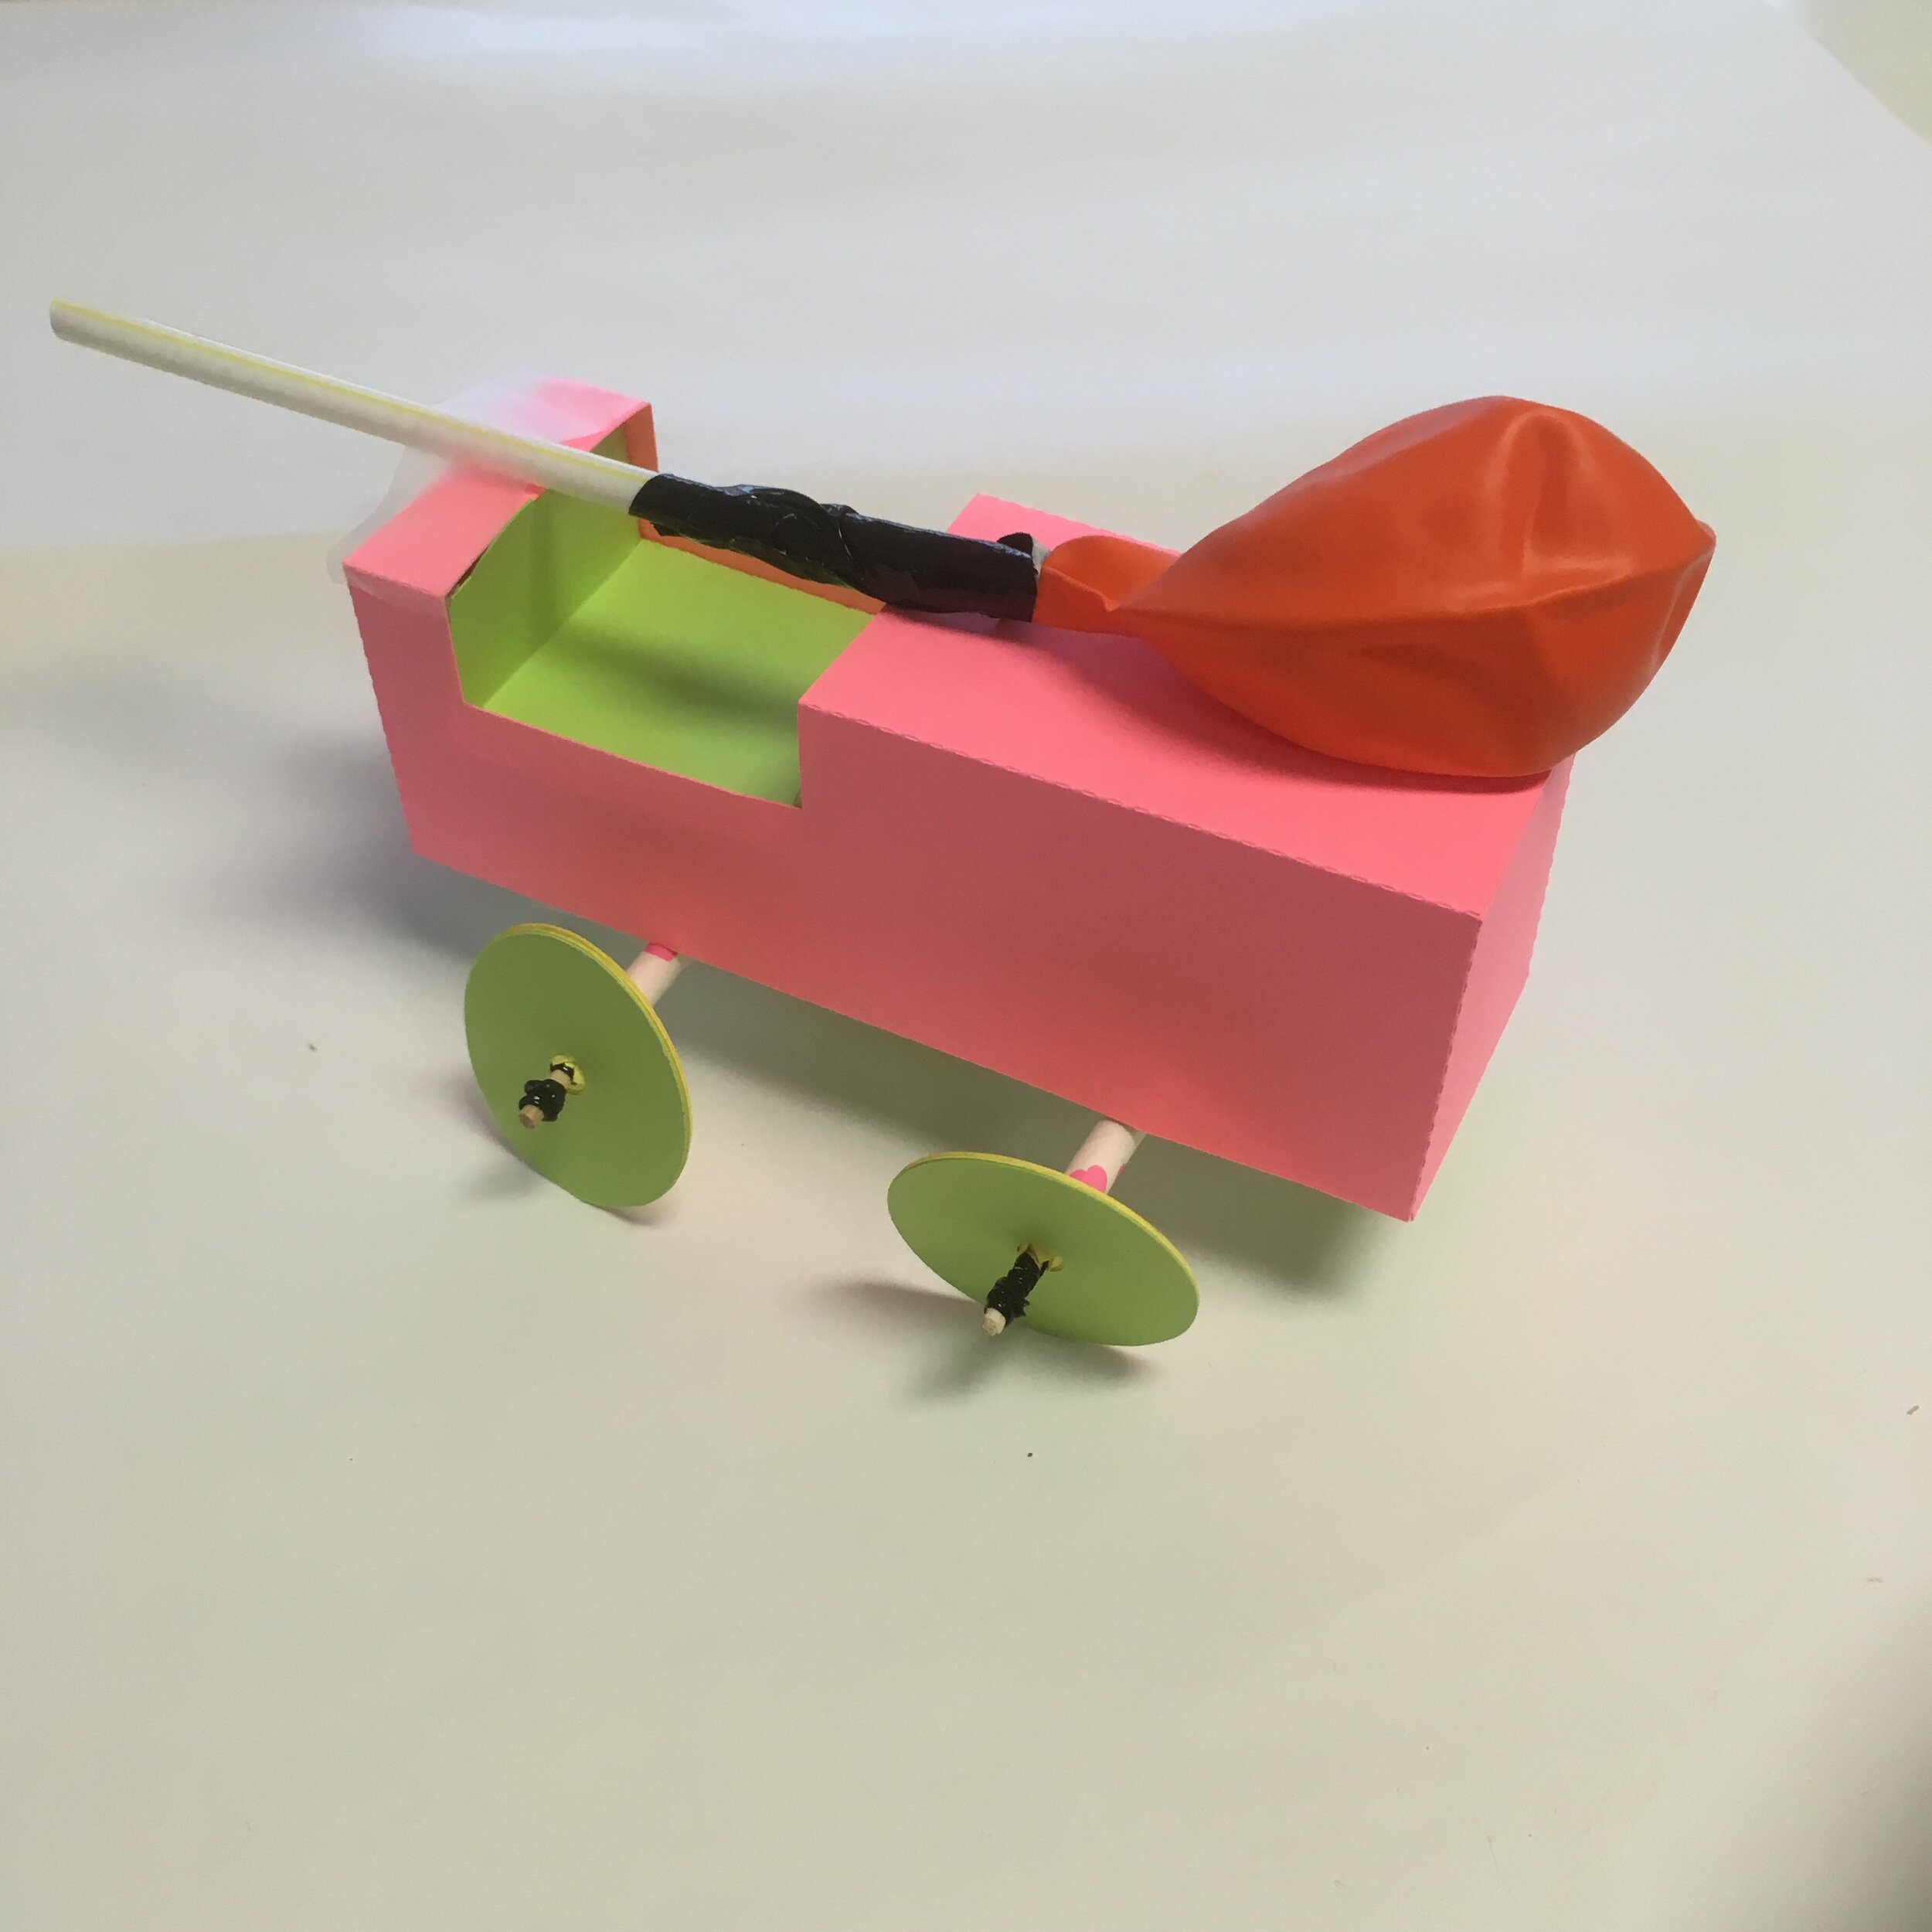
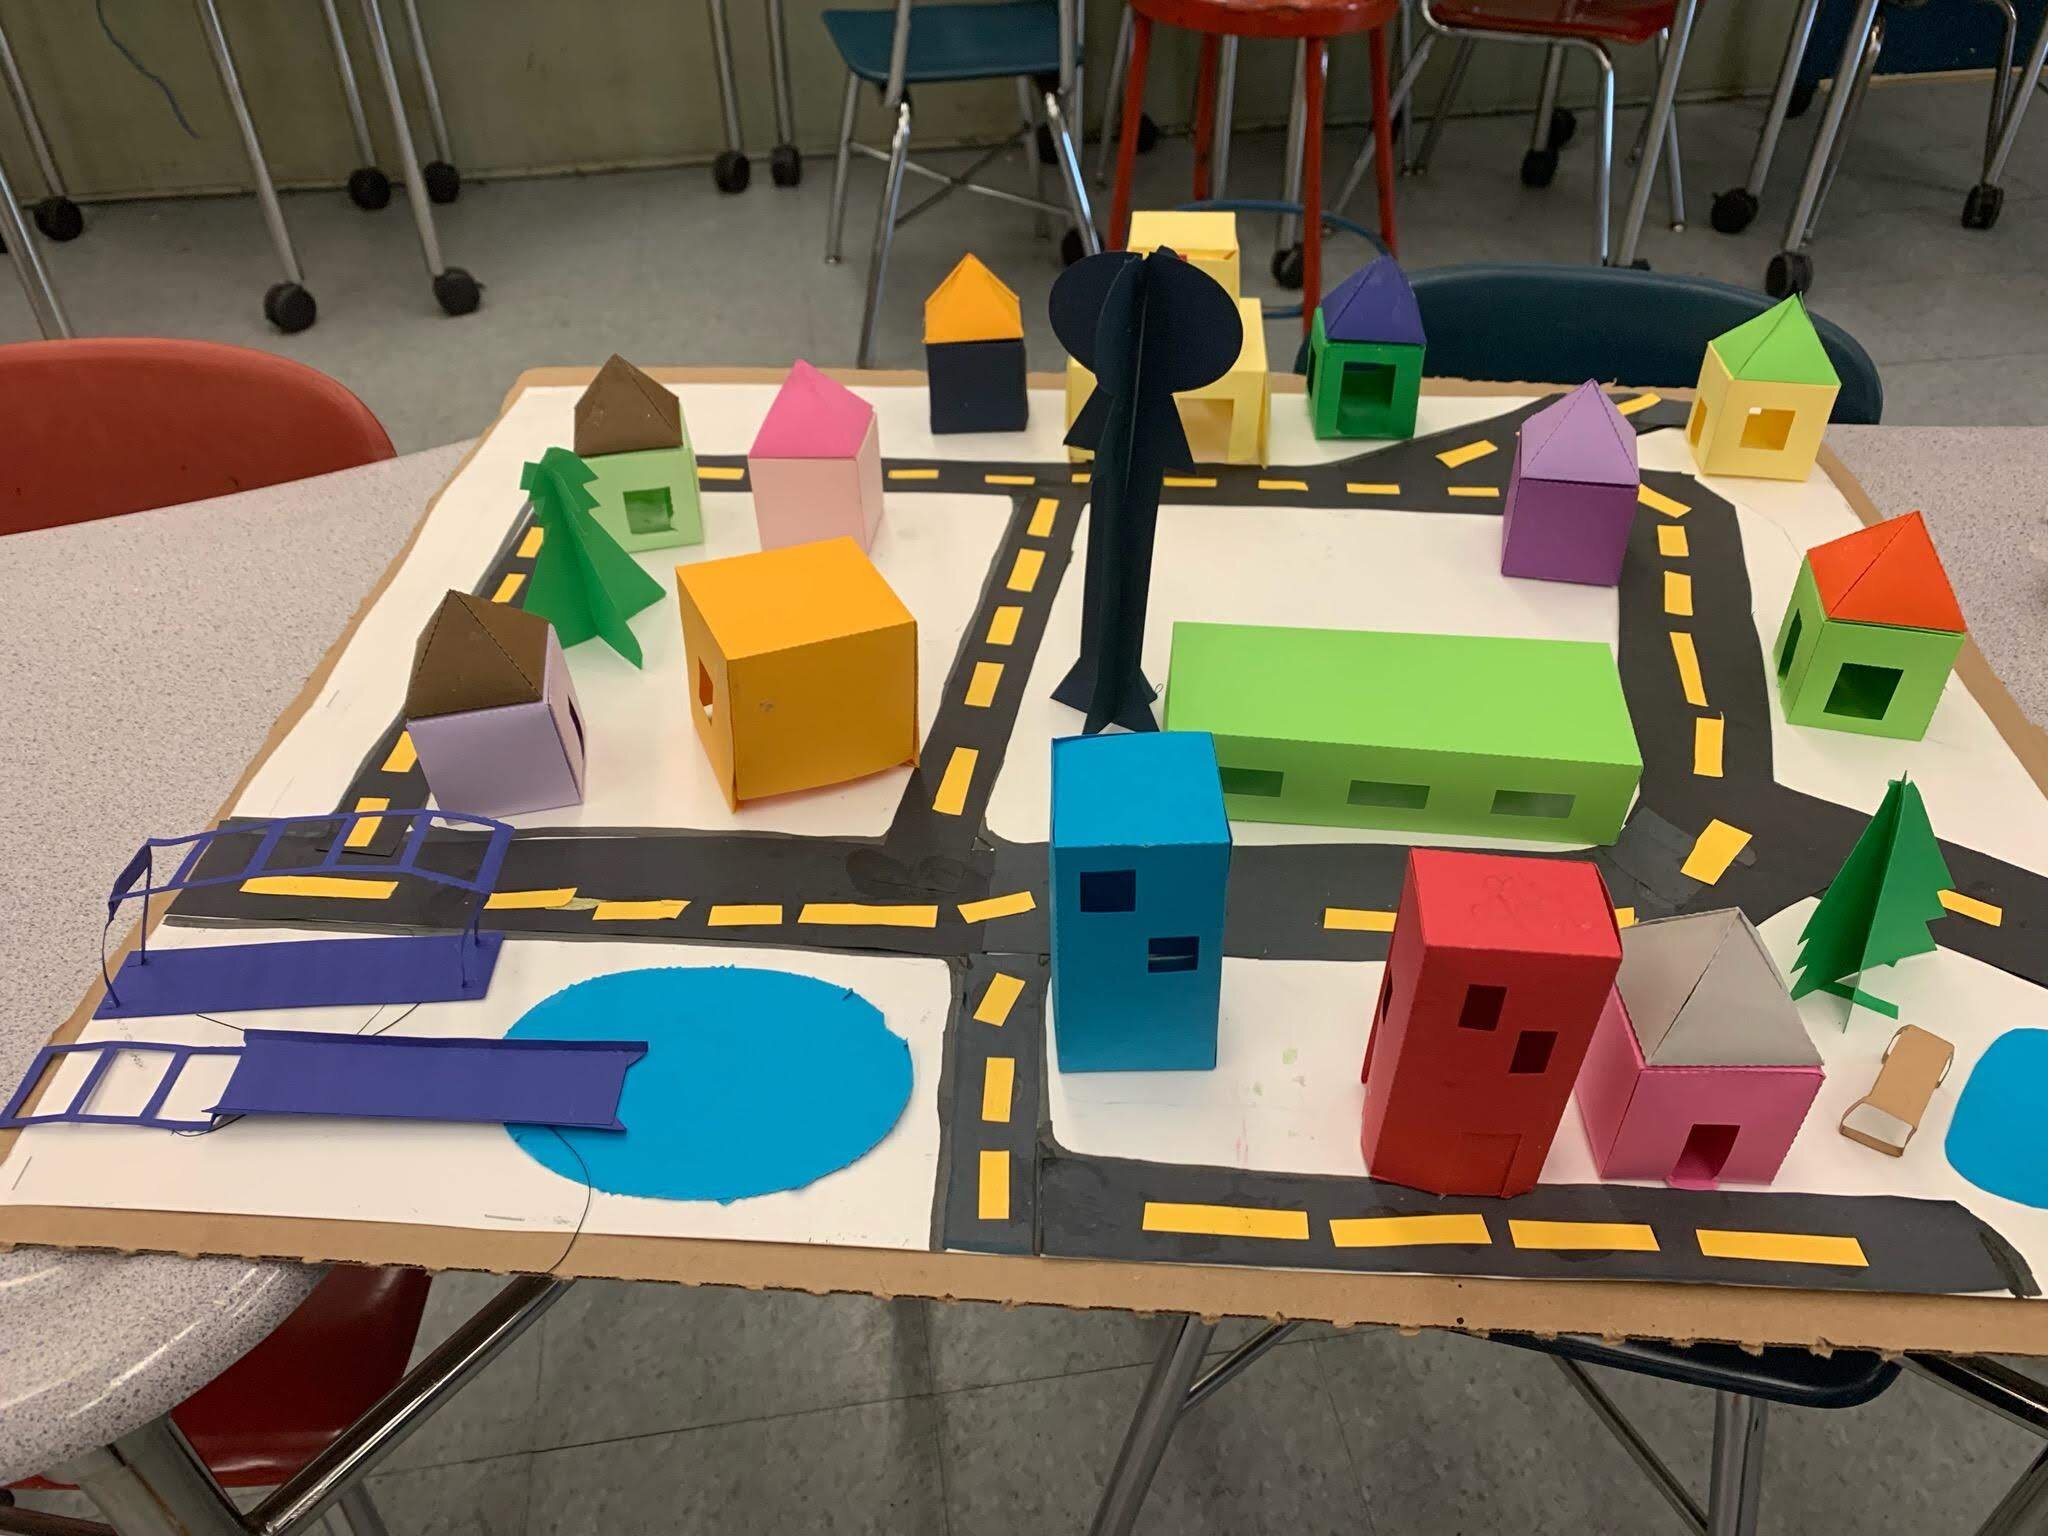
STEM content: Through FabMaker Studio, students can learn about constructing geometric shapes (activity here) and use the built-in measurement tools to engineer a scale model of a city or to exploring force and structure (go-cart activity).
Building first through technology then with actual materials is a hands-on way to gain skills in all the STEM fields.

Paper Prototyping: Prototyping is a valuable part of the creative process. Utilizing affordable and easily accessible materials, FabMaker Studio can help students make tangible objects to represent their ideas in order to test out their understanding. For details on how to use scissors to complete a project click here.
Spatial Reasoning: When designing in FabMaker Studio, students must think about how the final product they’re imagining would look when unfolded. Students have to envision where the paper must be cut and folded to create the end goal. Developing their spatial reasoning in this way is valuable for many applications and future careers.
FabMaker Tips: There are three lines in FabMaker Studio - perforated fold lines (green), cut lines (red), and black lines (don’t cut). For tips on how these lines function download our FabMaker Tool Tip sheet.
Design and Creativity: Students get to build objects starting with their imagination and then bringing them into reality. There are multiple possible ways to build the same object when you are talking about paper fabrication, so students’ design and creativity skills really get to shine. For ideas on how to get started with FabMaker Studio, check out these Spotlight Blogs and examples on the Reynolds Center site.
Perseverance and Resilience: Fabricating with just paper and tape/glue provides a low-stakes environment for taking risks and making mistakes. Students learn to try again and again and to think of mistakes as pieces of information to learn from. Perseverance and resilience are all part of the process.

Celebrate World Wildlife Day with FabMakerStudio!

When it comes to wildlife, the first step toward conservation may be appreciation. It’s easy for students to fall in love with nature when they explore the exciting worlds of animal life (fauna), plant life (flora), and the astounding ways in which they interrelate.
In the classroom, World Wildlife Day (March 3, 2020) provides a unique opportunity learn about the importance of biodiversity. If you’re looking to incorporate this year’s theme—Sustaining All Life on Earth—into your curriculum during the coming weeks, FabMaker Studio can serve as a fun, creative, and intuitive tool for your students.
Here’s a list of some of our favorite FabMaker Studio projects that relate to wildlife!

The Flight of the Bumblebee
There is a common myth that bumble bees defy the laws of physics as they apply to aerodynamics. How is it possible that they are able to fly? Using high-speed photography, Michael Dickinson—a professor of biology and insect flight expert at the University of Washington—researched how the bumblebee takes flight and published his findings. Through this Fab@School Maker Studio activity, your students will examine the anatomy of a bumblebee, or other flying insects.

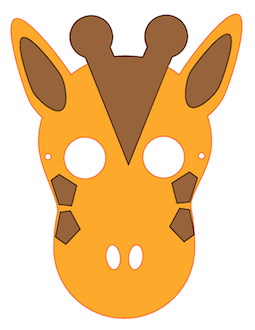
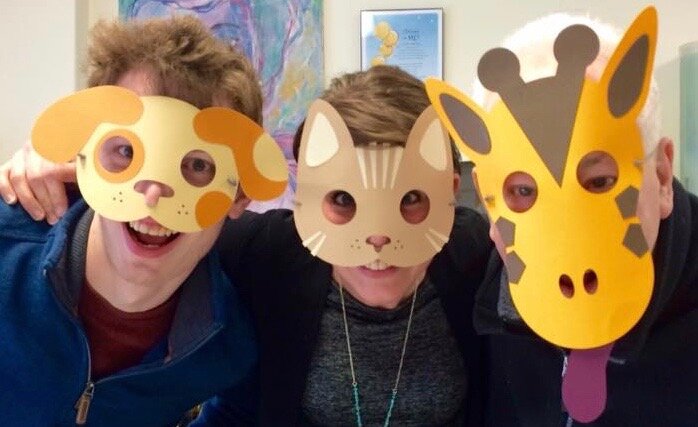
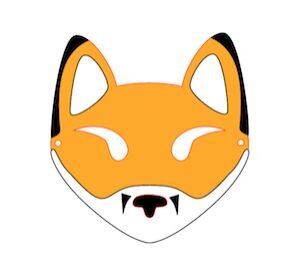
Giraffe Masks
Did you know that the small horns on top of a giraffe’s head are called ossicones? Giraffes appear to share these skin-covered, boned protuberances with an extinct relative called the Sivatherium. (Reference: National Geographic, "Sivatherium: A giraffe with a trunk?", and ”The Biggest Giraffe of All Time.”) Even as one of the most common symbols of wildlife, giraffes are relatively little-understood creatures, whose habits and origins are still being researched and discovered!
These card stock Giraffe Mask designs are a ready-made project in FabMaker Studio. For a simple activity, they can be assembled + worn by students, or combined into a classroom/hallway display.
Alternatively, you can use the mask designs to launch a lesson about the evolution of animal features, and how fossil records help researchers to decipher the evolutionary story of a species. With the FabMaker Studio design interface, students can use their imagination to adapt the features, or dream up attributes that the giraffe’s relatives could have evolved to survive. (For example, longer or differently-shaped ossicones, pointed teeth, a trunk, and more!)

Pair a Wildlife Project with a Themed Book!
For World Wildlife Day (and beyond) teachers can use FabMaker Studio projects alongside themed books to create memorable experiences for their students - especially those who like to get hands-on while learning!
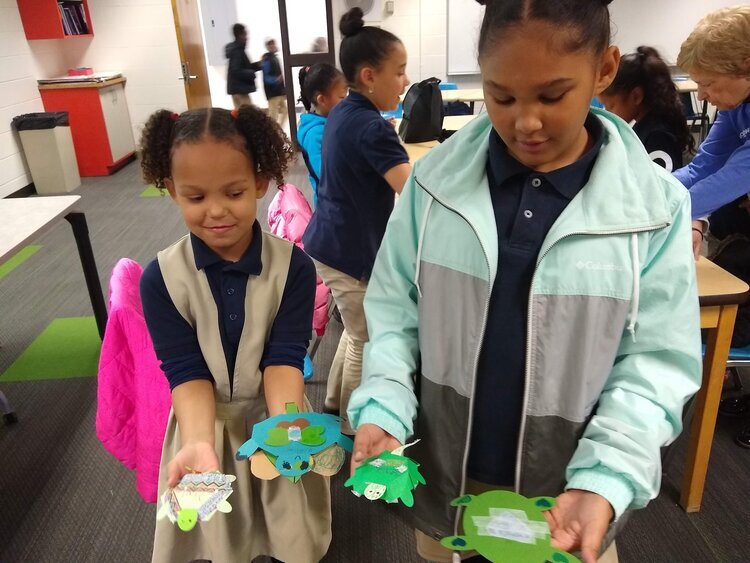
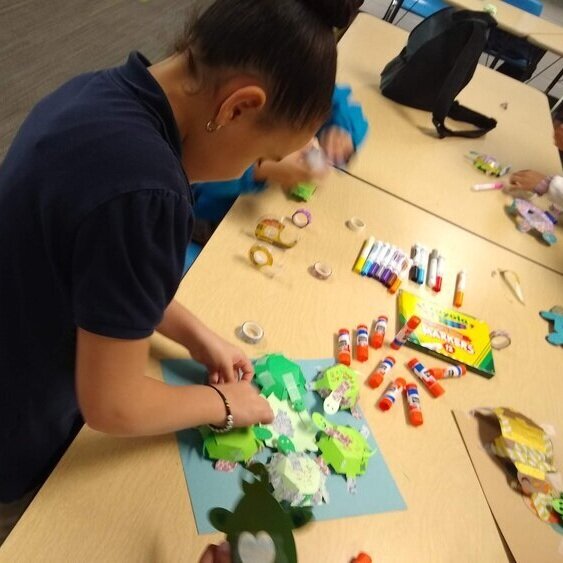
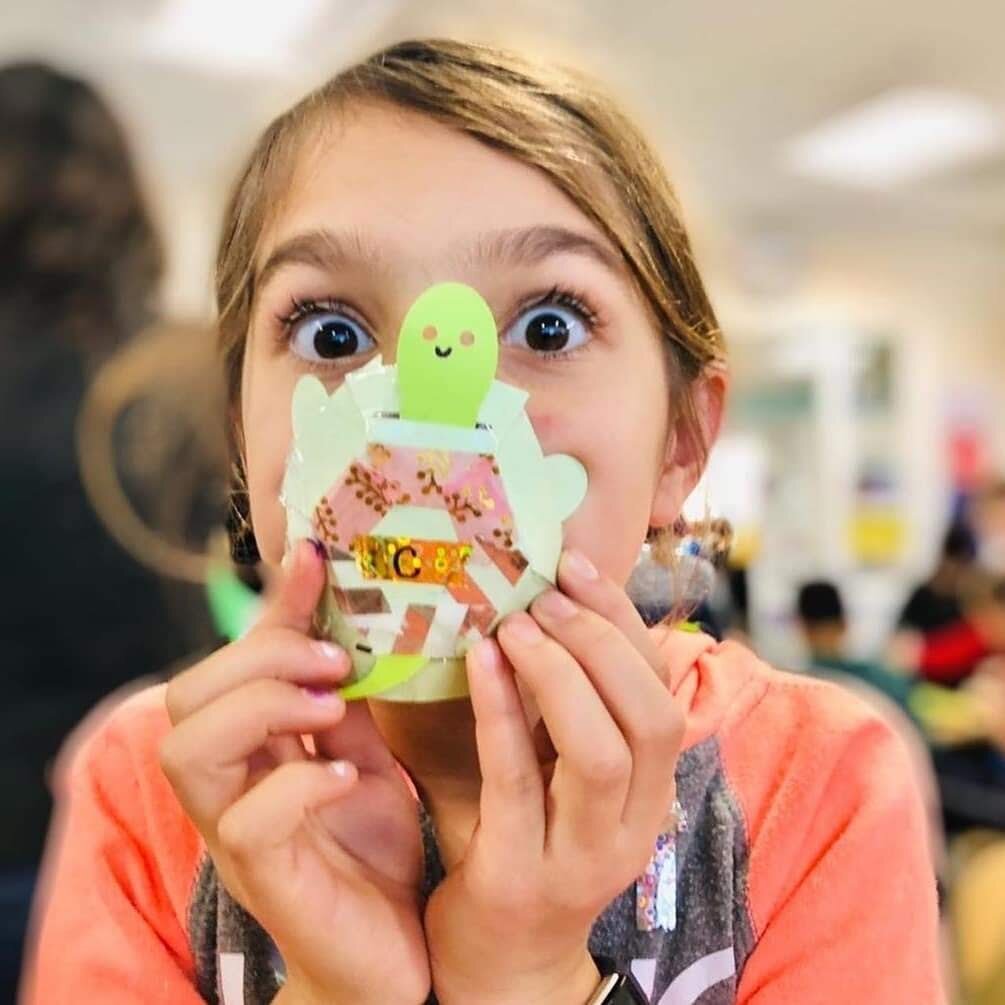
For example, this January at the School Within School at Goding in Washington, DC., FableVision/Reynolds Center TLC’s own Paul Reynolds spoke about his book, Sydney & Simon: Go Green!, which addresses the threat that ocean pollution poses to the environment and aquatic life…including sea turtles! Afterwards, the third grade students assembled 3D turtles that were created using FabMaker Studio.
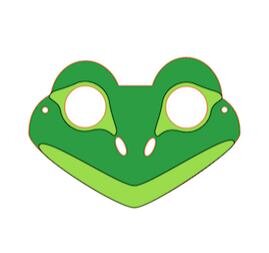
When considering your plans for celebrating wildlife in the classroom, remember that FabMakerStudio offers ready-made projects that feature bears, birds, foxes, turkeys, deer, and many more! Consider which of your favorite books about wildlife could be paired with a paper fabrication project!
How will you bring the lessons of World Wildlife Day in your classroom? How will you incorporate FabMakerStudio 2D and 3D fabrication to make your lessons come alive? For a chance to be featured in our FableVision Learning Spotlight, please email info@fablevisionlearning.com!
To learn more about school visits with Peter H. Reynolds and Paul Reynolds , click here.
Click here to learn about FabMaker Studio.

Fabricating Fun for National Engineers Week

Build a snowman without the frostbite! Watch this quick time-lapse video to see how educators can introduce engineering concepts to young learners with FabMaker Studio.
FabMaker Studio is the first digital fabrication software tool developed specifically for use in the classroom. It is an easy-to-use, web-based program that invites students to experience STEM and STEAM learning in an engaging, personally meaningful way.
For more information, contact us at info@fablevisionlearning.com