FableVision Learning Spotlight Blog
Categories
- Animation-ish 42
- Books 21
- Civics! 2
- Classroom Spotlight 17
- Conferences and Events 20
- Creative Educator 3
- Creativity 25
- Distance Learning 13
- Dot Day 22
- FabClassroom 28
- FabFriday 19
- FabMaker Studio 66
- FabMaker Studio Classroom 13
- FableFive 7
- FableVision Games 3
- Free Educator Resources 36
- HUTCH 1
- Home Activities 5
- In the Classroom 34
- In the News 11
- International Dot Day 23
- Ish 1
- Library 1
- Mapping the World by Heart 7
- Paul Reynolds 10
- Peter H. Reynolds 54
- Professional Development 9
- STEM/STEAM 20
- Storybook Academy 2
- Teacher Spotlight 14
- The Dot 17
- The North Star 2
- Words and Their Stories 1
- Zoombinis 3

Engineer, Invent & Make: Getting Started with FabMaker Studio (VIDEO)
From solar-powered homes to magnetic turtles and pop-up book reports, schools/programs across the country are using FabMaker Studio to encourage invention, creation, and engineering - all with paper.
Not sure how to get started? No worries we’ve got you covered in 4 easy steps!
Step 1: Watch Andrea Calvin as She Shares Her Tips & Tricks

Step 2: Tune into the Tutorials & Blogs
From how to use shapes to exploring the reflection tool, Peggy Healy Stearns, lead designer for FabMaker Studio, guides you through the the ins and outs of the program through these Quick Tips tutorial videos. Another awesome resource can be found on our Spotlight Blog. There your will find step-by-step guides from Peggy Healy Stearns and ideas pulled from the classroom.
Step 3: Give it a Go
If you have an account, hop into FabMaker Studio and take it for a test drive. Open a Ready-Made Project and send it to to your printer (our favorite one to start with is the house). Once you built the starter project, take it apart and build from scratch. How will you modify your design?


Step 4: Join the Conversation
Have a question or a a FABawesome idea to share? Join the FabMaker Studio Facebook Group. We are all in this together.
Want to Learn More? Send us an email at info@fablevisionlearning.com

FabMaker Mystery Monsters: Math Shapes & Cool Tools for Imagineering
The following blog post is by Peggy Healy Stearns, Lead Software Designer, FabMaker Studio.
Create a 3D “Mystery Monster” with FabMaker Studio! Identify and combine shapes, weld shapes, and morph shapes. Add 3D wings, legs, ears and other body parts!
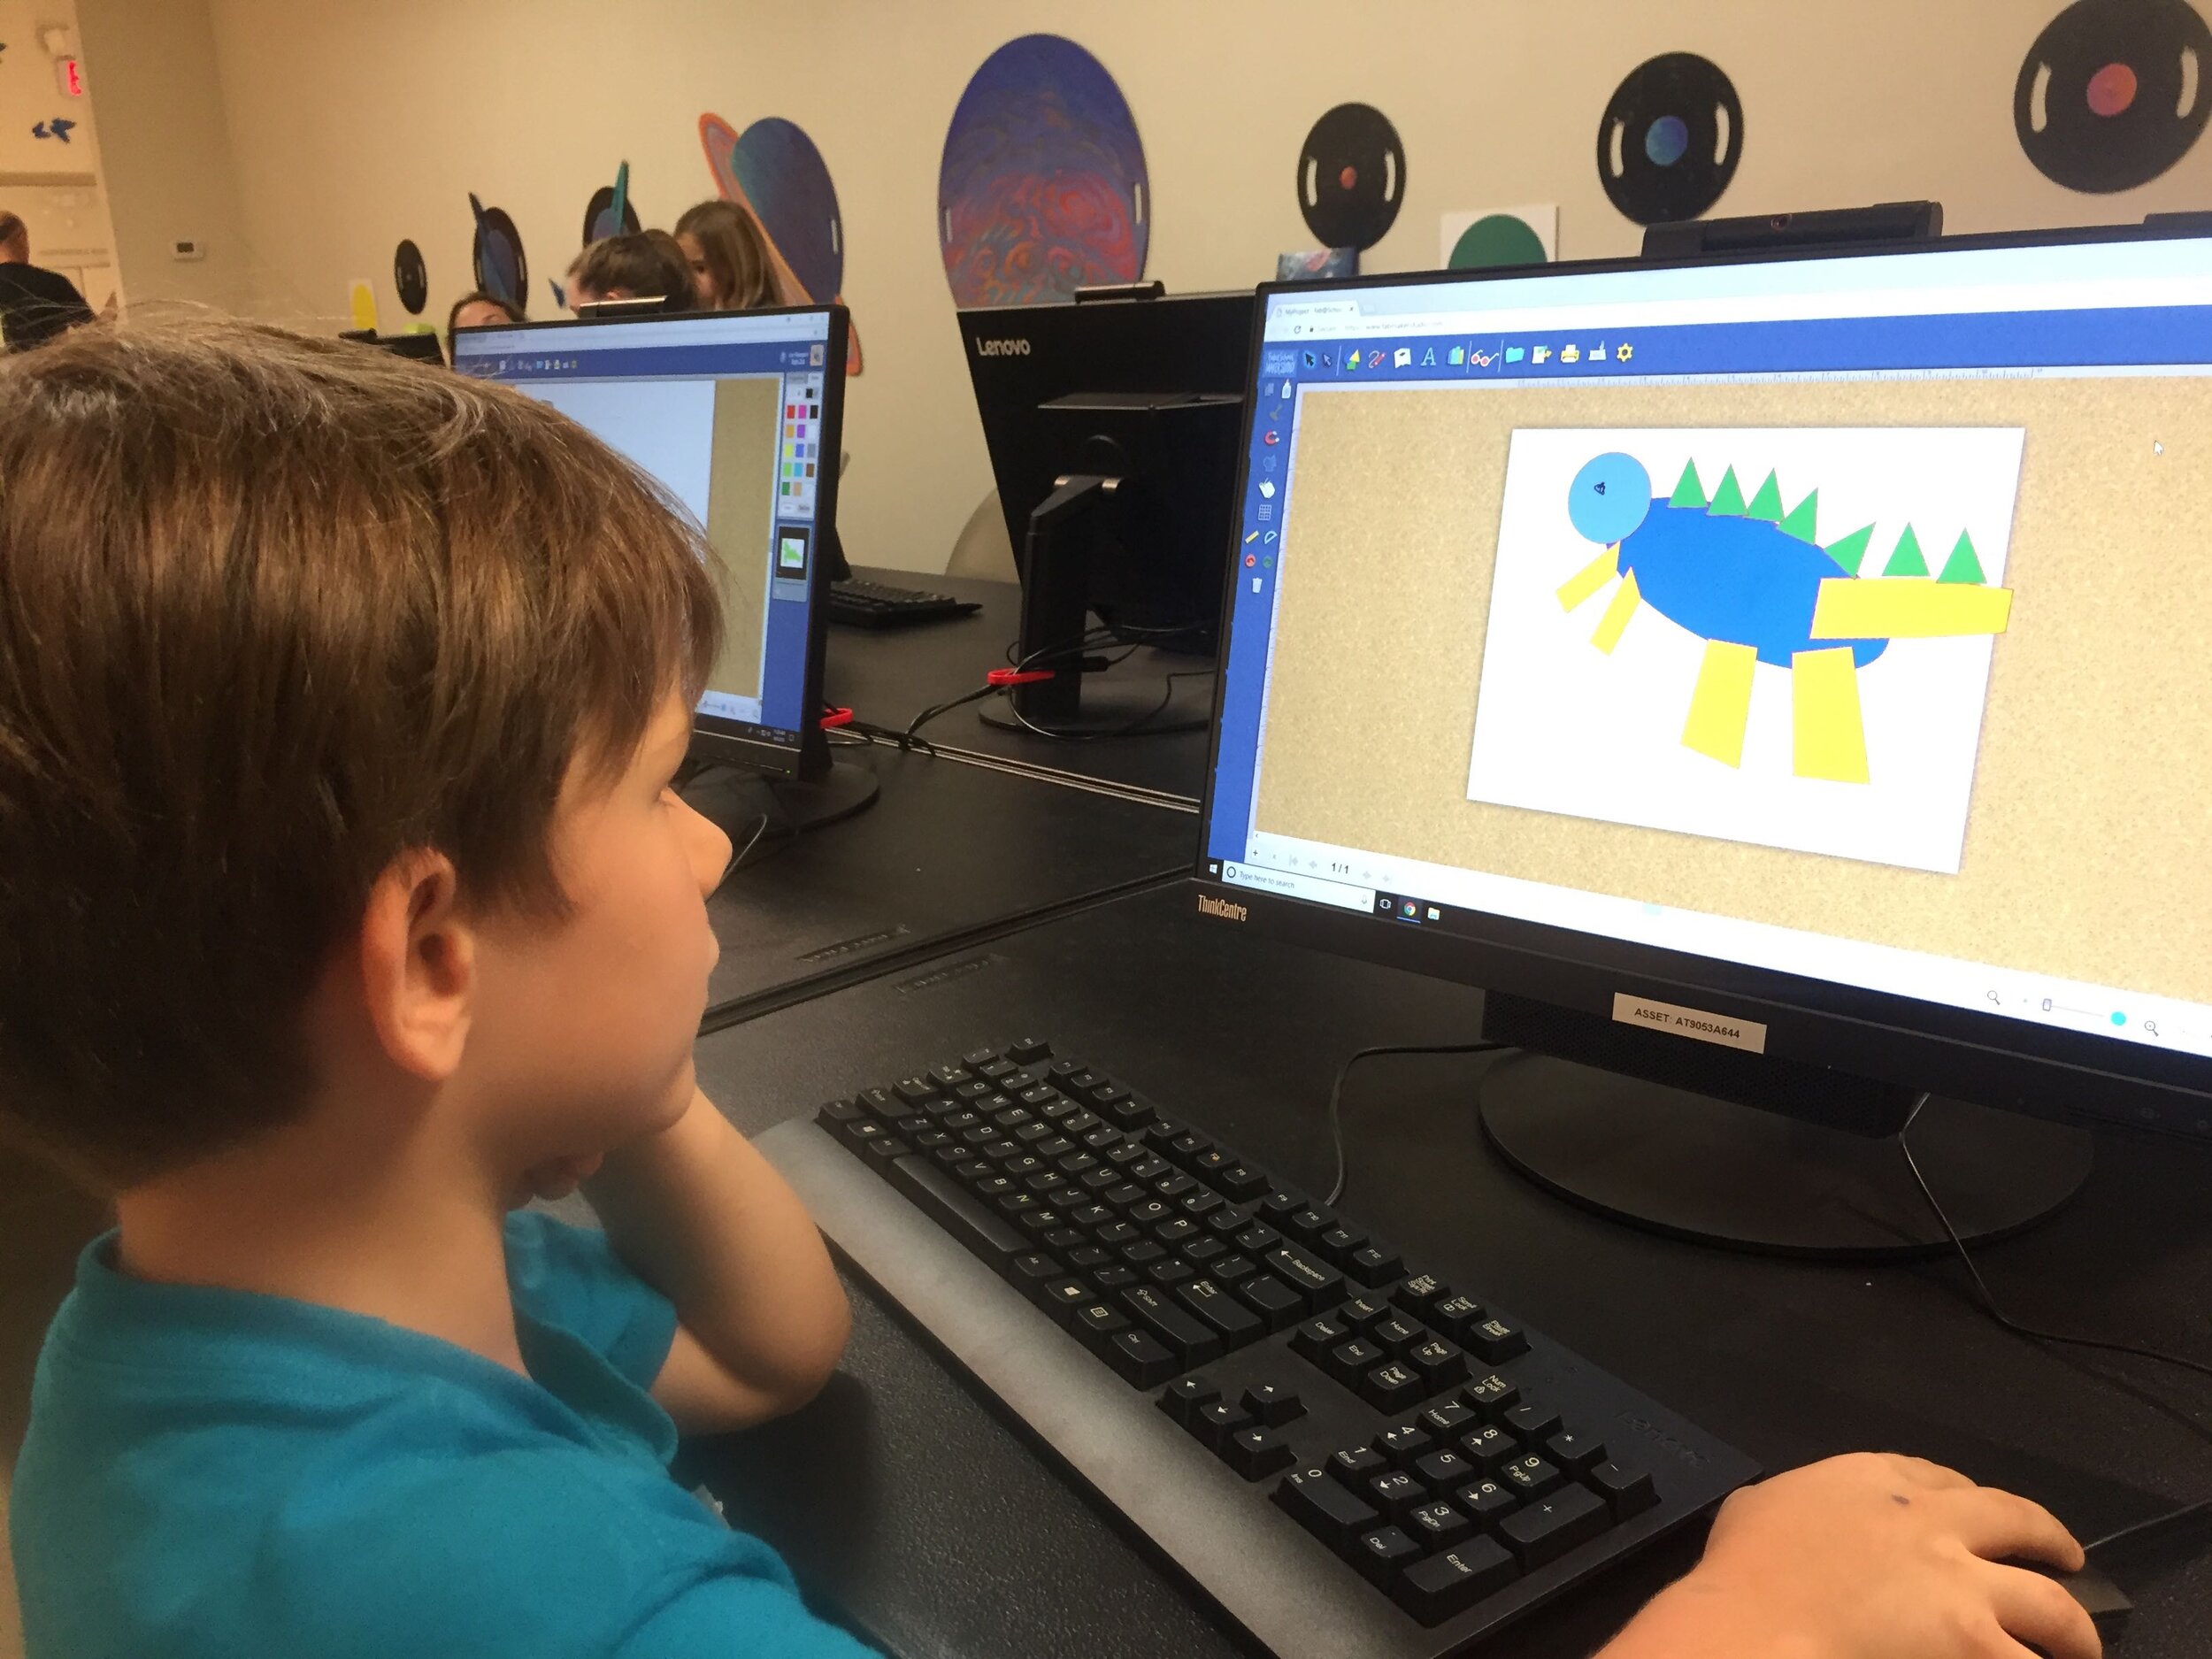
Designing “Mystery Monsters” is a motivating way to address foundational math standards and inspire meaningful writing prompts. In the process, students learn easy but powerful digital design tools they can use for years to come. This project can be simple or sophisticated. Follow the steps that work best for your makers and then print, cut and construct.
Make Your Monster
Watch this short video then follow the steps below.
Step 1: New Project Click here to go to FabMaker Studio. Sign in and go to New Project and click OK.
Step 2: Choose Shapes Open the Shapes tool at the top. Drag shapes onto the screen and arrange them to make your basic monster. To resize a shape, select it and drag handles.

Step 3: Weld Shapes Make sure your shapes touch or overlap. Then place your cursor and drag around all the shapes to select them. Choose the Weld button in the left toolbar to weld your shapes.

Tip: Be sure to drag far enough outside the shapes to select them all before welding.
Step 4: Rearrange If you want to rearrange your monster parts, you can Unweld. Select your monster and click the Weld button. This time, since your monster is already welded, it unwelds. Rearrange the shapes and then drag around to select them all and Weld again.
Tip: Make a mistake? Use the red Undo and green Redo buttons on the left above the Trash can.
Step 5: Save Go to the File button on the top toolbar and choose Save. Select “My Online Files” (or another location if desired), give your file a name, and click Save.

Tip: If you save your FabMaker Studio file to My Google Drive or My Computer, it can only be opened from within the FabMaker Studio software.
Morph Your Monster
Watch this video then follow the steps below.
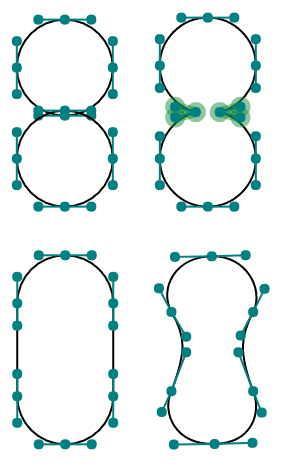
Step 1: Turn on Edit points With your monster file open, choose the gray Edit Points cursor in the top left corner of your design. The edit points that anchor your design will appear.

Step 2: Drag Edit points Drag edit points to morph your mystery monster.
Step 3: Add new Edit points Click anywhere on the outline to add a new edit point, and then drag the new edit point to reshape. Edit points can be tricky -- sometimes it helps to zoom in. Play around. You can always Undo and Redo.

Step 4: Check your design Choose the standard cursor (black arrow) again to see your morphed monster.

Tip: If you Unweld after using Edit points, you’ll go back to your original shapes and lose all your morphing! Remember you can quickly Undo changes.
Step 5: Save Go to the File button on the top toolbar and choose Save or Save As.
Make Your Monster 3D
Watch this video then follow the steps below.
Step 1: Make a new body part Design wings, ears, legs, bigger tail or other parts to cut separately and attach to your monster. Check the photos for ideas. You can use the following tools.
A. Shapes Tool: Choose a shape and use the handles to resize and reshape it. If you want, combine two or more shapes, weld them, and the choose Edit Points to morph.
B. Lines Tool: Choose the Lines tool and then choose Straight Lines, Curved Lines, or Brush. To use Straight Lines or Curved Lines, click to place each point. Double-click to place the final point. To close a shape, place your final point at or near the beginning point. For more detail on the Lines tool, see the FabMaker Studio Lines tutorial.
Step 2: Save Go to the File button on the top toolbar and choose Save or Save As.
Step 3: Print, cut and construct
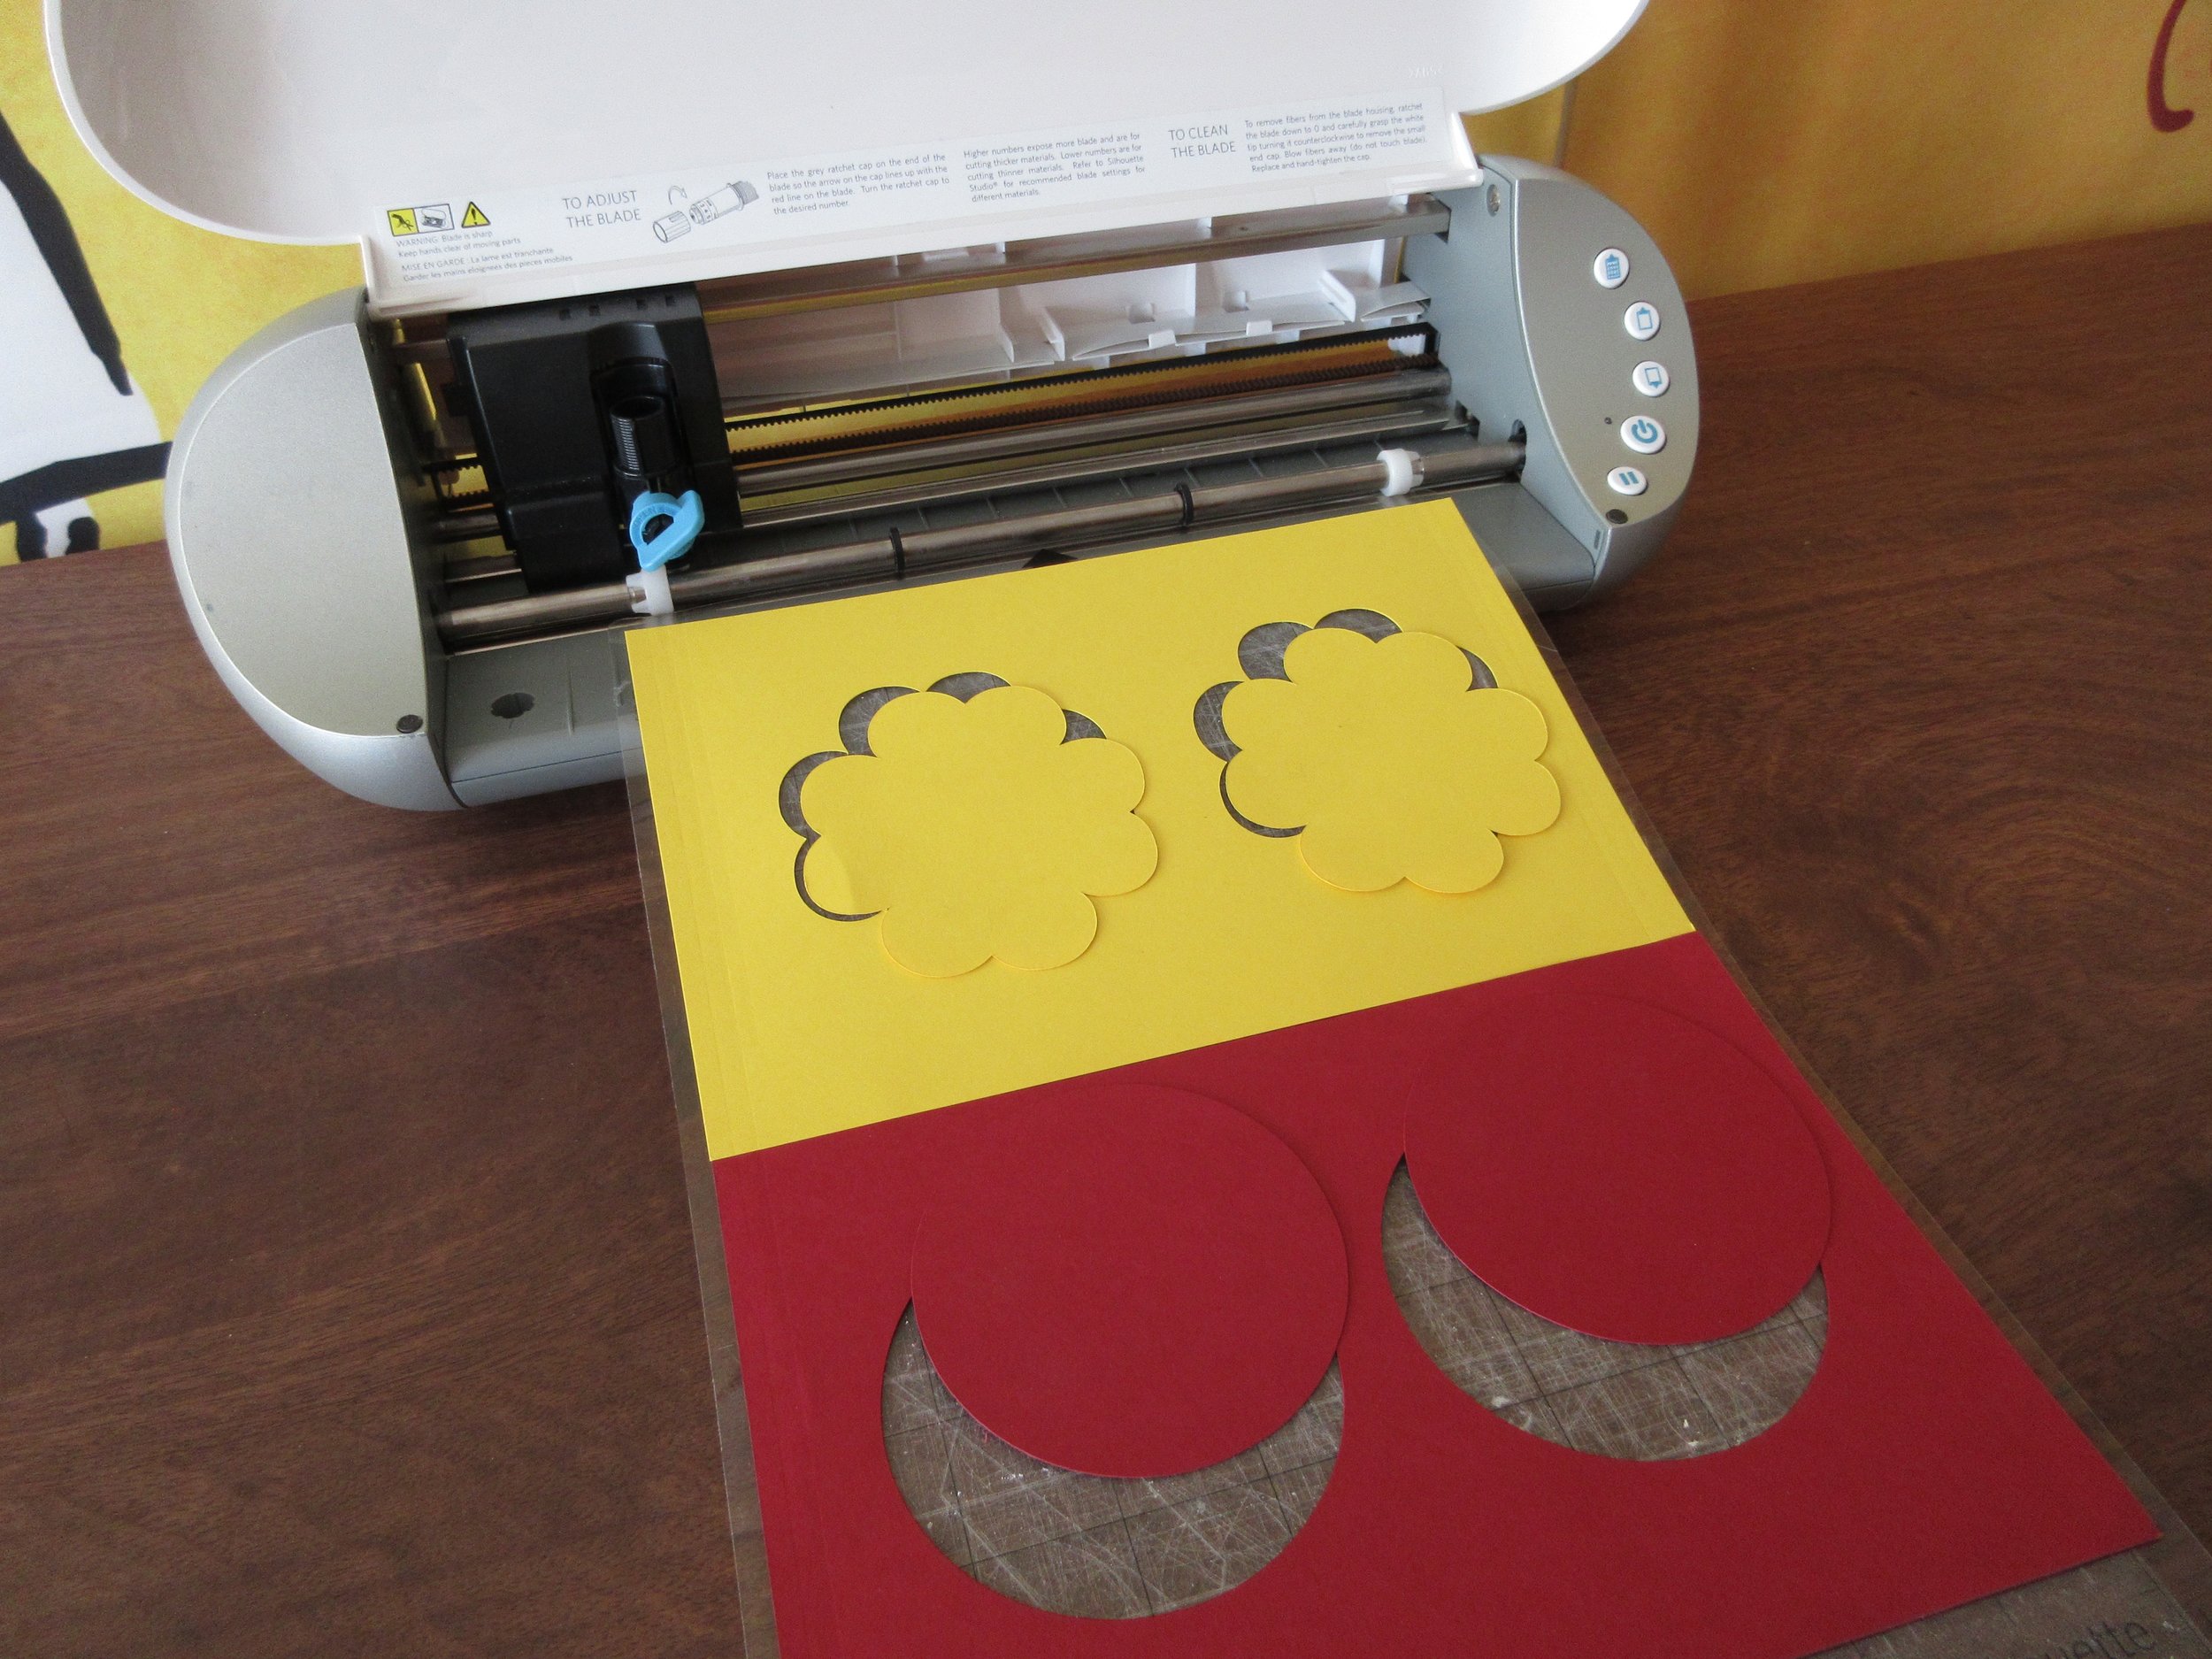
To cut by hand: Click the Print button at the top. If you want to color by hand or use color paper, select “Print Cut & Fold Lines” and “Remove Color Fill” on the Print Preview page. Then select Save to PDF and print.
To cut with a Silhouette: If you want to color by hand or use color paper, you can send directly to the cutter. Click the Fabricate button at the top and follow instructions. Tip: Shapes have automatic cut lines, but objects created with the Lines tool do not. To define the outlines of these objects as cut lines, see the “Cut Fold Tab” tutorial or the FabMaker Studio User Guide for details.

What To Do With a Mystery Monster?
Write about your mystery monster. How big is it? How does it move? Where does it live? What does it eat? Does it have any enemies?
Tell a story about your mystery monster.
Now that you’ve honed your design skills, create a herd or flock or an entire habitat complete with flora and fauna.
Share your mystery monster. Post a PDF or picture of your monster. For more share options, see the FabMaker Studio User Guide.
For more information, contact us at info@fablevisionlearning.com. We invite you to join the conversation on Facebook the FabMaker Teacher Group.

FABClassroom Spotlight: Castle Rock Middle School & Yvonne Miller

Meet Yvonne Miller from Castle Rock Middle School in Castle Rock, Colorado. The school has a makerspace library filled with resources and tools for students and teachers to use. They recently added Fab@School Maker Studio, a digital design and fabrication program, to space. We asked Yvonne to share more about how they are applying this software into their school curriculum.
Can you share a bit about your library makerspace and programming?

For the past 3 and a half years, we have been on a mission to transform our traditional library to a dynamic space for students. Students will have access to world-class tools, innovative spaces, comprehensive resources, and 21st Century instructional support. We started our Library MakerSpace with donations of recycled and consumable materials. Today, we have 3D printers, littleBits and MakeyMakey products, robotics, a CNC machine, and a 2D fabricator. Recently, with the generous donation from the Morgridge Family Foundation, we were able to add the Fab@School Maker Studio software, four additional Silhouette machines, and receive training on the software as well. The space has supported students and staff in numerous projects, and it has been wonderful to witness excited and engaged students learn about the potential of a MakerSpace.
Our school has adopted the mindsets of Design Thinking as our constructivist model of instruction. Every student attends a class called InnoV8 where they learn about the Design Thinking Process and apply it to authentic problems and designs for human needs.
How are the students at Castle Rock Middle School using Fab@School Maker Studio?

Students use Fab@School Maker Studio as part of the prototyping process in their Design Thinking curriculum. Currently, all 8th grade students are engaging in a Sustainability Project in their Science classes. They are learning about sustainable living, energy transfer, natural resources, and human environment interactions. They have been challenged to design a tiny home in a specific location and for specific users. For example, an environmentalist who lives in a Portland, Maine, or a pet rescue family who lives in Buffalo, New York. Students will build spaces that must be proportionally correct and includes the amenities of a tiny home. They will be using Fab@School Maker Studio to design the interior of the tiny home, receive feedback about their designs, then iterate any components needed for the tiny home.
We are also using Fab@School Maker Studio in numerous different ways. We had a team of 7th graders use Fab@School Maker Studio to design a school during a Mars Challenge. They’ve also created a game incorporating math concepts for their Math Challenge activity. Our World Cultures teacher also used Fab@School Maker Studio during a study of a Japanese culture and paper folding.


What has been the “aha” moment working with Fab@School?

The spatial awareness and critical thinking necessary to design a 3D project is challenging to say the least. Students also found it challenging to mentally deconstruct a 3D object to a 2D design. Students with strong visual spatial skills have an easier time with the design, compared to those who think in pictures. There is definitely a lot of metacognition and visible thinking going on, and we appreciate the ready-made objects as a learning tool to take the designs even further. But the challenge is real.
What is next?
I hope our students make it a routine to use Fab@School Maker Studio while prototyping their designs. It fosters and promotes the mindset of rapid prototyping and helps build the maker culture, all while supporting instruction with Design Thinking.
Is your classroom a FabClassroom? We would love to feature your school in an blog post! To be featured in an upcoming post, send an email to info@fablevisionlearning.com. You can also tweet your photos with the hashtag #FabMakerStudio! For more posts featuring Fab@School Maker Studio, click here.
FABClassroom Spotlight: Kim Slayton, Burnham Brook School

Meet Kim Slayton from the Burnham Brook School in Canterbury, New Hampshire. Not long ago, the school added Fab@School Maker Studio, a digital design and fabrication program, to their school curriculum. Kim and her students have been using the web-based program in art, science, and social studies projects. We asked Kim to share more about how her students were using the tool and how they plan on taking the program to the next step.

As a teacher, you truly encourage your students to Create Bravely. What tips can you share on encouraging creativity in the classroom?
An important tip to encourage creativity is not to panic. If something doesn’t work out the way it is supposed to, don’t be afraid to try again or find another way to solve the problem. Where there's a will there’s a way to work around any problem. It is also important to have a backup plan, in case your original idea doesn’t come out as you hoped it would. Finally, taking notes on what did and didn’t work helps gives the learner a general sense on how to solve the problem in the future.
How are you using Fab@School Maker Studio in the classroom?
We use Fab@School Maker Studio in art class for making sculptures, as well as creating boxes to store small art projects. The program is especially helpful in demonstrating concepts in science and social studies. To top it off, I also make paper masks for my dyslexic students, as well as other teachers for their students.
What has been an “aha” moment using Fab@School Maker Studio?
I have a student who, due to birth complications, has only four fingers on one hand. This makes it especially difficult for her to use scissors. She was so excited and amazed when she came across the Fab@School Maker Studio program. She was able to plan and create a very complex paper art project without difficulty [and cut it out with the digital cutter]. It was a great “aha” experience when she finally saw her concept come to life.
You work with learners of all ages and abilities. How have you used Fab@School Maker Studio with every student?
Some of my students have been using Fab@School Maker Studio on their own computers, while others explained what they wanted and I designed it on my computer. Typically, the students sketch out their desired finished product, and then we work together to figure out how to properly place the nets. My students and I have also used some of the 3D Ready-Made projects, such as the castle and automaton, for writing prompts and story mapping.

What is next? Any cool projects in the works!?
The student who has difficulties using scissors really likes horses, so we will be working on building an automaton with galloping horses instead.
Can you tell us a bit about your school?
Burnham Brook is a small private school founded in 1982 by Barbara and Walter Howell. All teachers use multisensory structured language instructions to teach their students. Each student is provided with an experience and then we attach a specific language to that experience. This allows them to take ownership for their learning, as well as develop a deeper foundational understanding of the concepts.
Instead of dividing the students into grades, they are instead grouped together based on their ability and language processing styles. The school consists of students with average, above average, and gifted intelligence. Some students have been identified as having a learning disability, while some have no learning difficulties but weren’t being challenged in their local public schools. All of the same types of classes meet at the same exact time, so if we need to change a student’s group, it would not disrupt his or her overall school schedule.
Is your classroom a FabClassroom? We would love to feature your school in an blog post! To be featured in an upcoming post, send an email to info@fablevisionlearning.com. You can also tweet your photos with the hashtag #FabMakerStudio! For more posts featuring Fab@School Maker Studio, click here.

FABClassroom Spotlight: Arrowwood Elementary

From the library to the classroom, Arrowwood Elementary is a FABschool. Earlier this year the neighborhood school in Douglas County, CO added Fab@School Maker Studio, a digital design and fabrication program, to its STEAM curriculum. Recently, Dana Palmer shared a bit about how students are using the tool and the plans for the future.
As a STEM/STEAM teacher can you share a bit about the importance of introducing STEAM concepts in elementary school?
I was the "tech lab teacher" for the first 8 years of my career - straight tech lab activities devoid of creativity did not help students develop a deeper understanding of concepts. I found students cutting and pasting information from the internet directly into PowerPoint and calling it "technology integration.” They were unable to explain concepts in their own words; they were unable to relate concepts to their lives or other applications. With the hands-on creative approach of STEAM that I use, students are highly engaged and have a much deeper understanding of concepts.

How are the students at Arrowwood Elementary School using Fab@School Maker Studio?
We are at the starting stages - our older students are creating manipulatives for younger students. We reworked an old lesson that used straws and pipe cleaners to make 3D prisms with Fab@School Maker Studio prisms created by students.
For our older students, they are learning to be creative and do for others-creating something another student will use to learn has been really exciting for them, and the younger students are receiving top quality manipulatives made by school mates.
What has been the “aha” moment?
When I looked at last year’s "prisms" compared to this year’s it is evident that they are accurate- having accurate prisms allowed students to better understand planes, vertices, etc...
They got the "correct" answer quicker and were able to understand the correlation between sides, vertices, etc..


What is next?
Looking to create a fabrication center in our library - great software - easy to get started with and reasonable equipment prices will make this a reality much quicker than I thought possible.
Is your classroom a FabClassroom? We would love to feature your school! To be featured in an upcoming post, send an email to info@fablevisionlearning.com. You can also tweet your photos with the hashtag #FabMakerStudio! For more posts featuring Fab@School Maker Studio, click here.

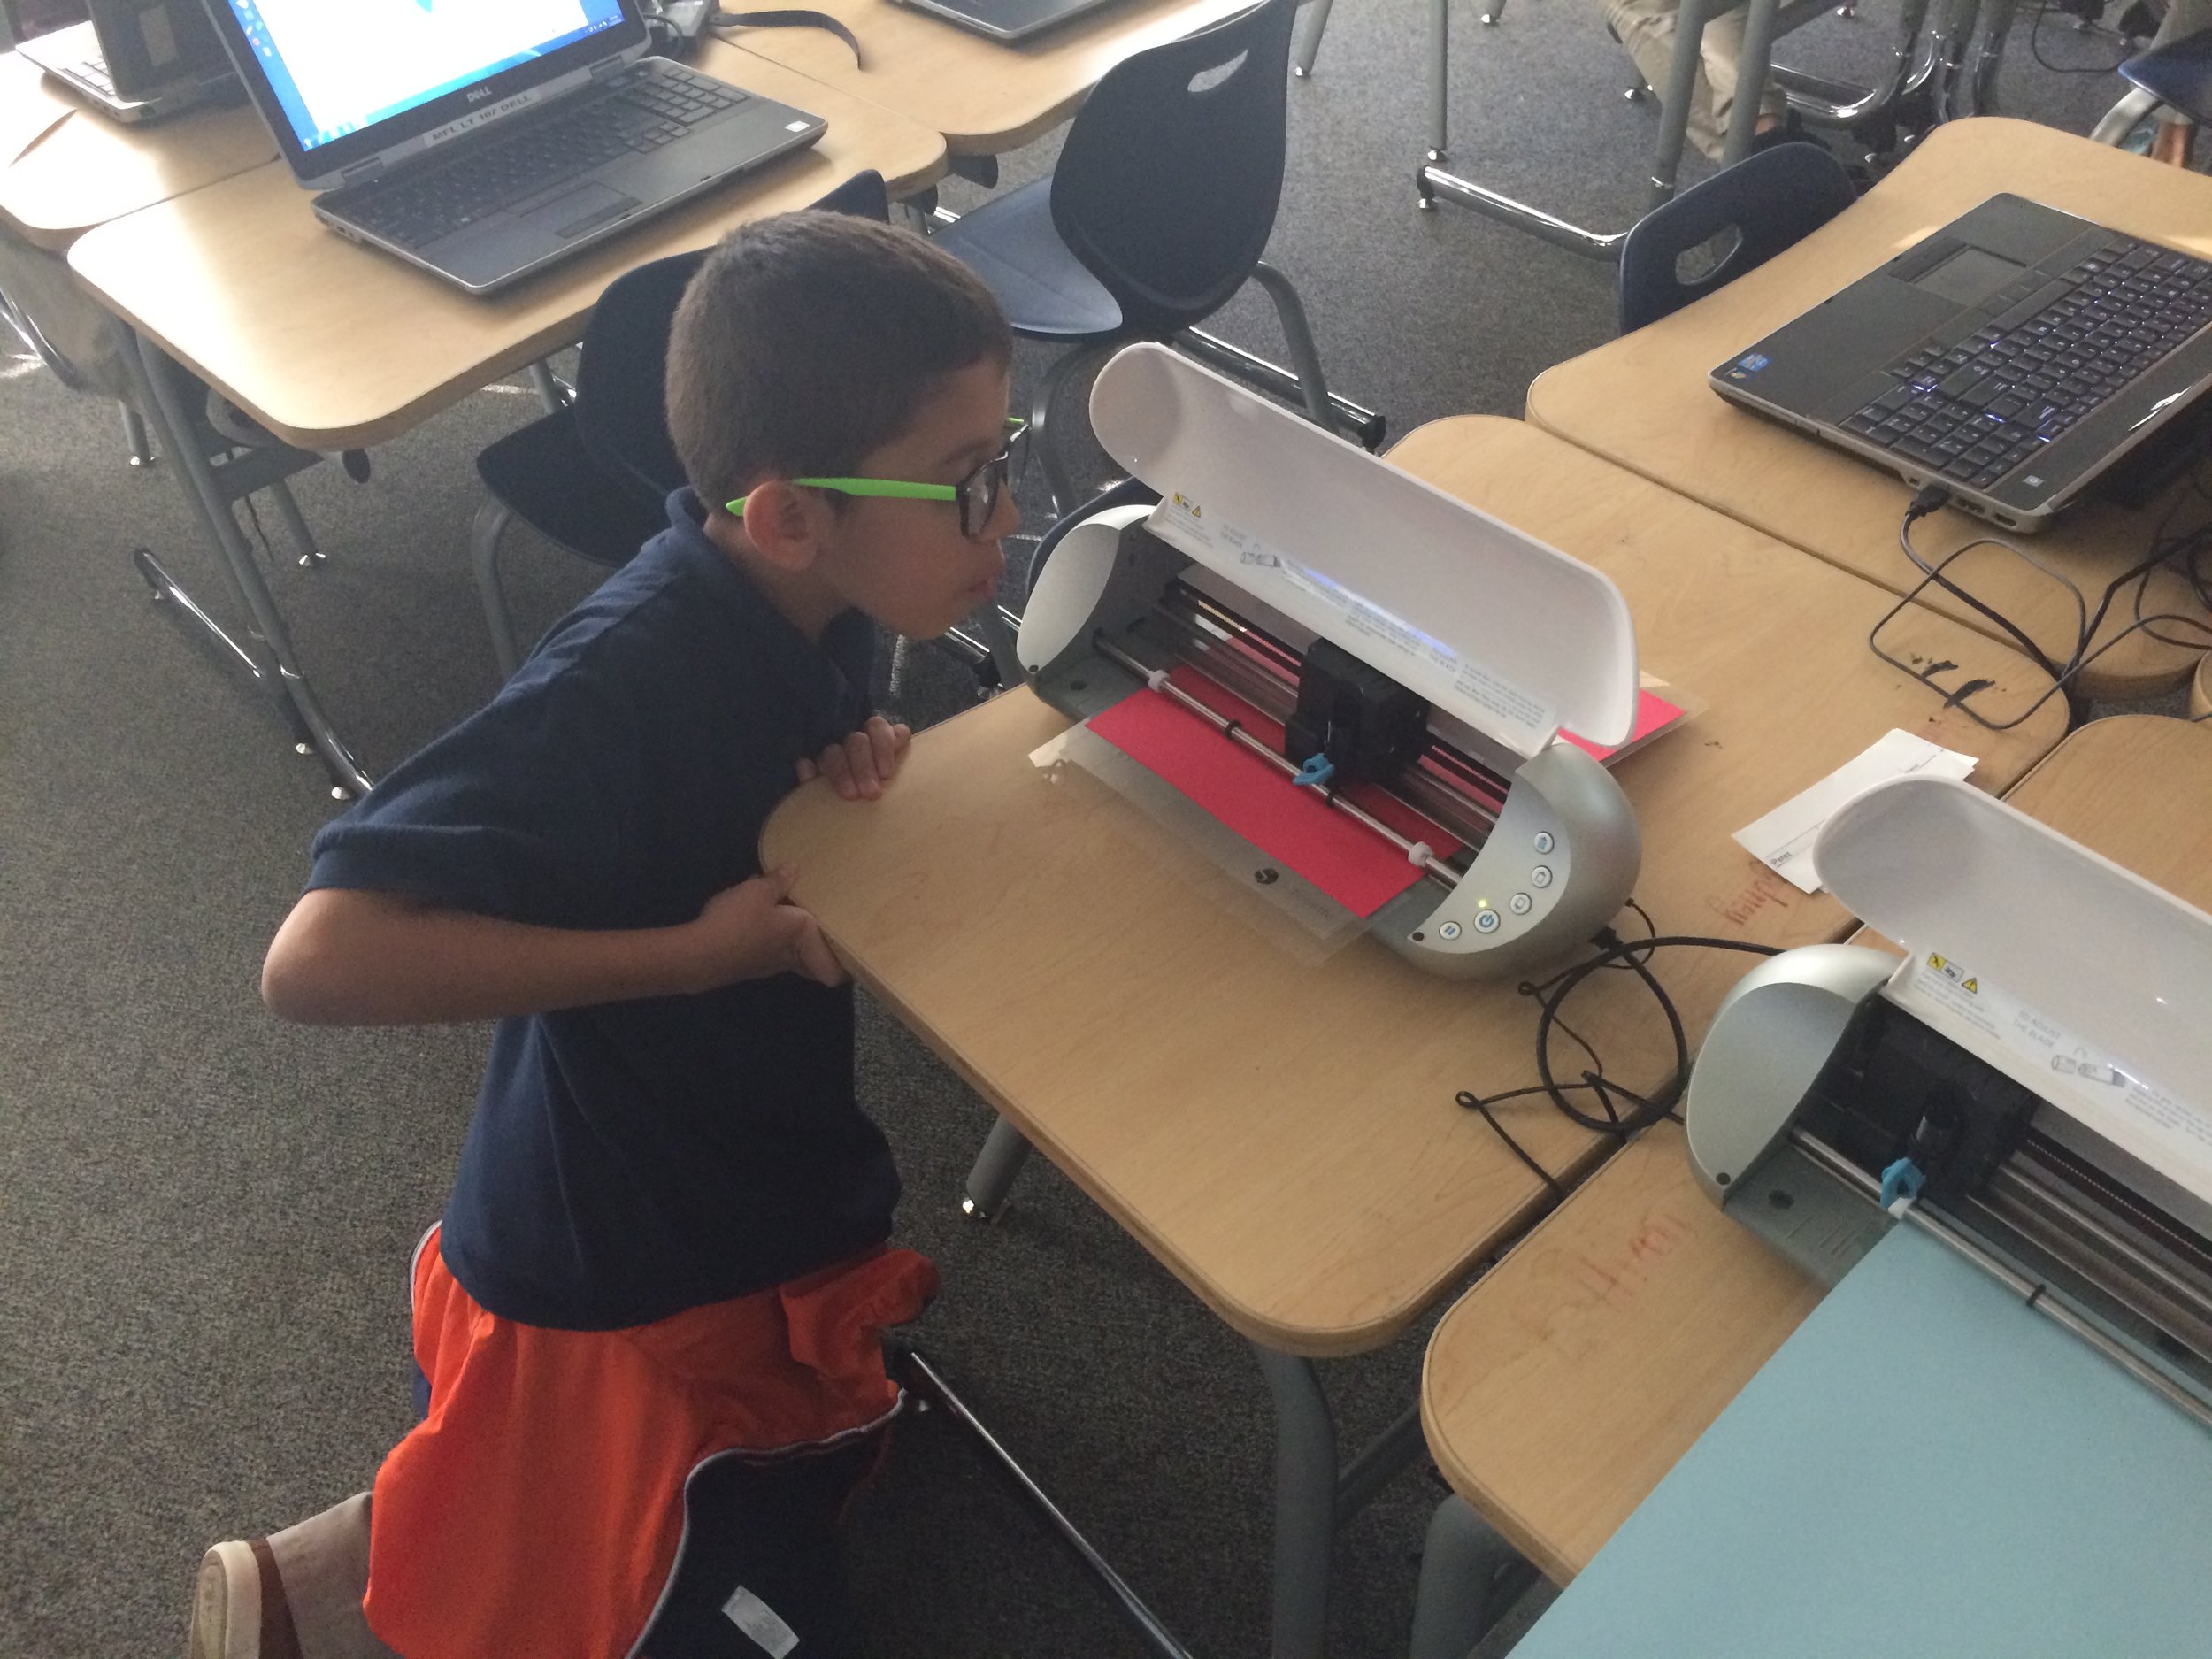
Fab Lab Tulsa Pilots Early Elementary School Program Featuring Fab@School Maker Studio
The following blog post was written by the team at Fab Lab Tulsa about their Digital Fabrication pilot with early elementary school students.
At Fab Lab Tulsa, we’re used to working with digital design and fabrication tools. In fact, we consider ourselves to be experts at it, with over five years of experience teaching youth programs that target 5th through 9th graders. We’ve had some experience with younger students but we’ve wanted to find some way to get early learners engaged in the design process. After a ton of research we were able to locate the Fab@School Maker Studio platformer. We were super excited to pilot Fab@School Maker Studio to see if it could be used to expand our existing programs to students in the 1st to 3rd grades.

In November 2016, we spent two weeks teaching 72 young students in the afterschool program at Kendall-Whittier Elementary School. In keeping with our existing education program philosophy, the curriculum included digital fabrication using Fab@School Maker Studio and Silhouette Portrait paper cutters. We focused on teaching elements of the design process as defined in the Next Generation Science Standards, and we encouraged students to apply the skills they learned in a project-based assignment. Our objective was to evaluate both the software and cutters, as well as test the feasibility and value of introducing digital fabrication concepts and skills at an earlier age.

Each student received approximately 4 hours of instruction over multiple sessions. The 1st grade students focused on 2D design. They were introduced to the topic of design and shapes by reading and discussing the book “The Wing of a Flea” by Ed Emberley. This led to instruction on how to design basic 2D shapes and combine those shapes into more complex structures. Students used the cutters to create their physical model.
The older students began with the 2D design but quickly moved to designing 3D shapes. They were able to use the cutter to render their 3D design and then glue it when necessary. Some older students tried their hand at more advance design concepts like pop-ups, a design principle that’s tough but easier to handle when using the friendly interface of Fab@School Maker Studio.


In short, we were very happy and excited about the results of the pilot. While there is still considerable room for improvement in the lesson plans and teacher instruction, designing with the Maker Studio software was a simple and straightforward concept to learn for all three grade levels. In addition, the cutters proved faster and more efficient than was expected.
We had been concerned that students would lack the developmental milestones needed to be successful in design and fabrication. We were overjoyed when this did not show up in the trial. All students were successful in producing and cutting their 2D and 3D files and we would expect those skills to continue to improve as the students gained more experience.
Best of all, student engagement was very high and we observed a high level of student interest and growing self-confidence. We’re excited about the implications this base of knowledge will have in future grades, when we ask them to use more complex CNC equipment for larger projects.
How is your classroom using Fab@School Maker Studio? We'd love to share YOUR tips and ideas! For more FabFriday posts, click here. Try out some or all of these techniques in the Winter Design Challenge! Share your photos with us, Tweet them with the hashtag #FabMakerStudio for a chance to have them featured on the next FabFriday!

FabFriday: Engineer Your Sweet Valentine's Day Cards!

It’s that time of year again, the holiday to show others how much you care about them with the timeless gifts of cards… and candy!
Using their creative problem-solving skills - and the engineering design process - your students can invent and design engineered Valentine’s Day cards that hold different kinds of candy. This Fab@School Maker Studio activity encourages students to identify challenges and create models and prototypes to refine their ideas. And, of course there is candy!
The first step in the design process is to define the challenge. Here’s my challenge: Design two different kinds of card that incorporates candy of two different shapes. The first card will hold a lollipop by the stick, and the second to fold open to show a chocolate candy. With these challenges in mind, I can now collect the data.
There are times where I like to measure everything and use numbers to guide my design process, and other times where I’d rather just play around with no limitations. For this project, I am using a ruler because I want to know the size of the candy before determining how it will be “held” on the card.
The stick on my lollipop is 2 inches long, and the chocolate heart is 1 ⅜ inches wide and tall.
Using these measurements I will brainstorm my solution. My favorite way is to doodle with paper and scissors, making quick and simple tests for all sorts of ideas. This way, I can get a lot of simple ideas out quickly, and get a rough idea of what I am going to then design with the Fab@School Maker Studio design tool.
My first card will have two holes that I can poke the lollipop stick though. Based off my measurements, I know that the holes must be less than 2 inches apart so that the stick can fit through both of them to lock it in place. I cut out a simple paper rectangle with scissors and made two slits roughly one inch apart. I can then stick the lollipop into the slits to test my design. Looks like it works!
The second card is a lot of fun. I wanted a folding design with the chocolate inside, but the card couldn’t close completely because the chocolate candy was too thick. I solved this challenge by cutting a hole through the top half of the card, so the candy is visible when the card is both open and closed!
If your student’s don’t like their draft? That’s okay! They’ll learn something new with each prototype they make, so encourage them to have fun and create! When a student is ready, jump on over to Fab@School Maker Studio to create a digitally fabricated version.
Now it is time for the development work! Using the math tools found within Fab@School Maker Studio, I am able to accurately plan for scale, length, and size.
For the lollipop card, I’m starting with a 4 by 6 inch rectangle, which was created with the Shape Tool. I then place two circles for the holes that the stick will poke through. They are not positioned the exact same as my prototype, but I am placing the holes less than 2 inches apart, so it’s okay! I can now decorate the rest of my card with Library images and the Text tool. Done!
The folding card is created with two congruent rectangles that have been snapped together with the Magnetize Tool so that they create a fold in the middle. I then place a heart shape with the Shape Tool and size it so that the 1 ⅜ inch wide chocolate can fit through when the card is folded. Once the design has been decorated, it’s ready to print and fabricate!
This activity is a fun way for your students to experience the engineering design process - more specifically working with prototypes. Encourage your students to share their engineering solutions with the rest of the class! What kinds of cards can you and your students create? Tweet your photos at @FableLearn using the hashtag #FabMakerStudio.
But wait, there's more! This Fab@School Maker Studio activity is aligned to the Next Generation Science Standards. This activity reinforces the standards K-2-ETS1-1, K-2-ETS1-2, and 3-5 ETS1-1, highlighting the process of defining and designing for challenges, and refining ideas through drafts, models, and prototypes.
How is your classroom using Fab@School Maker Studio? We'd love to share YOUR tips and ideas! For more FabFriday posts, click here. Send your photos to info@FableVisionLearning.com or Tweet them with the hashtag #FabMakerStudio for a chance to have them featured on the next FabFriday!

FabFriday: Engineering with Classroom Materials
Welcome to FabFriday, a blog series that highlights tips and tricks for using Fab@School Maker Studio. Fab@ School Maker Studio is a web-based digital fabrication software tool that creates a more accessible, comfortable onramp for teachers to introduce STEM learning to their students. Each week we'll be posting ideas about using different materials, design tips, and construction techniques to help you offer even more fab learning to your students.

Paperclip? Check!
Straw? Check!
Popsicle stick? Check!
Wondering about this week’s FabFriday checklist? Check!
In past FabFriday posts, we’ve explored different techniques such as working with shapes, adding color, and learning about different kinds of paper. While paper construction is versatile and surprisingly robust, with a little creativity it’s possible to engineer even more, like inventions that move, animate, and go places, by using materials found in your classroom!
Fasteners: Brads, Paper Clips, Staples, Binder Clips

There are all sorts of fasteners that come in handy when engineering Fab@School Maker Studio projects. Brads (brass paper fasteners) are great for linking pieces of paper through a shared hole, and you can even create rotating or hinging parts. Paper clips can be used to join edges of paper, add weight, and when bent can be used to create unique metal elements. Staples are another way to join together paper, especially in a design that requires a lot of strength.
I used paper clips when designing my trebuchet catapult, bending them around to create a release pin on the end of the throwing arm.

Engineering in Action
Fab@School Maker Studio was demonstrated at the 2016 National Technology Leadership Summit in Washington, DC during a Making & Storytelling workshop.

Participants were introduced to the linear motor invention kit developed and piloted in the Curry School of Education at the University of Virginia and in the Laboratory School for Advanced Manufacturing. Through this activity, workshop attendees used laser cut images - created in and exported through Fab@School- to construct a moving articulated figure that expanded upon the paper version.
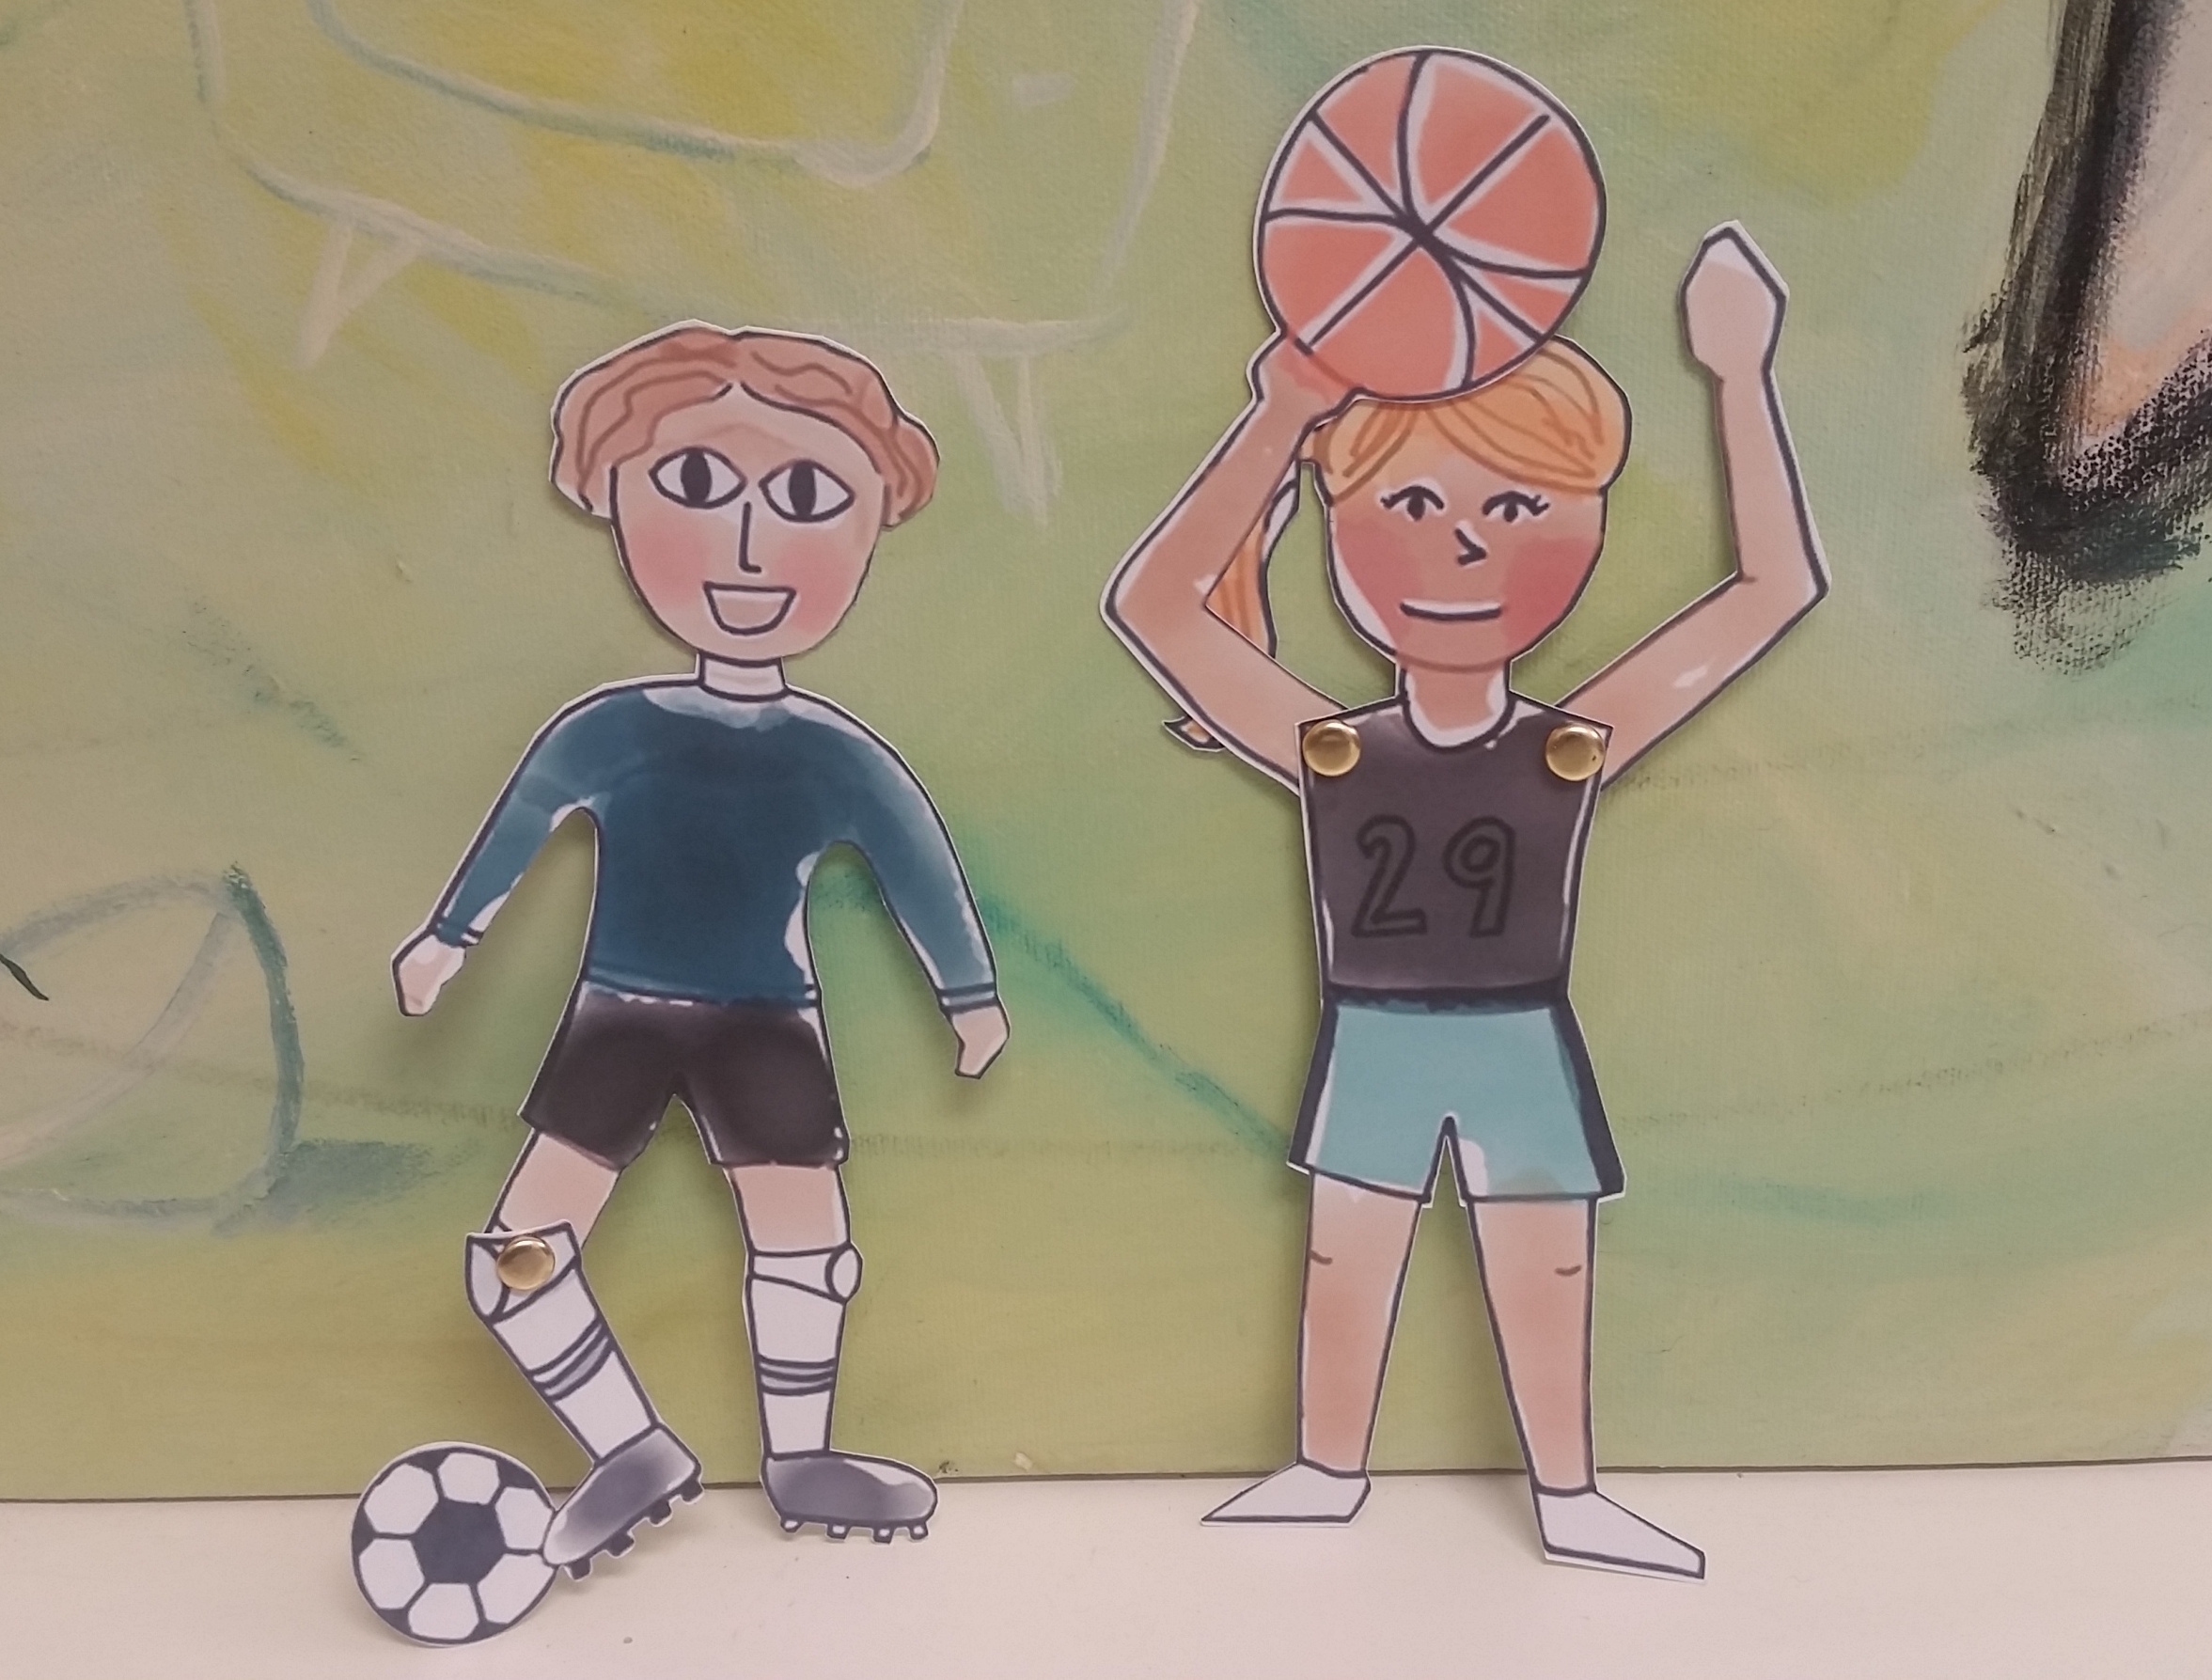
Give it a try! These paper figures use brads as joints so the soccer player can kick and the basketball player can move both her arms and make the shot! Hop into Fab@School Maker Studio and try this project with library images.
Supports: Paper/Plastic Straws, Popsicle Sticks, Splints, Dowels
If there is something that you want to build that is challenging to construct entirely out of paper, try and find materials that you can use to strengthen it. Popsicle sticks and wood splints can be used as ribs in between layers of paper to create thin and strong constructions, as well as for constructing frames to build off of.
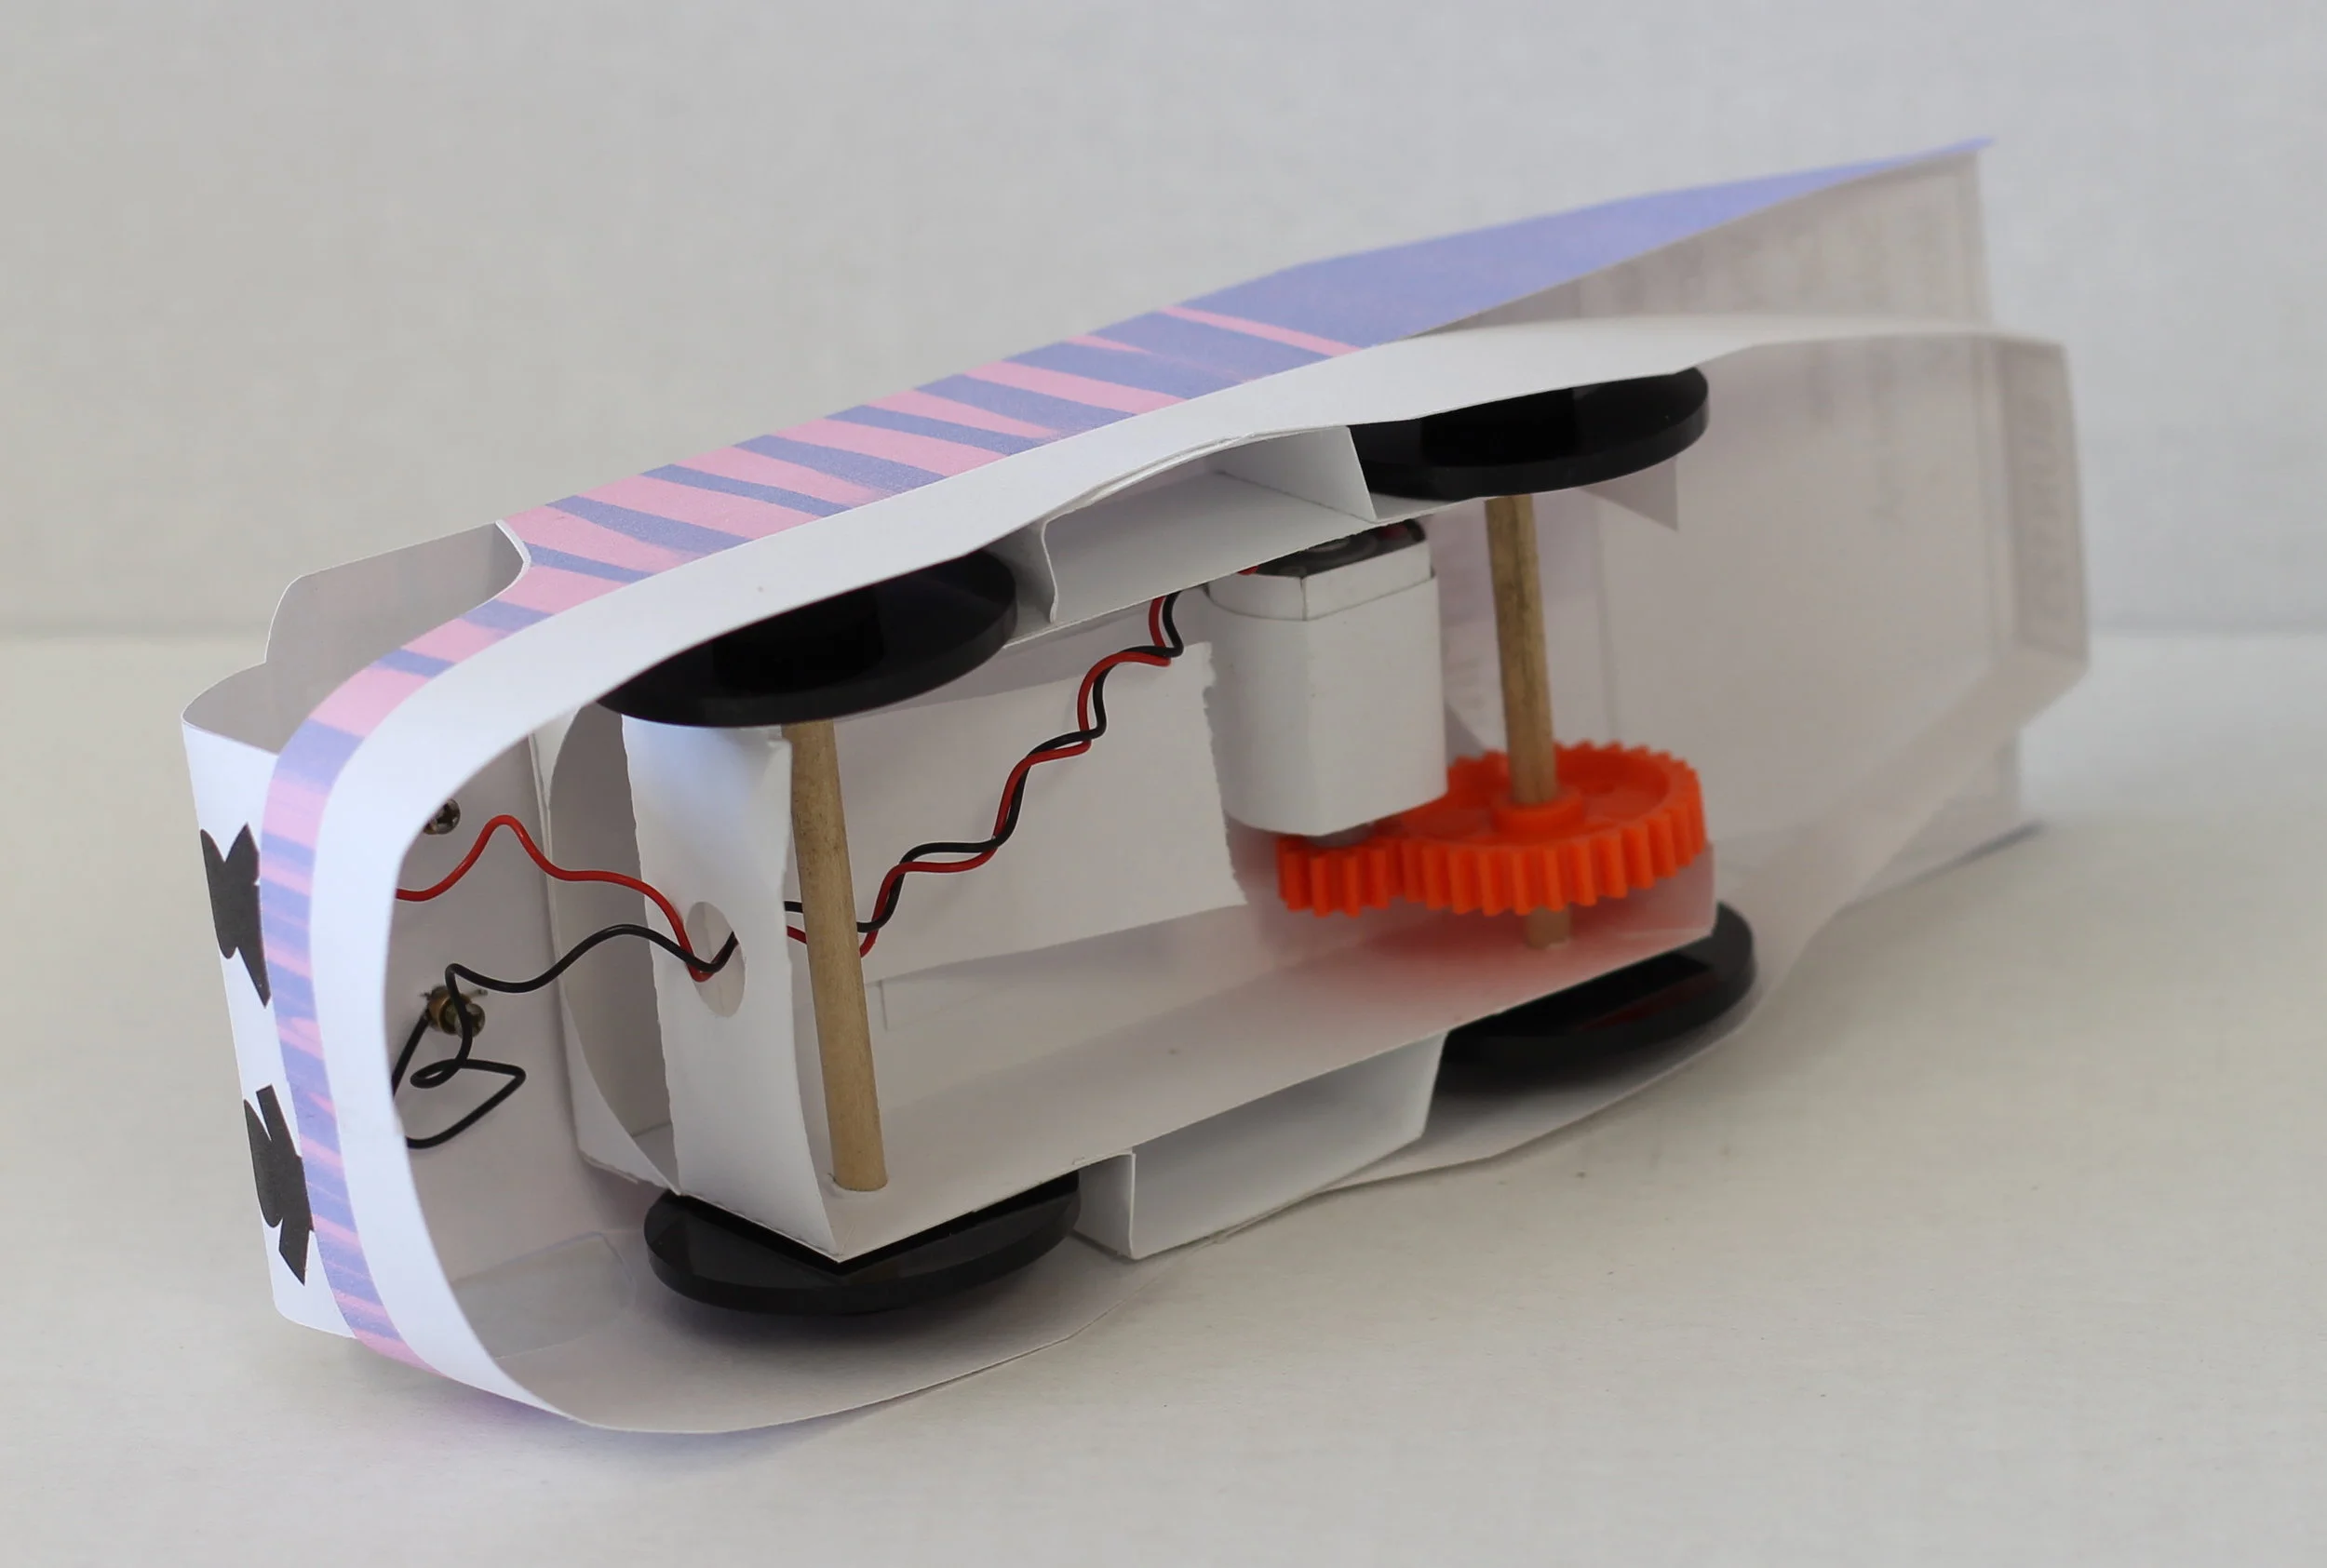
Straws and dowels are fantastic tubular supports that are light and strong. They also make great axles for wheels, gears, and lever fulcrums. Check out the dowels in the underbelly of this STEAM-Infused STELLA Solar car. This construction allows the wheels to freely rotate while remaining very strong.

Try combining all or some of these techniques together to fully utilize all of your resources! I used both paper straws and brads to construct this wind-powered pinwheel. What can you combine together with Fab@School Maker Studio?
Look around your classroom and see what ideas spring up from your surroundings! A designer’s environment is a constant inspiration, and finding new materials fuels the inventiveness of creativity.
In future posts, we'd love to share YOUR tips and ideas about how you’re using Fab@School Maker Studio. For more FabFriday posts, click here.
Send your photos to info@FableVisionLearning.com for a chance to have them featured on the next FabFriday!

FabFriday: Explore More Construction Materials!

Welcome to FabFriday, a blog series that highlights tips and tricks for using Fab@School Maker Studio. Fab@ School Maker Studio is a web-based digital fabrication software tool that creates a more accessible, comfortable onramp for teachers to introduce STEM learning to their students. Each week we'll be posting ideas about using different materials, design tips, and construction techniques to help you offer even more fab learning to your students. In future posts, we'd love to share YOUR tips and ideas about how your'e using Fab@School Maker Studio. For more FabFriday posts, click here.

Fab@School Maker Studio provides engaging digital fabrication/desktop manufacturing tools where elementary and middle school students can make, test, and revise 2D designs, pop-ups, 3D objects, and working machines as they learn science, technology, engineering, and math concepts in a meaningful context. Fab@School Maker Studio uses paper for most activities, allowing for a fast-paced and low-cost design experience. However, not all papers are created equal! Just like how a painter can choose between a wide variety of oils, acrylics, and watercolors, a Fab@School engineer has many choices of building materials. Let’s explore how you can use these materials to their greatest advantage and design more complex constructions!

Copy Paper
This thin white paper is most commonly used in printers. While it is not strong enough for most Fab@School projects, it can be used for prototyping to experiment with your cut, fold, and tab lines before switching to a special sheet of colored or printed paper. Thin paper is also very helpful when making windmills, airplanes, or other projects where a lighter weight construction is needed.

Check out all of these activities, which have all been created from 65lb Cardstock.
65lb Cardstock
65lb cardstock comes in a wide variety of colors, and is a fantastic mix between structural rigidity and flexibility. It is perfect for 2D, Pop-Up, and 3D construction, as well as projects with simple moving parts. It comes in packs of individual or mixed colors, making it easy to bring a splash of color to your creation. I recommend using this material most often, as it is very diverse.

This trebuchet catapult was designed with 110lb cardstock to survive the forces of the counterweight and throwing arm!
110lb cardstock
For when 65llb cardstock doesn’t quite cut it, 110lb cardstock opens up the opportunity for stronger construction, more complicated designs, and longer lasting moving parts. While it does not come in as wide of a variety of colors, it makes up for it in strength. Combine it with 65lb cardstock to reinforce critical pieces of your design, or create an entire model with 110lb cardstock for extra durability.

Pattern and Special Paper
Even decorative papers provide a potential engineering decision! You can use patterned or colored paper to customize and differentiate different parts of your design, or to make your project look more realistic! I used metallic-colored cardstock to make these cars look like they have a shiny coat of paint, and vellum paper was used to create transparent windows!

Do More With Lamination
You can combine all of these different weights of paper to customize your projects! Try gluing entire layers of paper together to create a thicker construction, or combine 65lb and 110lb cardstock to create a structural base with colored cardstock layered on top.
You can also pinpoint sections of your design that need more rigidity and layer 110lb cardstock into just these areas. Check out this STEAM-Infused STORM electric motorcycle made using lamination techniques. 110lb cardstock was used to construct the base of the motorcycle body, and then a layer of colored 65lb cardstock was glued on top to simultaneously fortify and decorate the motorcycle.
Sometimes I choose which materials to use in order to achieve a certain goal, and other times I decide what I want to build based on available materials. Experiment with as many kinds of paper and cardstock as you can, in whichever order your creative mind flows!
How are you using different kinds of paper with your Fab@School creations? In future posts, we'd love to share YOUR tips and ideas about how your'e using Fab@School Maker Studio. Send your photos to info@FableVisionLearning.com to have them featured in an upcoming FabFriday! For more FabFriday posts, click here.

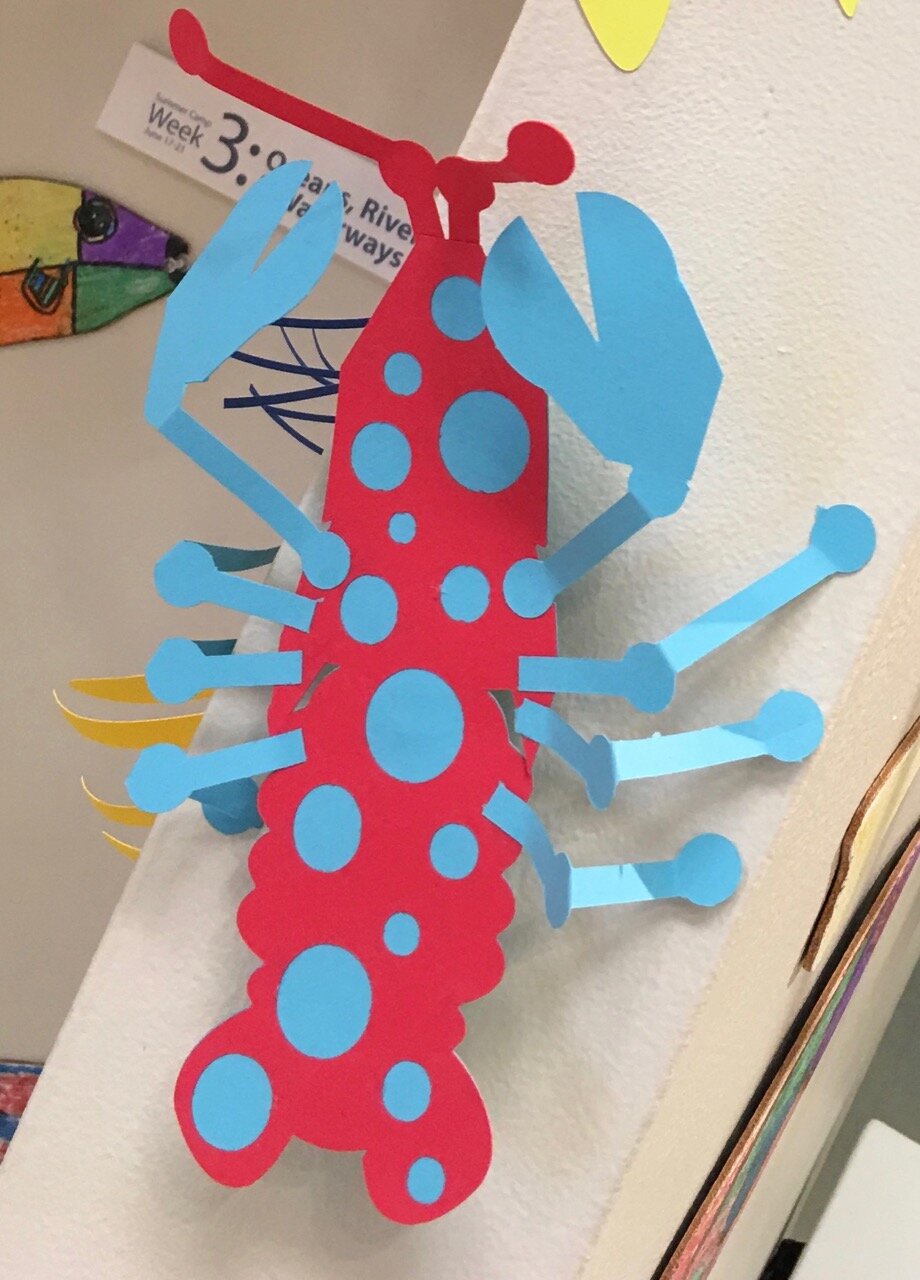
FabFriday: I’m Thankful For… Shapes!
Welcome to FabFriday, a blog series that highlights tips and tricks for using Fab@School Maker Studio. Through this series, we will focus on different materials, design tips, and construction techniques to make the most out of your paper engineering experience. For more FabFriday posts, click here.
Shapes comprise almost everything you can see! Just look around you, your classroom, or your entire town. Which shape do you see the most? Breaking down everyday items into their base shapes is a fun and eye-opening exercise. You can also imagine and build with shapes!
I love shapes - you could say I am thankful for shapes! So, this Thanksgiving I am celebrating by making a festive turkey out of shapes with Fab@School Maker Studio.
Let’s begin by making a circle with the Shape Tool for the body.

Next is the turkey’s neck, which I design by combining two circles with the Weld Tool and the Edit Points Tool.


Now I need to make the face! It’s a lot of fun to experiment with how to make different expressions with shapes. Here I use a triangle for the beak, two circles for the eyes, and an oval for the “snood” draped over the turkey’s beak.

Now what turkey is complete without their magnificent feathers? I’m going to make the feathers for my turkey by creating an oval and stretching one control point with the Edit Points Tool to make a long feather-like shape.


I layered all of my shapes together to see what my turkey is going to look like once it is fabricated and assembled. When I turn on the X-Ray Tool, I can see how the overlapping shapes cause all of the red cut lines to intersect. If I were to send this project to the Silhouette cutter like this, it would cut the paper into tiny pieces!

In order to send my turkey to a Silhouette cutter, I’ll have to separate the shapes onto pages that can be cut. I made a lot of copies of the face shapes so I don’t waste paper on such tiny parts. Try using only a few sheets of paper to make enough eyes, beaks, or other parts for your entire class!


I can now fabricate my shapes to create a Fab-tastic Thanksgiving turkey! I fastened the body and neck together with a brad so that my final model can move!


How are you using shapes in your Fab@School Maker Studio creations? Share how you used these tips! Send your photos and ideas to info@FableVisionLearning.com, for a chance to have them featured in an upcoming FabFriday!

FabFriday: Add a Splash of Color to your Fab@School Maker Studio Projects!

Welcome to FabFriday, a blog series that highlights tips and tricks for using Fab@School Maker Studio. Through this series, we will focus on different materials, design tips, and construction techniques to make the most out of your paper engineering experience.
Color is a great way to add a creative flair to your Fab@School Maker Studio projects. There are plenty of colorful techniques to try, all with their own advantages.
Colored Cardstock
Cardstock paper comes in a wide variety of colors. Try fabricating ready-made and custom creations in your favorite colors. This is good for whenever your project has a large areas of flat color, or a simple color scheme. Layering and mixing different colors is a lot of fun, so make sure you have lots of different colors to experiment with!


Try cutting your page into two colors when fabricating to make parts in two colors at the same time! How can you position cut shapes in your workspace so that you can cut two colors at once?

Printing with Registration Marks
You can also print Fab@School Maker Studio projects before fabricating. This is key when including Library images and imported pictures in your projects. Remember to use registration marks when printing and fabricating. Learn more about registration marks with our Fabrication Quick Start Guide.


I used printing with registration marks to create this pizza box for Arno's Pizza. This Pizza Troll is from the award-winning math and logic game Zoombinis, developed in partnership with TERC, a not-for-profit leader in K-12 math and science education, the Learning Games Network, a not-for-profit game company, and FableVision Studios.
Hand Coloring
What’s more fun that drawing all over your creations? Give your projects a unique touch with pens, colored pencils, or markers. After all, it is paper! You can doodle on your prototypes to get new ideas, or add the finishing touch to completed projects!

Combine all Three!
Can you design a Fab@School Maker Studio creation that uses printed pictures, colored paper, and your own drawing? Combining different techniques and trying new things is Fab-tastic!

How are you adding color to your Fab@School Maker Studio creations? Share how you used these tips! Send your photos and ideas to info@FableVisionLearning.com, for a chance to have them featured in an upcoming FabFriday!