FableVision Learning Spotlight Blog
Categories
- Animation-ish 42
- Books 21
- Civics! 2
- Classroom Spotlight 17
- Conferences and Events 20
- Creative Educator 3
- Creativity 25
- Distance Learning 13
- Dot Day 22
- FabClassroom 28
- FabFriday 19
- FabMaker Studio 66
- FabMaker Studio Classroom 13
- FableFive 7
- FableVision Games 3
- Free Educator Resources 36
- HUTCH 1
- Home Activities 5
- In the Classroom 34
- In the News 11
- International Dot Day 23
- Ish 1
- Library 1
- Mapping the World by Heart 7
- Paul Reynolds 10
- Peter H. Reynolds 54
- Professional Development 9
- STEM/STEAM 20
- Storybook Academy 2
- Teacher Spotlight 14
- The Dot 17
- The North Star 2
- Words and Their Stories 1
- Zoombinis 3

FabFriday: Engineering with Classroom Materials
Welcome to FabFriday, a blog series that highlights tips and tricks for using Fab@School Maker Studio. Fab@ School Maker Studio is a web-based digital fabrication software tool that creates a more accessible, comfortable onramp for teachers to introduce STEM learning to their students. Each week we'll be posting ideas about using different materials, design tips, and construction techniques to help you offer even more fab learning to your students.

Paperclip? Check!
Straw? Check!
Popsicle stick? Check!
Wondering about this week’s FabFriday checklist? Check!
In past FabFriday posts, we’ve explored different techniques such as working with shapes, adding color, and learning about different kinds of paper. While paper construction is versatile and surprisingly robust, with a little creativity it’s possible to engineer even more, like inventions that move, animate, and go places, by using materials found in your classroom!
Fasteners: Brads, Paper Clips, Staples, Binder Clips

There are all sorts of fasteners that come in handy when engineering Fab@School Maker Studio projects. Brads (brass paper fasteners) are great for linking pieces of paper through a shared hole, and you can even create rotating or hinging parts. Paper clips can be used to join edges of paper, add weight, and when bent can be used to create unique metal elements. Staples are another way to join together paper, especially in a design that requires a lot of strength.
I used paper clips when designing my trebuchet catapult, bending them around to create a release pin on the end of the throwing arm.

Engineering in Action
Fab@School Maker Studio was demonstrated at the 2016 National Technology Leadership Summit in Washington, DC during a Making & Storytelling workshop.

Participants were introduced to the linear motor invention kit developed and piloted in the Curry School of Education at the University of Virginia and in the Laboratory School for Advanced Manufacturing. Through this activity, workshop attendees used laser cut images - created in and exported through Fab@School- to construct a moving articulated figure that expanded upon the paper version.
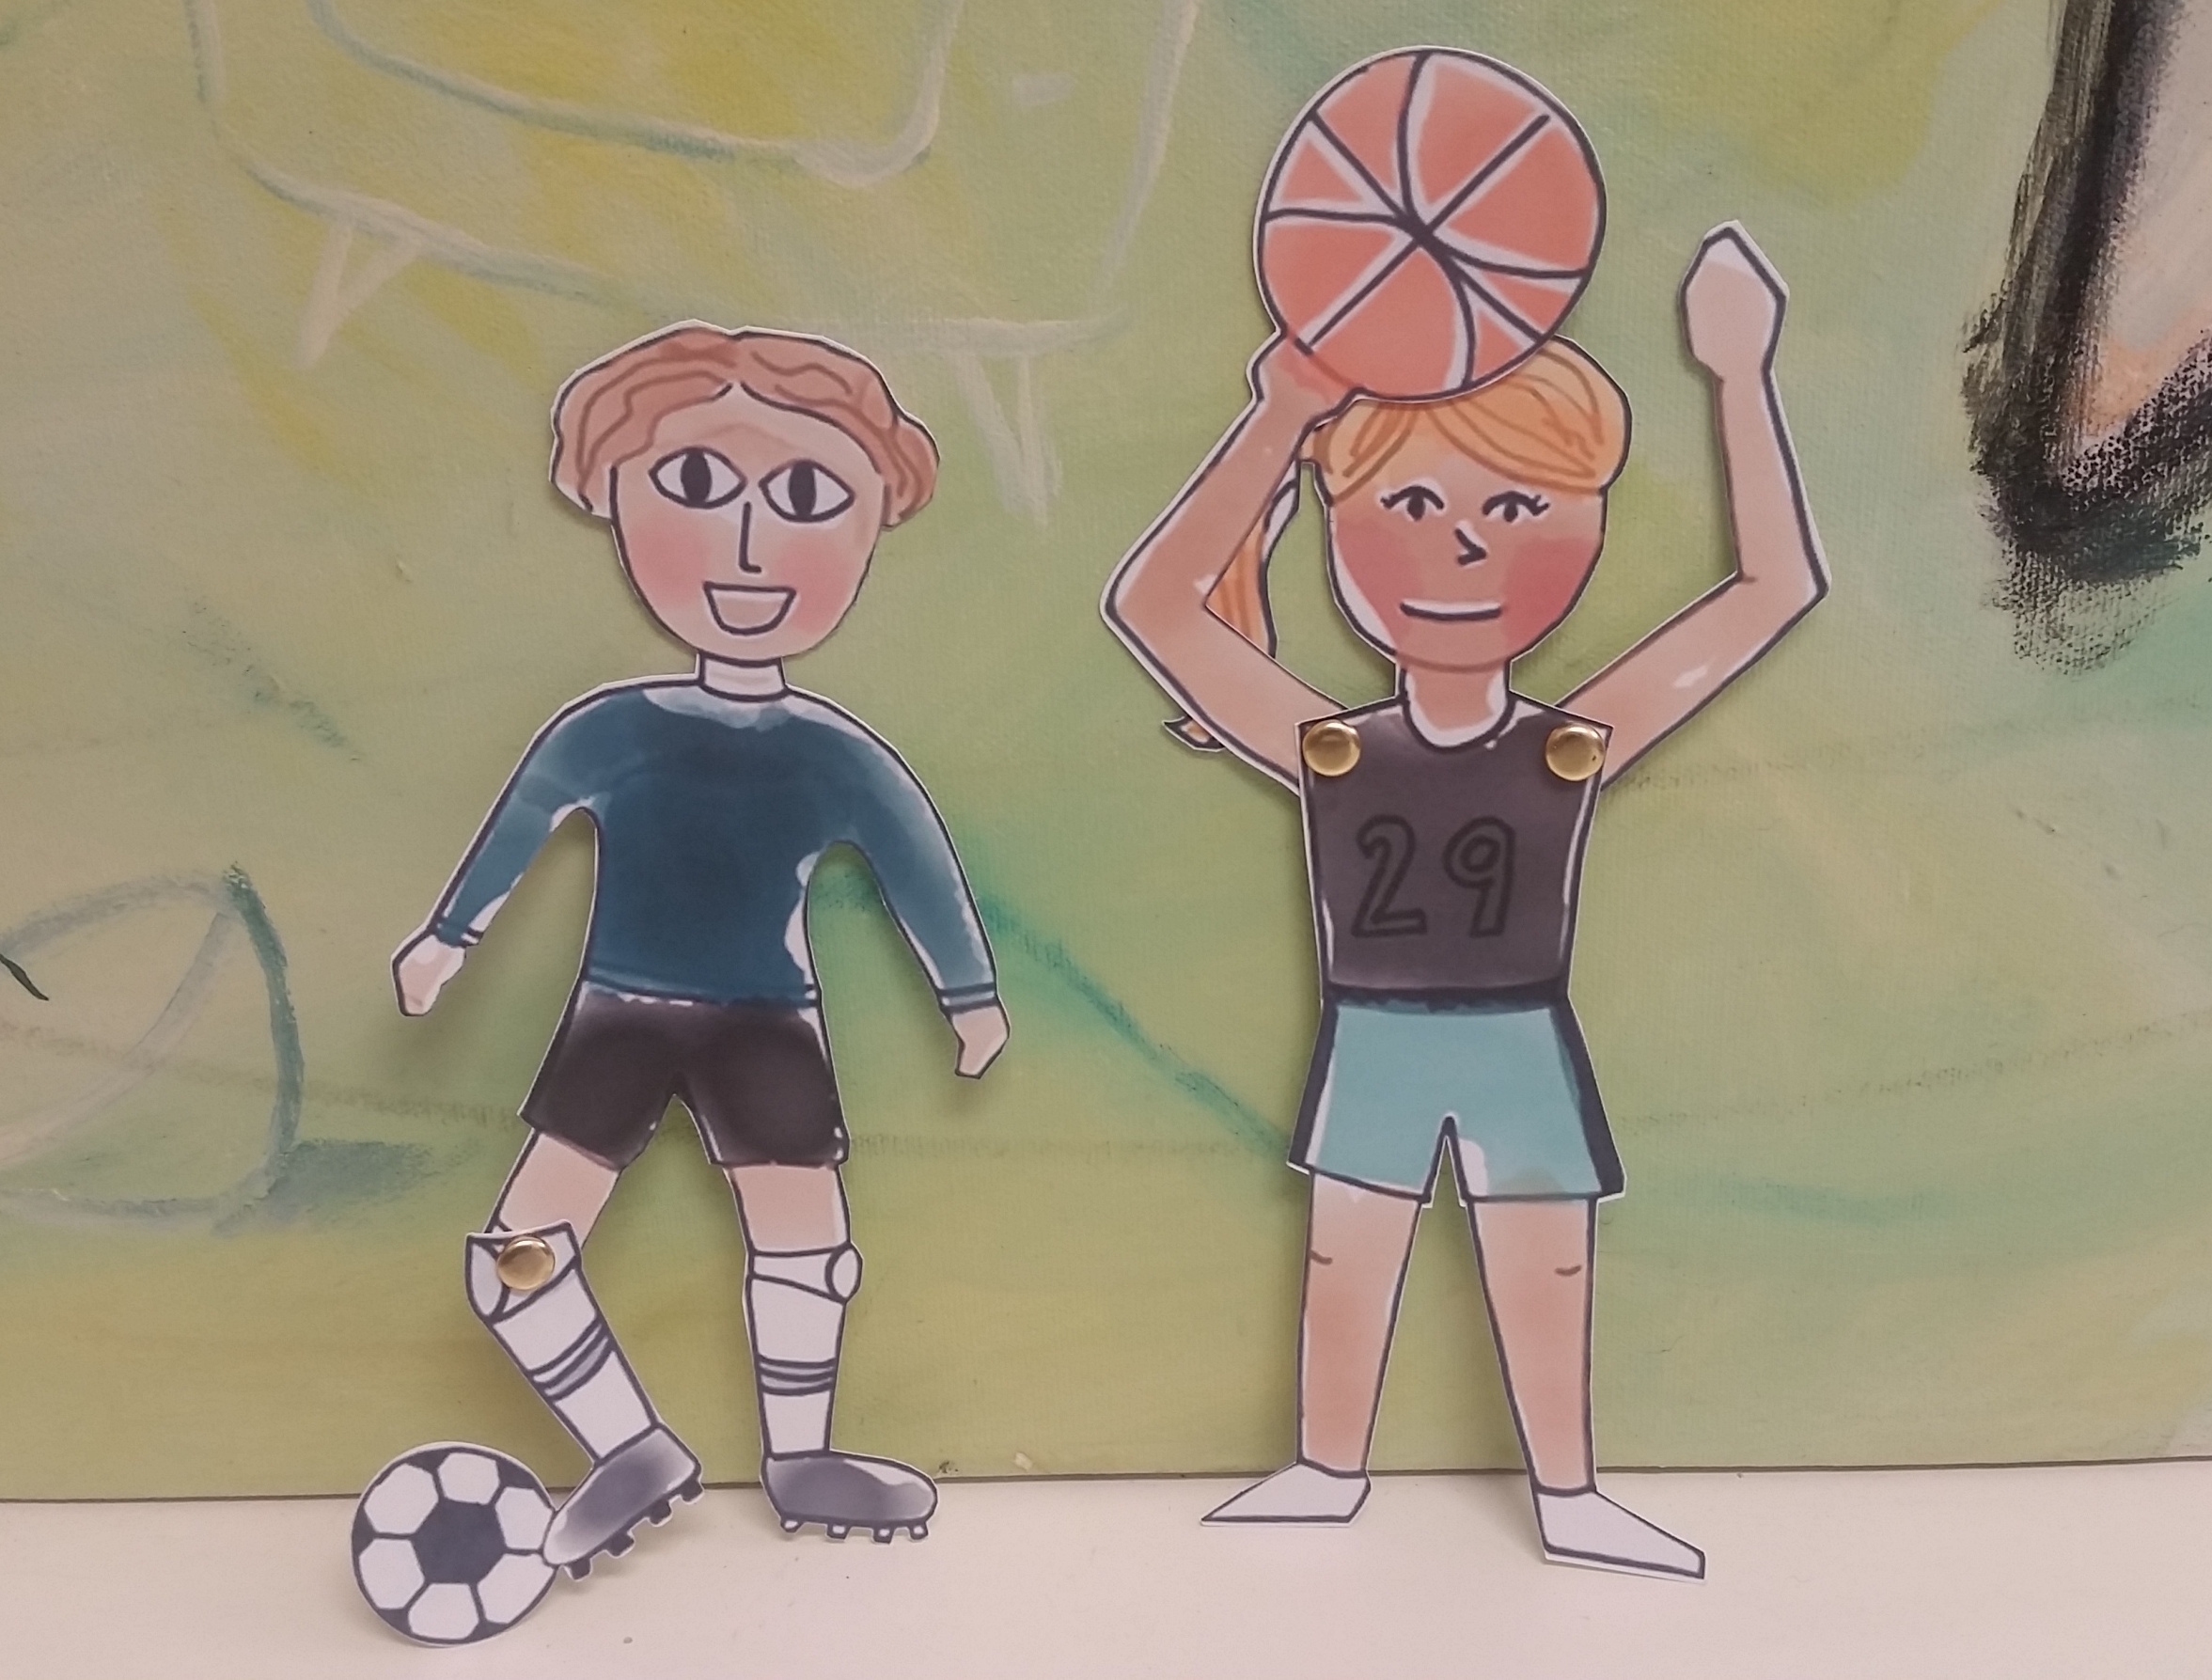
Give it a try! These paper figures use brads as joints so the soccer player can kick and the basketball player can move both her arms and make the shot! Hop into Fab@School Maker Studio and try this project with library images.
Supports: Paper/Plastic Straws, Popsicle Sticks, Splints, Dowels
If there is something that you want to build that is challenging to construct entirely out of paper, try and find materials that you can use to strengthen it. Popsicle sticks and wood splints can be used as ribs in between layers of paper to create thin and strong constructions, as well as for constructing frames to build off of.
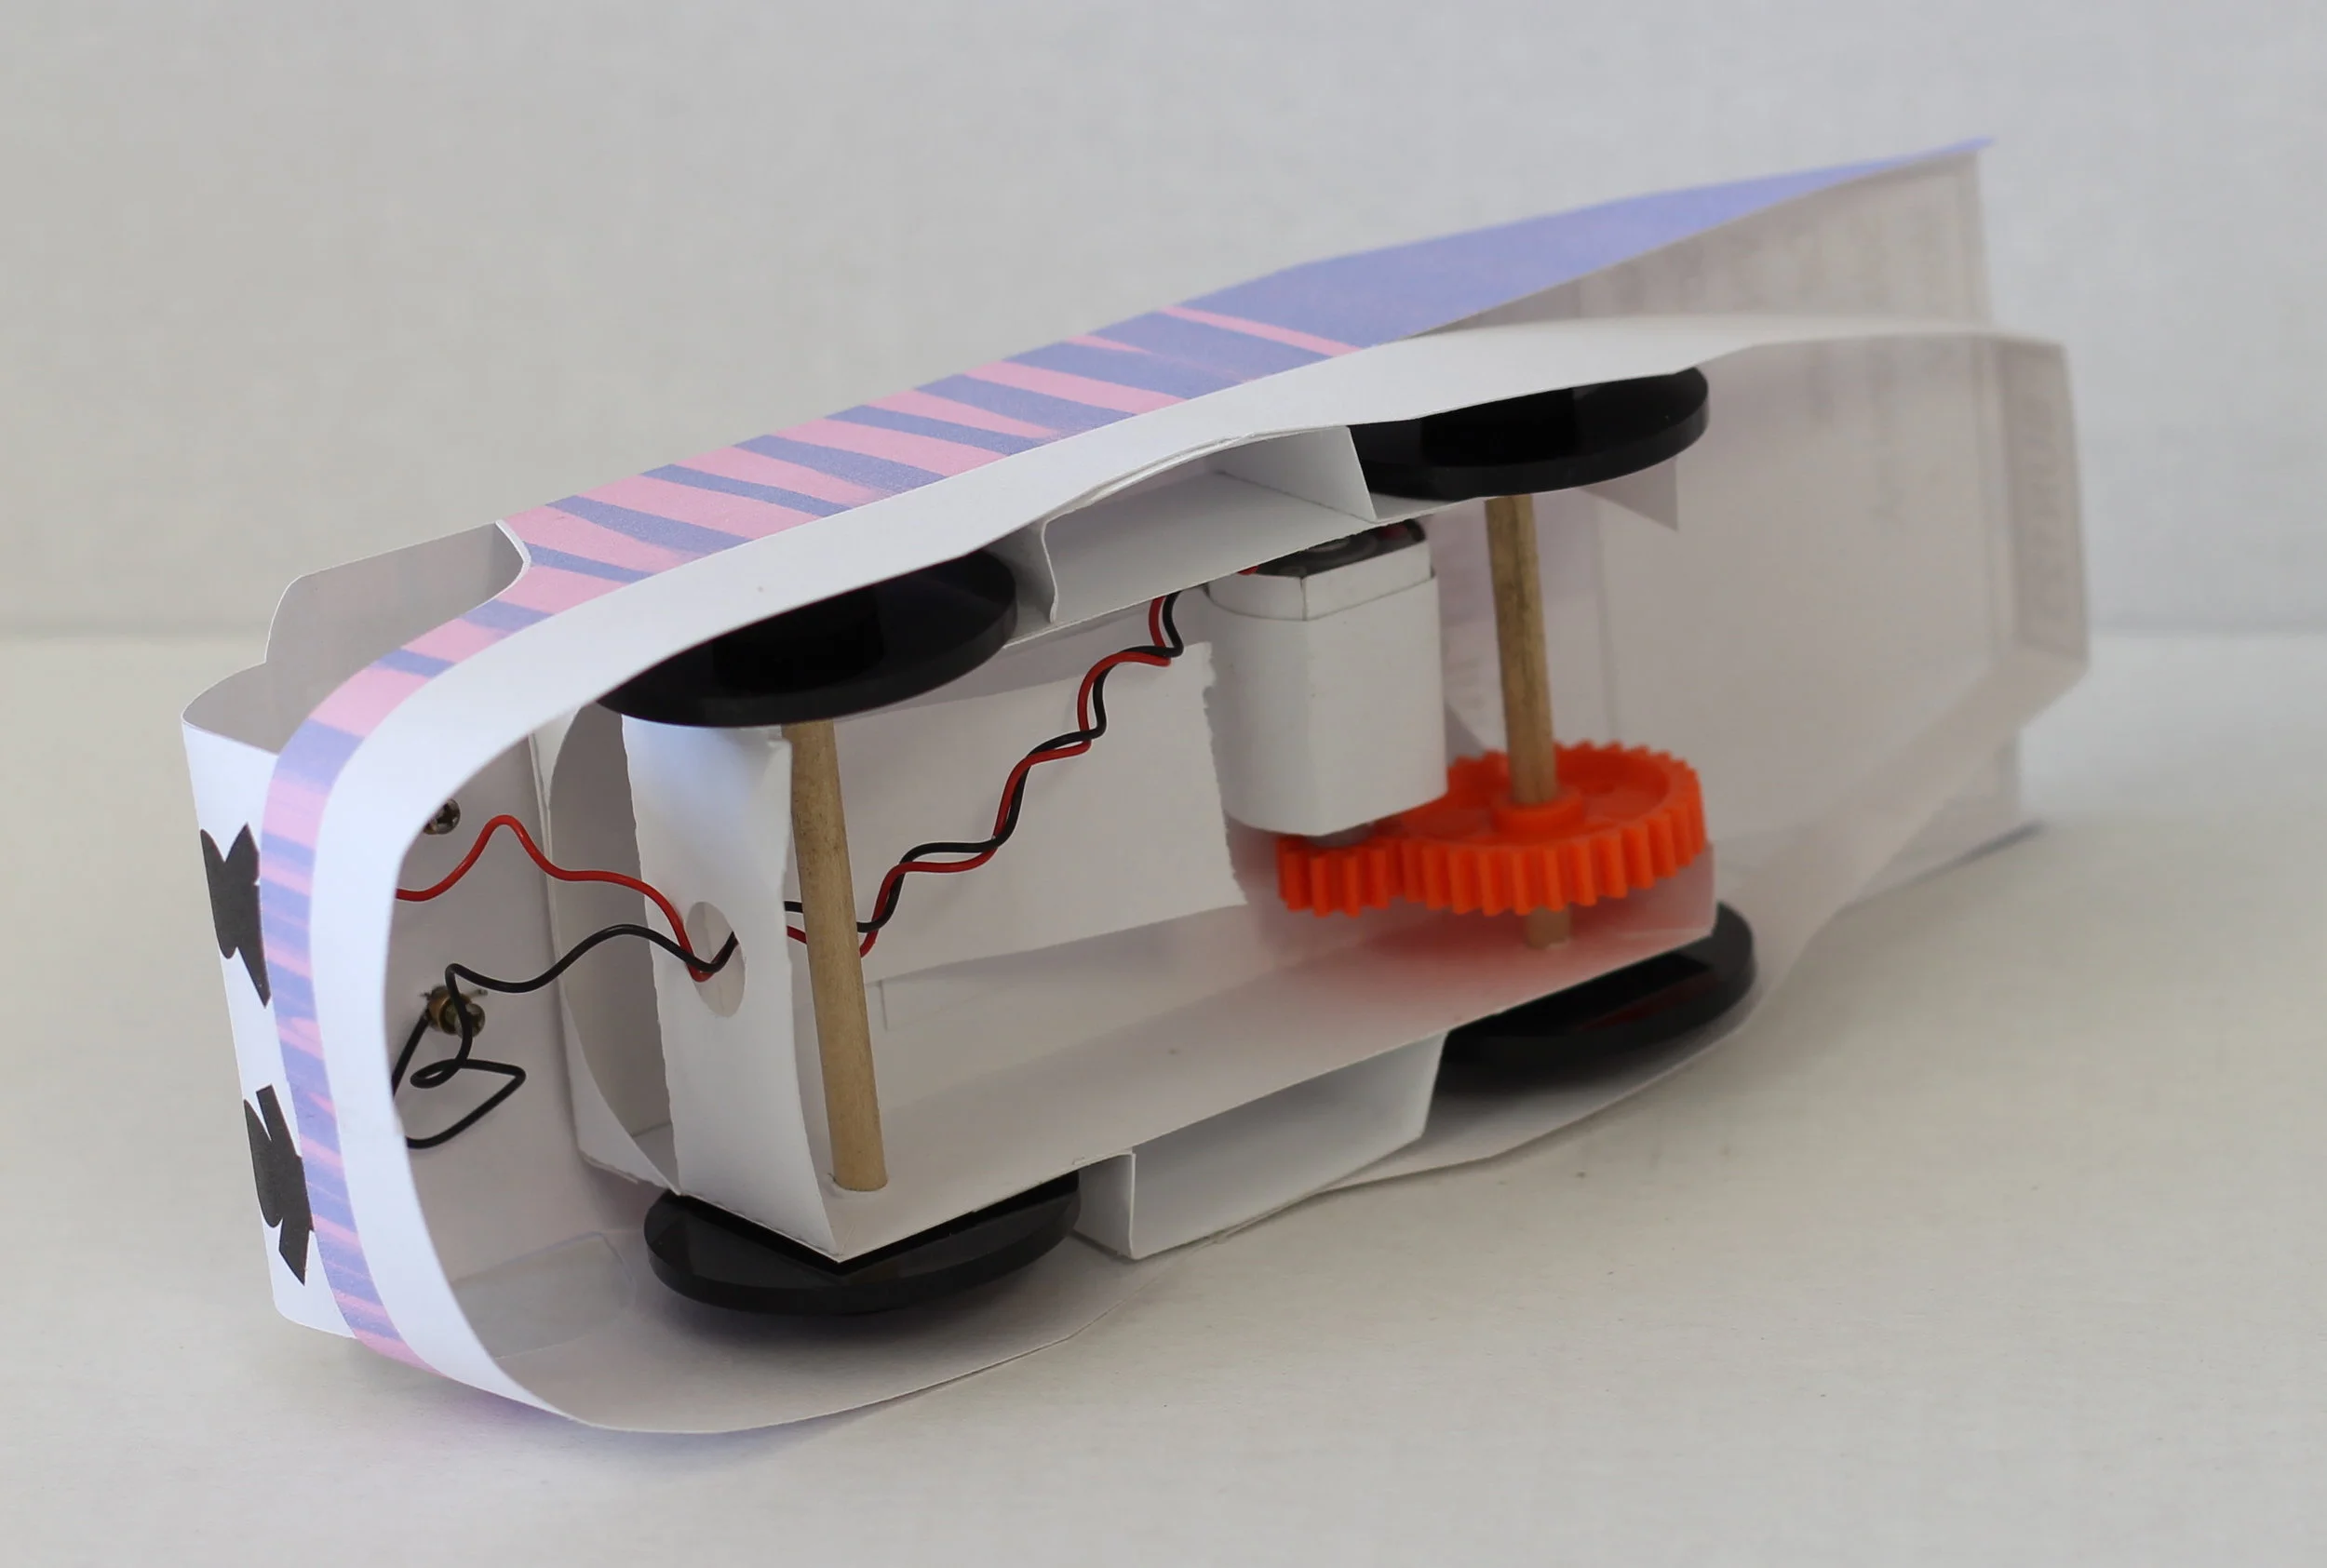
Straws and dowels are fantastic tubular supports that are light and strong. They also make great axles for wheels, gears, and lever fulcrums. Check out the dowels in the underbelly of this STEAM-Infused STELLA Solar car. This construction allows the wheels to freely rotate while remaining very strong.

Try combining all or some of these techniques together to fully utilize all of your resources! I used both paper straws and brads to construct this wind-powered pinwheel. What can you combine together with Fab@School Maker Studio?
Look around your classroom and see what ideas spring up from your surroundings! A designer’s environment is a constant inspiration, and finding new materials fuels the inventiveness of creativity.
In future posts, we'd love to share YOUR tips and ideas about how you’re using Fab@School Maker Studio. For more FabFriday posts, click here.
Send your photos to info@FableVisionLearning.com for a chance to have them featured on the next FabFriday!

FabClassroom: Young engineers at CU Science Discovery light up the holidays with Fab@School Maker Studio

At FableVision Learning we are so excited to hear how our creative classroom tools are being used. Stacey Forsyth, Ph.D., Director, CU Science Discovery, recently shared a bit about some young engineers who used Fab@School Maker Studio to design pop-up cards.
Over the holiday break, some creative young designers spent two days at CU Science Discovery in Boulder, Colorado, designing electrifying holiday cards.
First, the students used FableVision Learning’s Fab@School Maker Studio to design cards that could be cut and folded in specific ways.


Then by sending the designs to a Silhouette Cameo, a digital craft cutter, they were able to cut and perforate their designs.
After a few introductory activities to explore the basics of circuits, designers used copper tape and LEDs to light up their cards! For some tips on creating paper circuits, check out this tutorial from our friends at Spark Fun!


After designing, cutting, folding, and lighting the lights, students had a chance to add on any final touches using an assortment of colorful craft materials.


Their finished products were simply illuminating!


How are your student’s using Fab@School Maker Studio? We would love to hear from you. Send an email to the team at info@fablevisionlearning.com.

FabFriday: Explore More Construction Materials!

Welcome to FabFriday, a blog series that highlights tips and tricks for using Fab@School Maker Studio. Fab@ School Maker Studio is a web-based digital fabrication software tool that creates a more accessible, comfortable onramp for teachers to introduce STEM learning to their students. Each week we'll be posting ideas about using different materials, design tips, and construction techniques to help you offer even more fab learning to your students. In future posts, we'd love to share YOUR tips and ideas about how your'e using Fab@School Maker Studio. For more FabFriday posts, click here.

Fab@School Maker Studio provides engaging digital fabrication/desktop manufacturing tools where elementary and middle school students can make, test, and revise 2D designs, pop-ups, 3D objects, and working machines as they learn science, technology, engineering, and math concepts in a meaningful context. Fab@School Maker Studio uses paper for most activities, allowing for a fast-paced and low-cost design experience. However, not all papers are created equal! Just like how a painter can choose between a wide variety of oils, acrylics, and watercolors, a Fab@School engineer has many choices of building materials. Let’s explore how you can use these materials to their greatest advantage and design more complex constructions!

Copy Paper
This thin white paper is most commonly used in printers. While it is not strong enough for most Fab@School projects, it can be used for prototyping to experiment with your cut, fold, and tab lines before switching to a special sheet of colored or printed paper. Thin paper is also very helpful when making windmills, airplanes, or other projects where a lighter weight construction is needed.

Check out all of these activities, which have all been created from 65lb Cardstock.
65lb Cardstock
65lb cardstock comes in a wide variety of colors, and is a fantastic mix between structural rigidity and flexibility. It is perfect for 2D, Pop-Up, and 3D construction, as well as projects with simple moving parts. It comes in packs of individual or mixed colors, making it easy to bring a splash of color to your creation. I recommend using this material most often, as it is very diverse.

This trebuchet catapult was designed with 110lb cardstock to survive the forces of the counterweight and throwing arm!
110lb cardstock
For when 65llb cardstock doesn’t quite cut it, 110lb cardstock opens up the opportunity for stronger construction, more complicated designs, and longer lasting moving parts. While it does not come in as wide of a variety of colors, it makes up for it in strength. Combine it with 65lb cardstock to reinforce critical pieces of your design, or create an entire model with 110lb cardstock for extra durability.

Pattern and Special Paper
Even decorative papers provide a potential engineering decision! You can use patterned or colored paper to customize and differentiate different parts of your design, or to make your project look more realistic! I used metallic-colored cardstock to make these cars look like they have a shiny coat of paint, and vellum paper was used to create transparent windows!

Do More With Lamination
You can combine all of these different weights of paper to customize your projects! Try gluing entire layers of paper together to create a thicker construction, or combine 65lb and 110lb cardstock to create a structural base with colored cardstock layered on top.
You can also pinpoint sections of your design that need more rigidity and layer 110lb cardstock into just these areas. Check out this STEAM-Infused STORM electric motorcycle made using lamination techniques. 110lb cardstock was used to construct the base of the motorcycle body, and then a layer of colored 65lb cardstock was glued on top to simultaneously fortify and decorate the motorcycle.
Sometimes I choose which materials to use in order to achieve a certain goal, and other times I decide what I want to build based on available materials. Experiment with as many kinds of paper and cardstock as you can, in whichever order your creative mind flows!
How are you using different kinds of paper with your Fab@School creations? In future posts, we'd love to share YOUR tips and ideas about how your'e using Fab@School Maker Studio. Send your photos to info@FableVisionLearning.com to have them featured in an upcoming FabFriday! For more FabFriday posts, click here.
FableVision Celebrates Universal Children's Day at Bridgewater State University
In a packed auditorium, Paul and Peter H. Reynolds inspired roughly 200 third-graders from Brockton’s Huntington School to make their mark during Bridgewater State University Universal Children’s Day on Nov. 18, 2016.
Following Peter and Paul's presentation and reading of "The Dot," the FableVision Learning crew joined students on the lawn to create a giant dot.

To round out the creative celebration, the team stuck a pose for the Universal Children's Day mannequin challenge.
Learn more about Universal Children’s Day here.
Happy Thanksgiving from the FableVision Learning Team!


It was November 1621 when the newly arrived Pilgrims and the Wampanoag tribe came together
for a celebration of an autumn harvest feast. And so began the complicated story of modern America.

Click this poster for a downloadable version for your classroom!
The beginning of our shared story - penned by bringing together two very different communities at one proverbial table - was underpinned by the 5C’s - communication, collaboration, critical thinking, creativity, and compassion. How differently the future chapters of the American story may have played out if we’d stuck to that framework.
Moving forward, FableVision’s mission is to help steward the next generation of storytellers - here in the U.S. and around globe - to write stories that matter - stories that move. The creative educators we partner with every day know, as we do, that positive, purposeful stories can move the world to a better place.
And so, the FableVision team are giving thanks this week to all our kindred spirits - like you -
who are ready to create bravely with their students. Looking forward to your stories in the coming weeks, months, and years!
Thankful for YOU,
FableVision Learning Team
P.S. Click here to view a special Thanksgiving e-card created by William Levin, our on-the-ground FableVision trainer supporting NYC's District 75's Middle School After School Program. Students at District 75, the largest special needs district in the nation, are enjoying using FableVision's Animation-ish software to share their own #storiesthatmatter.

FabFriday: I’m Thankful For… Shapes!
Welcome to FabFriday, a blog series that highlights tips and tricks for using Fab@School Maker Studio. Through this series, we will focus on different materials, design tips, and construction techniques to make the most out of your paper engineering experience. For more FabFriday posts, click here.
Shapes comprise almost everything you can see! Just look around you, your classroom, or your entire town. Which shape do you see the most? Breaking down everyday items into their base shapes is a fun and eye-opening exercise. You can also imagine and build with shapes!
I love shapes - you could say I am thankful for shapes! So, this Thanksgiving I am celebrating by making a festive turkey out of shapes with Fab@School Maker Studio.
Let’s begin by making a circle with the Shape Tool for the body.

Next is the turkey’s neck, which I design by combining two circles with the Weld Tool and the Edit Points Tool.

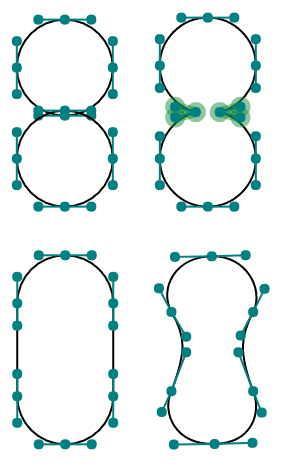

Now I need to make the face! It’s a lot of fun to experiment with how to make different expressions with shapes. Here I use a triangle for the beak, two circles for the eyes, and an oval for the “snood” draped over the turkey’s beak.

Now what turkey is complete without their magnificent feathers? I’m going to make the feathers for my turkey by creating an oval and stretching one control point with the Edit Points Tool to make a long feather-like shape.


I layered all of my shapes together to see what my turkey is going to look like once it is fabricated and assembled. When I turn on the X-Ray Tool, I can see how the overlapping shapes cause all of the red cut lines to intersect. If I were to send this project to the Silhouette cutter like this, it would cut the paper into tiny pieces!

In order to send my turkey to a Silhouette cutter, I’ll have to separate the shapes onto pages that can be cut. I made a lot of copies of the face shapes so I don’t waste paper on such tiny parts. Try using only a few sheets of paper to make enough eyes, beaks, or other parts for your entire class!


I can now fabricate my shapes to create a Fab-tastic Thanksgiving turkey! I fastened the body and neck together with a brad so that my final model can move!


How are you using shapes in your Fab@School Maker Studio creations? Share how you used these tips! Send your photos and ideas to info@FableVisionLearning.com, for a chance to have them featured in an upcoming FabFriday!
FableFive: Leah Garofalo- combining arts and science with a musical flair

Leah Garofalo always approached high school projects with an ambitious sense of creativity. For a ninth grade biology assignment at Monticello High School, she wrote, performed and produced an original song about taxonomy. Years later, The FableVision Learning Team asked her some questions to discover more about the creative process that turned this complicated science topic into music.
1) Can you share a bit about yourself and your school?
At the time I was a tiny 13 year old coming from a middle school where I knew every student and every teacher, heading into the newest, shiniest high school in the county. I was a band geek and that would prove to be my in with new friends and multiple assignments throughout my high school career.
My song writing career didn’t follow me to college, although being a band geek did. I went on to major in mechanical engineering and currently work for a financial firm in Fairfax, Va.
2) What was the inspiration for the Taxonomy song?

Sister Ruby, soundmixer Joe, and Leah Garofalo when the Taxonomy song was being recorded.
I wish I could remember the exact circumstances, but I believe it was just a regular class project involving the topics at the time. Instead of doing a typical boring report or trifold science fair presentation, I decided to go all out and write a song. My dad was and still is a professor at UVA in the math-ed department. At that time I remember his main focus was (and again, really still is) creative teaching methods to get students more engaged. Coming up with intricate powerpoint presentations, games, and videos was always my go-to for class projects.
It was a no-brainer once we were given free rein on the assignment about a biology topic of our choice that it would be some sort of audio or visual presentation.
3) How did you craft the lyrics? I noticed you have a backup singer, can you share a bit about the collaboration?

Leah Garofalo and her sister/backup singer Ruby
I knew I would have to give some background information on the scientist as well as a rundown of the classification scheme, complete with an example. If I can recall correctly, "Yellow Submarine" was chosen pretty early on in the lyric writing process, not only because I was raised on classic rock, but because I said to myself, “Ok, this guy (Linnaeus) was born in the town of Uppsala” and immediately thought wow that’s just like “in the town where I was born.” And soon the rest of the song started flowing.
My backup singer is my little sister who was 7 at the time. Best collaborator ever.
4) What is next?
What came next, still in 9th grade, was a music video with my friend Cydney for our world history class. It was a 6 minute song comprised of "Ice Ice Baby" by Vanilla Ice followed by "Girls" by the Beastie Boys. Not only did we play and record the music, but we again rewrote the lyrics to both songs to give a brief history of the world. The video was us singing along to our recording and dancing in my dad’s office with my sister making a cameo in it as well.
In 12th grade, as a final project in calculus, some friends and I wrote a song called "Werewolves of Blundin" about our teacher to the tune of "Werewolves of London." He was nice enough to accept the work even though the amount of math included was really only for rhyming purposes.
A parody of the Warren Zevon song, Werewolves of London. This uses the famous UVA quarterback, Matt Brent Blundin as its protagonist. He is a werewolf in two ways, first, he thirsts for blood and he's a calculus teacher, second he is a two-sport athlete, basketball and football.
5) Tell us about you now? How did your creative upbringing influence your career path?
Unfortunately as a financial professional, I don’t have many opportunities to create songs or music videos anymore. However, I do think that by doing projects such as these and countless other intricate PowerPoints and interactive presentations has helped me become someone who thinks out of the box. I am able to approach problems and situations them in a much different manner than providing just traditional solutions. I certainly credit my upbringing and desire to be different to most of my successes.
Are you or someone you know, a student or educator making their mark in a creative way? Contact Andrea Calvin, andrea@fablevision.com, to be featured in a FableFive.

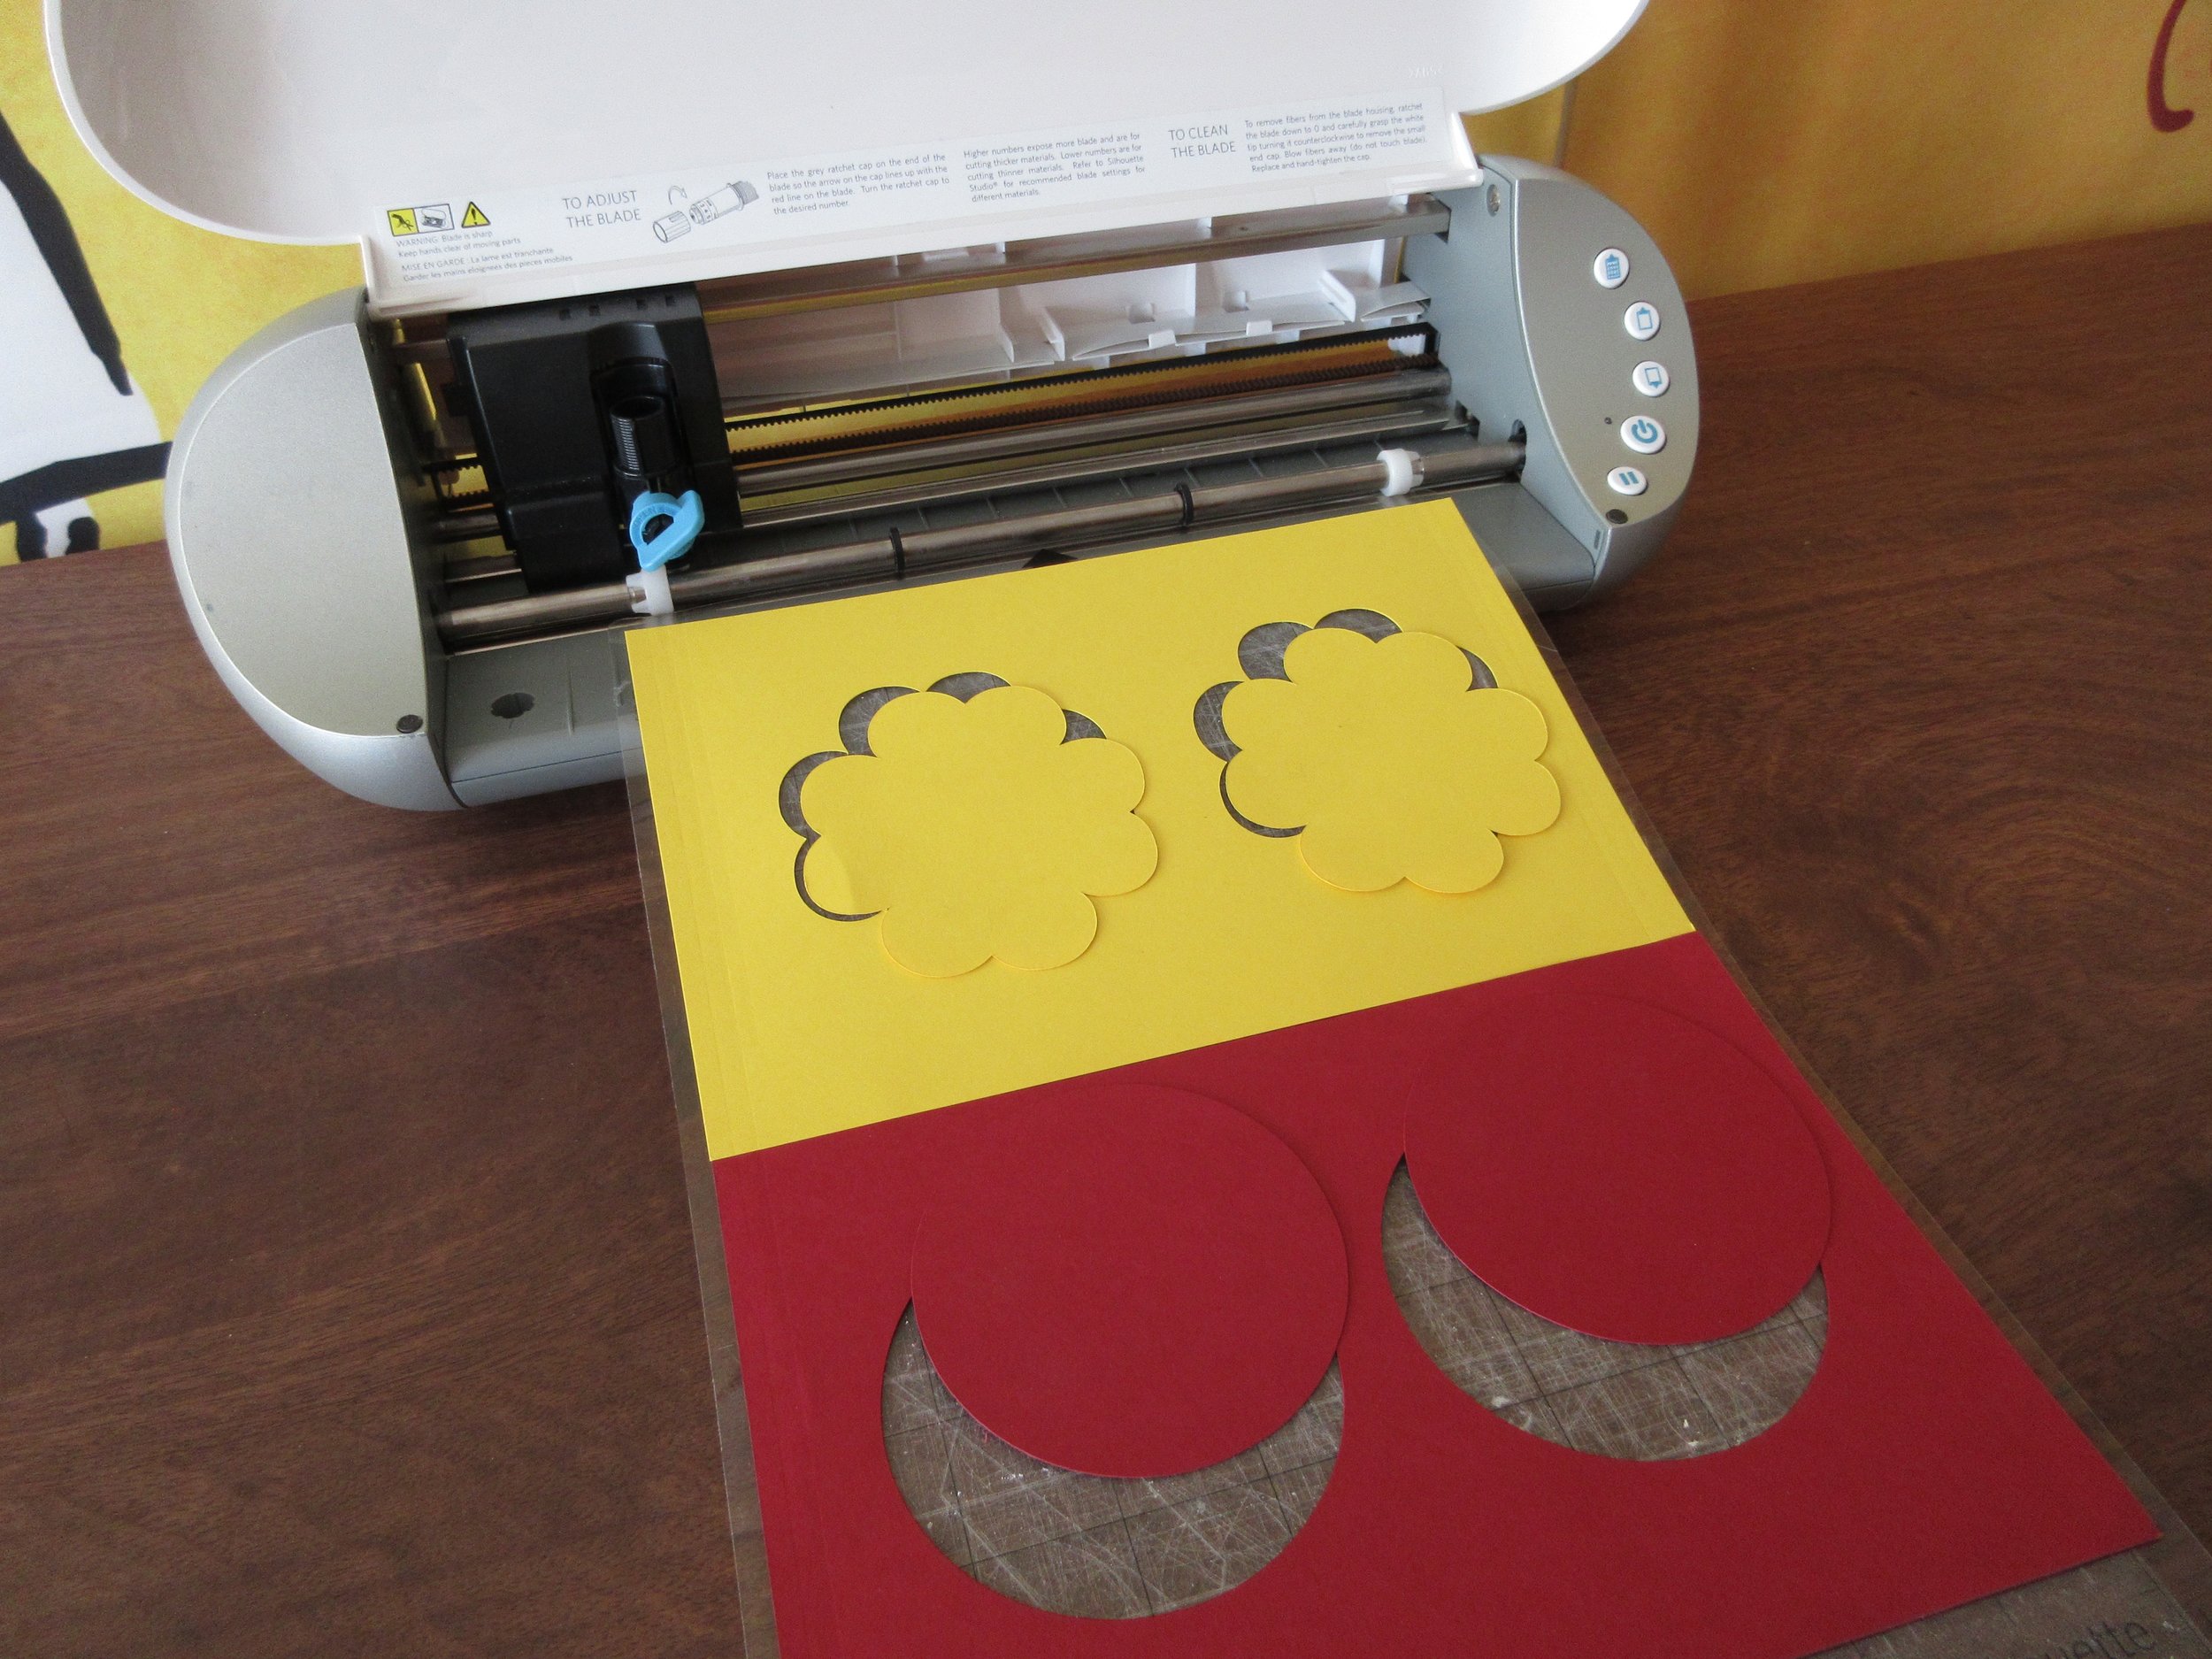
FabFriday: Add a Splash of Color to your Fab@School Maker Studio Projects!

Welcome to FabFriday, a blog series that highlights tips and tricks for using Fab@School Maker Studio. Through this series, we will focus on different materials, design tips, and construction techniques to make the most out of your paper engineering experience.
Color is a great way to add a creative flair to your Fab@School Maker Studio projects. There are plenty of colorful techniques to try, all with their own advantages.
Colored Cardstock
Cardstock paper comes in a wide variety of colors. Try fabricating ready-made and custom creations in your favorite colors. This is good for whenever your project has a large areas of flat color, or a simple color scheme. Layering and mixing different colors is a lot of fun, so make sure you have lots of different colors to experiment with!


Try cutting your page into two colors when fabricating to make parts in two colors at the same time! How can you position cut shapes in your workspace so that you can cut two colors at once?

Printing with Registration Marks
You can also print Fab@School Maker Studio projects before fabricating. This is key when including Library images and imported pictures in your projects. Remember to use registration marks when printing and fabricating. Learn more about registration marks with our Fabrication Quick Start Guide.


I used printing with registration marks to create this pizza box for Arno's Pizza. This Pizza Troll is from the award-winning math and logic game Zoombinis, developed in partnership with TERC, a not-for-profit leader in K-12 math and science education, the Learning Games Network, a not-for-profit game company, and FableVision Studios.
Hand Coloring
What’s more fun that drawing all over your creations? Give your projects a unique touch with pens, colored pencils, or markers. After all, it is paper! You can doodle on your prototypes to get new ideas, or add the finishing touch to completed projects!

Combine all Three!
Can you design a Fab@School Maker Studio creation that uses printed pictures, colored paper, and your own drawing? Combining different techniques and trying new things is Fab-tastic!

How are you adding color to your Fab@School Maker Studio creations? Share how you used these tips! Send your photos and ideas to info@FableVisionLearning.com, for a chance to have them featured in an upcoming FabFriday!
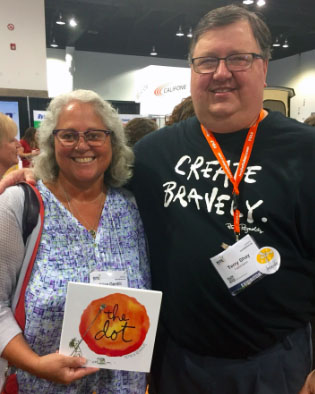
Dot Day: Shea’s Story
At the 2016 International Society for Technology Education Conference in Denver, CO, Peter H. Reynolds had the good fortune to meet an exceptional educator, Alice Gentili.
Alice shared the story of Shea, a young art student, and the transformative effect of International Dot Day.
This is her story in her own words:
Shea’s Story
Late March 2008, I was six and I had a headache.
Then I could barely walk and I passed out. My dad drove me to the hospital. My mom came shortly afterward. It was discovered later that day that I had an AVM blood vessel in my brain, and it had ruptured.
An AVM is a knot of a bunch of blood vessels in the brain. They are very rare. They occur in less than one percent of the world's population. Even then they are less common in females, the chances of surviving one are slim.
Even if one did manage to survive they would likely suffer severe side effects, such as severe brain damage, field vision loss, blindness, numbness or weakness in one or more areas of the body, language difficulties, or not being able to walk again.
The doctors suspected that, even though I would have to get surgery, I would not survive. I have left side weakness now. Although that is partially because I got Bell’s Palsy twice on the left side of my face before I turned two. I also have partial field vision loss on the left side of each of my eyes. I still have 20/20 vision otherwise though.
***
Shea and Mrs. Gentili
It was in art class in fifth grade.
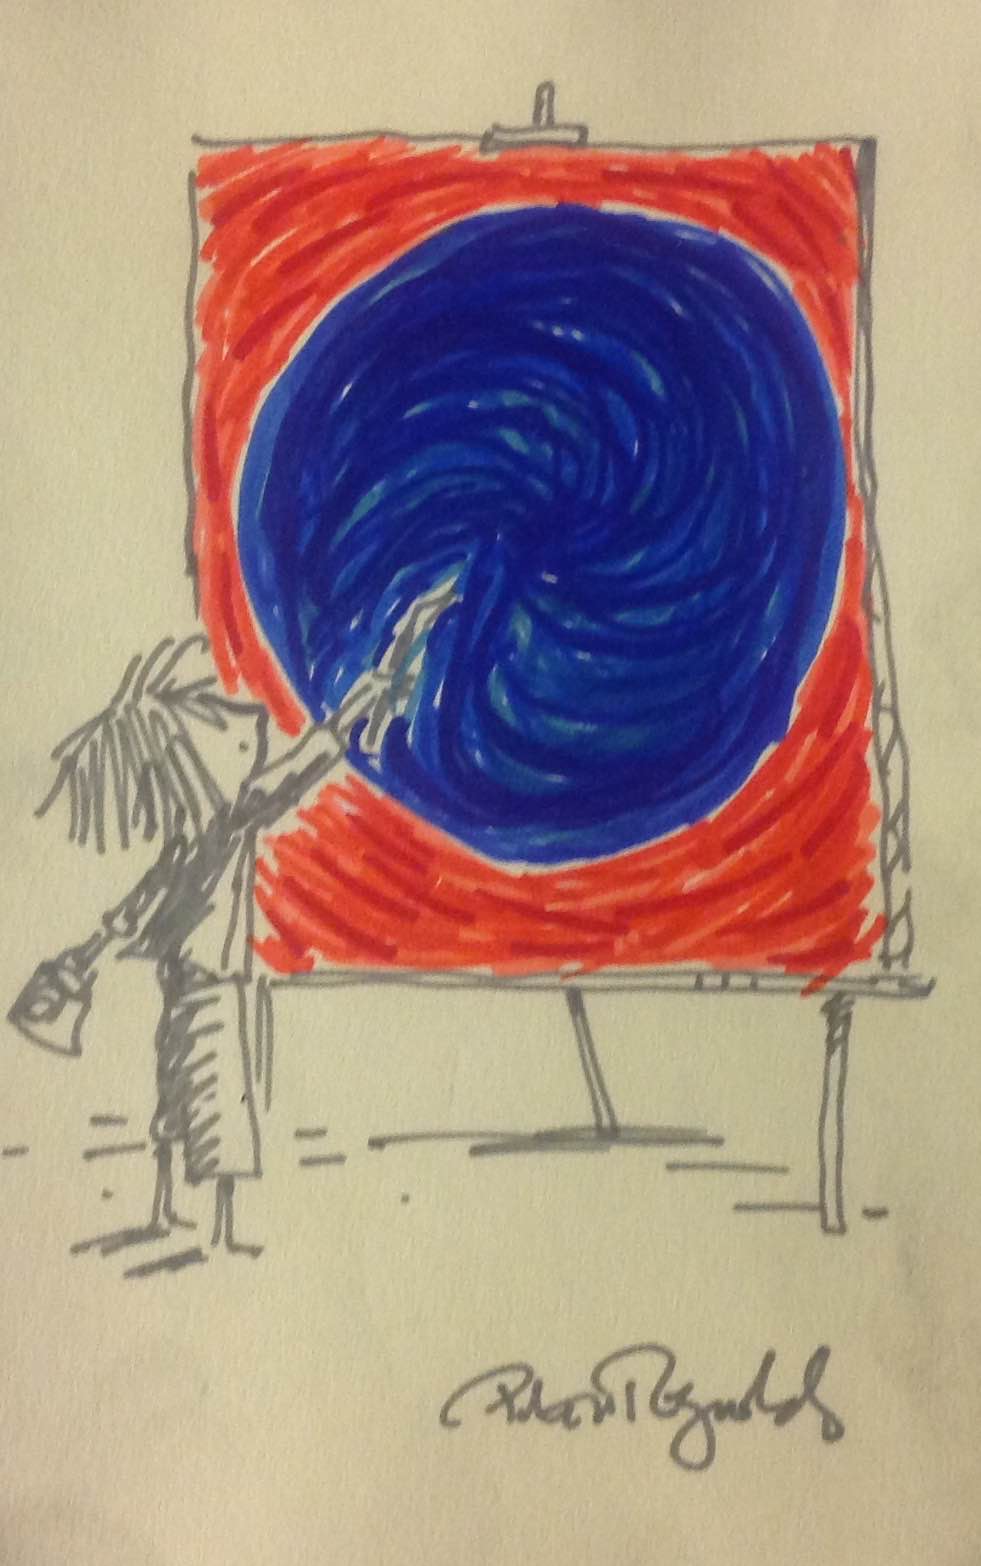
That day my art teacher, Mrs. Gentili, told us it was International Dot Day. That was a day named after a picture book, "The Dot" by Peter H. Reynolds.
Mrs. Gentili read the book to us and there was one sentence, that I remember, that inspired me, that ended up influencing who I am as an artist. The sentence read, "Make a mark and see where it takes you."
We had to draw dots of our own after reading the book. That gave me an idea, and when I get an idea there's no stopping me. When I got home that day I pulled out a small, unused sketchbook and some markers. Probably the least sophisticated markers of all time but they worked for me.
When I was at my little brother's soccer practice that day I began. I drew a dot that resemblesa marble of sorts, using four different colors: light blue, bright blue, light green, and bright purple.
About a month or so later I came into art class with a completed dot journal. It was filled with dots I had drawn with similar designs as the first and all sorts of colors. Mrs. Gentili loved it, she made a video of it and put it on YouTube.
I would go to create more dot journals after that, as well as taking sculpture classes and other classes. Completing a collection of more than 365 drawings on Sketchbook Express, and finishing at least two other sketchbooks. I am in the process of finishing a third. Circles, dots would be a part of almost every drawing, painting, or sculpture I did after that.
Eighth grade was my last year in middle school. We had a little graduation ceremony and an awards ceremony before hand. I was one of the two people who got the Georgia O'Keefe award.
Afterwards somehow everyone in the school knew who I was. Probably because my fifth grade art teacher, Mrs. Gentili put it on Facebook, Instagram, and Twitter because she was so proud of me. I honestly didn't like the attention and publicity at first. I'm not mad at her for it though. I saw her, Mrs. Gentili, afterwards. She told me that she felt that it all began with "The Dot," my dot journals. I told her she was right. It did.
"The Dot" turned the visual arts into my number one passion.
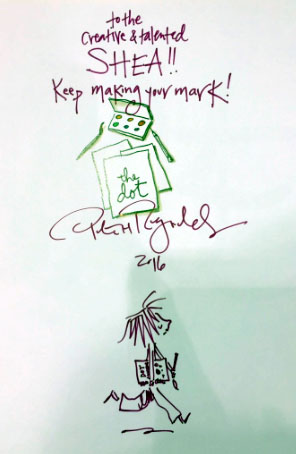
A Special Dot Day Message from From Peter H. Reynolds
How are you making your mark this Sept. 15-ish? Tweet at us using #DotDay and let us know!
FableVision Learning’s Teacher Spotlight: John Long
Let Helping Teachers Develop Students that Learn Through Creating

“My classroom is a bit large these days,” explains John Long, technology program specialist in the Department of Educational Technology for the School District of Palm Beach County. “It involves working with several hundred teachers and thousands of students at about 30 schools a year…I like to consider myself a digital learning architect at any of the 183 schools in Palm Beach County. My role involves designing professional development for the schools and implementing professional learning communities for integrating technology embedded into the curriculum.”
John recently chatted with FableVision Learning about his unique method of integrating technology into the curriculum, his work with programs like Animation-ish and Fab@School Maker Studio, and plans for Dot Day! If you are curious about what he is up to in the classroom, follow John on Twitter: @adigitallearner
Can you share a bit about your creative teaching style?
I focus on coaching, modeling, curriculum design, and creating professional learning networks for educators. I believe it is important for students to create based on their learning instead of constantly consuming content and having to be assessed on it.
I started years ago training in educational technology on how to use programs but they never seemed to understand how to use it in their classrooms. Over the years I changed my methods to include ongoing professional development with time to implement and receive feedback. Then took the professional development into the classrooms and talked with teachers, librarians, administrators, and parents. I researched their standards and curriculum. I have built quite a community of teachers over the past 20 years and decided to head back into the classroom to work directly with teachers and students on integrating. This was the key to getting teachers comfortable with using technology into their curriculum.
The first emphasis was to focus on teaching and learning. It is hard for teachers to see this because they focus on the “wow” or “cool” factor and it is more show and tell and not about learning from technology. The second focus is to design a project where the teacher is comfortable enough to watch and learn. Teachers are still learners too. Focusing on a core set of apps or tools that allow students to create projects. Once teachers get comfortable they turn it over to them and observe and give feedback. Each project and class is different so the learning never stops. This process is my methodology in a nutshell.
You have created a fantastic collection of videos that show how Animation-ish can be used in the classroom. Can you tell us about the subject of some of these videos and the inspiration behind them?

I believe in developing a core set of apps or tools to work with in the classroom and then supplement with more tools based on grade level and subject area. The core set of apps should be used in grades Kindergarten through 12th grade. One of my apps in that core set is an animation app. Animation allows students to design and draw concepts that they have learned and demonstrate that learning. It allows them to synthesize and apply the learning. I learned about Animation-ish back in 2009 talking with a dear friend, Dr. Peggy Healy Stearns. I started to see all kinds of uses in Science but also in language arts. One of my first projects was to create a animated dictionary of words. Here is a great example of this in action..
Animation-ish is great in Science. Using it to document things like the water-cycle, or the butterfly life cycle, and even things like cell mitosis. This got me thinking of another project creating digital student portfolios in iBooks Author or now Book Creator. Students can create e-book portfolios by recreating through word processing, video, pictures, or animation using Animation-ish. I started working with a biology teacher and a fifth grade teacher to design these projects. This is an ongoing project that keeps evolving over the years.

A few years ago, a librarian colleague of mine shared with me her fairytale project, which was part of the second grade curriculum. I got to thinking about making it digital and letting students create a digital fairytale. The premise was to start with writing a fairytale including the characteristics then let the students animate the project. Since it is electronic, let the students read their passage with the animation and create an e-book to share. I decided that I would become the story wizard and began to dress the part. This is a fun and challenging project. We have now completed three digital fairytales. One of the favorite parts of the projects is the students learning how to use Animation-ish. You can see how the project is implemented below.
After we did the second digital fairytale, I thought wouldn’t it be interesting to try a digital mystery and what would that look like? In the digital mystery, I became the digital sleuth to guide them through creating a digital mystery. How do you create a mystery, you have to start with the ending first. Then you need to develop four or five clues guiding the students to veer away from inappropriate types of mysteries. Once you have the ending and the clues decided, you start from the beginning and guide them through creating the story including the clues. You have to keep them focused on the clues, the characteristics, and the ending as they forget and need reminding. You even have to narrow the focus of some of your most “creatives” in the class. Then they can start to use Animation-ish to create their scenes. It was a most rewarding experience with students thanking me. Check out the video with student and teacher feedback.
Do you have any cool Fab@School Maker Studio stories to share?
I have followed the development of Fab@School Maker Studio for 6 years since Dr. Peggy Healy Stearns showed it to me in Denver, CO at the 2010 ISTE conference. I was so excited to see this product was the missing key to teaching STEAM in the classrooms. I first used (Fab@School Maker Studio) a few years ago to design a jack-o'-lantern with an electric circuit with fifth graders and now use it with other groups. It is perfect to build something and teach. I always refer back to the literacy aspect as most schools need to still focus and that is the hook to using it.
We are just getting started in Palm Beach County and with all large districts, it takes time but as the video below will show - we are Going Places...
You love to find creative ways to mark International Dot Day. What has been your favorite celebration and what do you have planned for this year?
Terry Shay challenged me at 2013 ISTE in San Antonio, Texas to bring International Dot Day to Palm Beach County. This is a big task due to the nature of a large district with over 13,000 teachers and 187,000 students.
I am sure that some teachers in this district celebrated International Dot Day way before I brought it up. I had heard about it but never really did it. So, I decided to take him up on his challenge. I went back home and discussed with my supervisors and they agreed to support it. It took six weeks to approve it and it finally became a bulletin, which is how information is officially communicated to the schools.
The first year was a test and I developed some ideas to support International Dot Day. I came up with the basic illustrations and language arts activities. I even came up with the idea to create the first “Dot”cumentary to share how people use it in their classrooms. The first year was definitely a trial run. After the first year, I spent a whole year thinking of new ways to develop ideas for the next year. It is truly a yearlong process. We have had math teachers, science teachers, art teachers, music teachers, and everything in between participate. I have had librarians use it for teaching digital citizenship about making their digital footprint and leaving their mark. Each summer after school is out, I work on the “Dot”cumentary from that year as a way to gear up for the next year.
2013 “Dot”cumentary
2014 “Dot”cumentary
2015 “Dot”cumentary
In 2014, one of my professional learning networks called eMobilize developed a workshop around The Dot as a way to promote and build projects for International Dot Day. The workshop is called the Excellent Learning Adventure and the premise is to learn to use the iPad with Common Core (aka Florida Standards) to help students make their mark in the world through learning. We conduct the workshop a month before International Dot Day so that teachers become aware and promote creativity.
2015 Excellent Learning Adventure
Each year gets better and better with more people learning about it and innovating. The past school year, I started working with a librarian and art teacher at a middle school. The librarian wanted to do a digital project but didn’t know how to get started and lacked the confidence to try. She works well with the art teacher and she wanted to do something with International Dot Day even though it was January. The art teacher was using Photoshop in their class. I brainstormed with both of them and came up with a project. The art teacher would teach them Photoshop by making backgrounds out of dots. Then I would work with the librarian and art teacher to coach them on how to film their students in front of a green screen talking about “how they will make their mark” in the world. It was amazing what came out of the middle school students.
You can see it here:
Check out his awesome Dot Day ideas for the classroom, here.
More Ways to Celebrate International Dot Day in 2016!
From a Facebook Live pre-party with Emily Arrow to special episodes of "Ready Set Draw!" and "StoryMakers" featuring Peter H. Reynolds on KidLit TV, there are so many ways to Celebrate International Dot Day! Read on.
Wednesday, Aug. 24: Emily Arrow's Dot Day Pre-Party!
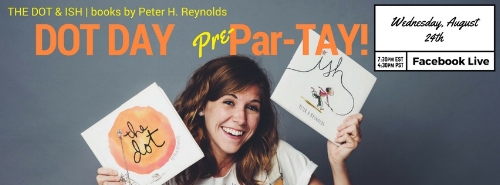
Join Emily Arrow on Wednesday, August 24 for a Dot Day (Pre)Par-TAY. She wants to sing and practice The Dot Song with you, and get excited for International Dot Day on September 15.
This way kids, parents, and teachers will have lots of time to learn The Dot Song and the new ISH Song.
Join Emily Arrow on Facebook Live Wednesday, August 24 at 7:30 p.m. EST, 4:30 p.m. PST.
Sept. 5 & 14: KidLit TV Features Peter H. Reynolds

To celebrate International Dot Day KidLit TV is premiering extra special episodes of "Ready Set Draw!" and "StoryMakers" featuring Peter H. Reynolds.
September 5: Ready Set Draw-ish!
Peter shows you how to make your mark for Dot Day!
September 14: StoryMakers
Peter and StoryMakers host Rocco Staino discuss the Creatrilogy, Dot Day, and more!
But Wait, There's More: KidLit TV will be giving away Peter's Creatrilogy (The Dot, Ish, and Sky Color) and one of a kind paintings made while filming 'Ready Set Draw!' Watch the shows above for your chance to enter. Stay Tuned to KidLit TV.
Sept. 10: Dot Day Celebration at the Blue Bunny!

Come celebrate International Dot Day with Peter H. Reynolds and The Blue Bunny Books & Toys in Dedham, MA, on Saturday, Sept. 10, 11 a.m. to 1 p.m.
Signed and personalized copies of The Dot will be available during the celebration and online through The Blue Bunny website.
Sept. 13: Dot Day live stream with Discovery Education

Discovery Education is helping us kick-off International Dot Day global creativity fest with a special virtual event. The team will be live streaming from the school in Iowa that started Dot Day back in 2009! Dot Day founder and creative educator Terry Shay will be hosting Peter H. Reynolds, author/illustrator of The Dot, with FableVision Learning's Dot Connector Bill Norris and Vice President Andrea Calvin.
Register for free here. Join us Tuesday, September 13 from 1:00 p.m. to 1:30 p.m. CDT
Now: Get Your Epic Bonus!

Students' families can click here, sign up for Epic! - the trusted online K-5 children's book library, and use special promo code DOTDAY to get two months of FREE access at home to digital book/audio/film versions of The Dot.
Of course, educators get Epic! free year-round. But now, home users will also get 2 months free access - just like those lucky teachers - to more than 15,000 high-quality books for kids 12 and under from Epic!'s all-you-can read digital library. How's that for an epic offer?