FableVision Learning Spotlight Blog
Categories
- Animation-ish 42
- Books 21
- Civics! 2
- Classroom Spotlight 17
- Conferences and Events 20
- Creative Educator 3
- Creativity 25
- Distance Learning 13
- Dot Day 22
- FabClassroom 28
- FabFriday 19
- FabMaker Studio 66
- FabMaker Studio Classroom 13
- FableFive 7
- FableVision Games 3
- Free Educator Resources 36
- HUTCH 1
- Home Activities 5
- In the Classroom 34
- In the News 11
- International Dot Day 23
- Ish 1
- Library 1
- Mapping the World by Heart 7
- Paul Reynolds 10
- Peter H. Reynolds 54
- Professional Development 9
- STEM/STEAM 20
- Storybook Academy 2
- Teacher Spotlight 14
- The Dot 17
- The North Star 2
- Words and Their Stories 1
- Zoombinis 3

Explore Math with a Valentine’s Day Explosion Box!
This post was written by Peggy Healy Stearns, Ph.D., the designer of Fab@School Maker Studio and co-founder of the Fab@School coalition.
If you love pop-ups – those playful, joyful constructions that bring books and cards to life – then you’ll probably love “explosion boxes.” These popular 3D paper crafts take pop-ups to a whole new dimension.
Like pop-ups, “explosion boxes” offer an engaging way to invite students into the world of math and engineering. They encourage students to explore and work with measurement, parallel and perpendicular lines, angles, triangles, symmetry, and transformational geometry, all in the context of engaging manipulatives kids design and make themselves.
Although the deepest learning comes when students design from scratch, a Fab@School Maker Studio Ready-Made Project jumpstarts students by providing a model they can explore and customize. Once students understand the shapes, cuts, folds, and angles that make up an explosion box, they are better able to design from scratch.


The simple explosion box shown here is designed to enclose a small Valentine’s Day treat, gift, or note. It can be printed first and then cut, or cut without printing from colored card stock or plain white paper that students decorate themselves.
Encourage students to customize with color, cutouts, and other design elements. Once students have their initial model in hand, ask them to explore their constructions. Use some of the questions below to kickstart a class discussion. Then challenge students to design their own original explosion boxes.
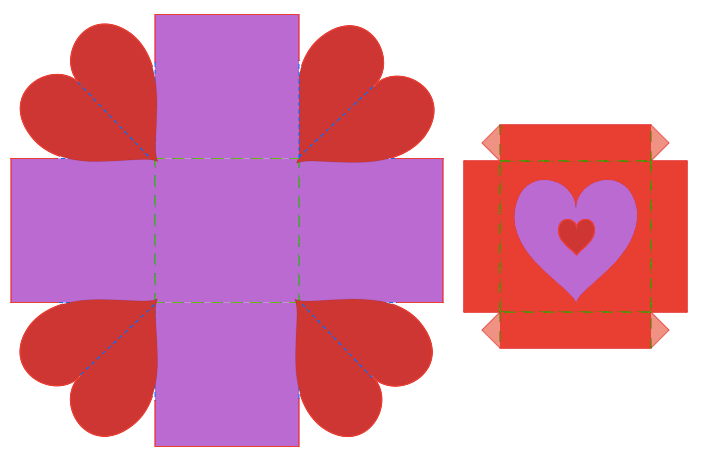
Above, is the template for the Fab@School Explosion Box Ready-Made. Check it out!
Explore the explosion box:
- How many faces does your explosion box pattern have? How do you get 9 faces to fold into a square box?
- What will fit inside the box?
- What is the volume of the box? How many M&M’s, plastic counters, or marbles will fit?
- At what angle do the square sides fold? At what angle do the hearts fold?
- Can you suggest other shapes or images that would work in place of the hearts?
- What do you like best about your explosion box? What would you like to change?
Challenge:
- Design 2D, pop-up, or 3D elements scaled to fit inside your explosion box.
- Can you resize the box to hold a different object?
- Design an original explosion box from scratch for Valentine’s Day or another occasion. Search “explosion box” on the Internet for ideas.
- Make a different shaped explosion box. Can you design a box that looks like a building, animal or other object? With a specific purpose or “client” in mind, set criteria and constraints and design a box that meets these guidelines.
Common Core Math Standards [Additional standards apply.]
- CCSS.MATH.CONTENT.K.MD.A.1
- CCSS.MATH.CONTENT.1.G.A.2
- CCSS.MATH.CONTENT.2.G.A.1
- CCSS.MATH.CONTENT.3.MD.C.5
- CCSS.MATH.CONTENT.4.G.A.3
- CCSS.MATH.CONTENT.5.MD.C.3
- CCSS.MATH.CONTENT.6.G.A.2
- CCSS.MATH.CONTENT.7.G.B.4
Next Generation Science Standards

Getting "Messy" with Fab@School at the ED Games Expo
In a room filled with amazing virtual reality stations, impressive mobile apps, and science simulations, we were the “messy table.”
On Monday, Jan. 8, FableVision Learning joined hundreds of game developers at 5th annual ED Games Expo hosted by the U.S. Department of Education at the The John F. Kennedy Center for the Performing Arts in DC. The expo was a chance to showcase learning games developed through The Small Business Innovation Research (SBIR) program to students from the DC area.
We discovered that in this digital age, youngsters were drawn the tangible. Our table was the busiest of all! Why? We were there to demo Fab@School Maker Studio, an online tool where students design with 2D shapes to create nets that when fabricated using a digital cutter become 3D objects.
The perk - it is all done with paper.
I was inundated with students all lining up to answer one simple question: “What do you want to make”? Everytime the answer was different.
- “What do you mean… make?”
- “A house.”
- “A car.”
- “A Mickey Mouse face that has stars instead of circles for ears”
- “What can I make?”
- “I want what she made, only different.”
The challenge was on and it was only 10 a.m.
Students picked a piece of colored cardstock, mounted it on a sticky mat, and patiently waited for their turn.
A fourth-grade girl was excited to create a dodecahedron - she just loves shapes. But wanted two sides to have a cut-out of a star. This was simple - by dragging a star from the shapes pallet onto her design she was able to see her idea come to fruition digitally and after 50 seconds though the digital cutter - she was folding her geometric shape.
One girl wasn’t impressed with the sunglasses she was wearing and wanted to create her own. As a group of young engineers we examined what shapes were used in the construction of the glasses.
“Maybe two circles with two more circles in the middle to see,” one student suggested.
“Now we need a rectangle to make them connected,” another added.
At the end of the design phase, we had a pretty nifty pair of sunglasses with very long arms. Back in Fab@School, she used the ruler tool to accurately create the perfect pair of sunglasses.
There were oohs and aahs from all folks of ages when the students snapped pulled together six squares and watched as the program’s 3D viewer showed how the shape would fold. One exhibitor remarked that Fab@School was unique because you create 2D nets to create 3D objects instead of building in a 3D environment and having the program flatten it.
Toward the end of the afternoon, teachers were giving the five-minute-until-the-bus-leaves warning to students that had been there for a good part of the day - designing, creating, and getting messy.
We left tired but excited to know we had inspired a few more future engineers.

FabFriday: Explore More Construction Materials!

Welcome to FabFriday, a blog series that highlights tips and tricks for using Fab@School Maker Studio. Fab@ School Maker Studio is a web-based digital fabrication software tool that creates a more accessible, comfortable onramp for teachers to introduce STEM learning to their students. Each week we'll be posting ideas about using different materials, design tips, and construction techniques to help you offer even more fab learning to your students. In future posts, we'd love to share YOUR tips and ideas about how your'e using Fab@School Maker Studio. For more FabFriday posts, click here.

Fab@School Maker Studio provides engaging digital fabrication/desktop manufacturing tools where elementary and middle school students can make, test, and revise 2D designs, pop-ups, 3D objects, and working machines as they learn science, technology, engineering, and math concepts in a meaningful context. Fab@School Maker Studio uses paper for most activities, allowing for a fast-paced and low-cost design experience. However, not all papers are created equal! Just like how a painter can choose between a wide variety of oils, acrylics, and watercolors, a Fab@School engineer has many choices of building materials. Let’s explore how you can use these materials to their greatest advantage and design more complex constructions!

Copy Paper
This thin white paper is most commonly used in printers. While it is not strong enough for most Fab@School projects, it can be used for prototyping to experiment with your cut, fold, and tab lines before switching to a special sheet of colored or printed paper. Thin paper is also very helpful when making windmills, airplanes, or other projects where a lighter weight construction is needed.

Check out all of these activities, which have all been created from 65lb Cardstock.
65lb Cardstock
65lb cardstock comes in a wide variety of colors, and is a fantastic mix between structural rigidity and flexibility. It is perfect for 2D, Pop-Up, and 3D construction, as well as projects with simple moving parts. It comes in packs of individual or mixed colors, making it easy to bring a splash of color to your creation. I recommend using this material most often, as it is very diverse.

This trebuchet catapult was designed with 110lb cardstock to survive the forces of the counterweight and throwing arm!
110lb cardstock
For when 65llb cardstock doesn’t quite cut it, 110lb cardstock opens up the opportunity for stronger construction, more complicated designs, and longer lasting moving parts. While it does not come in as wide of a variety of colors, it makes up for it in strength. Combine it with 65lb cardstock to reinforce critical pieces of your design, or create an entire model with 110lb cardstock for extra durability.

Pattern and Special Paper
Even decorative papers provide a potential engineering decision! You can use patterned or colored paper to customize and differentiate different parts of your design, or to make your project look more realistic! I used metallic-colored cardstock to make these cars look like they have a shiny coat of paint, and vellum paper was used to create transparent windows!

Do More With Lamination
You can combine all of these different weights of paper to customize your projects! Try gluing entire layers of paper together to create a thicker construction, or combine 65lb and 110lb cardstock to create a structural base with colored cardstock layered on top.
You can also pinpoint sections of your design that need more rigidity and layer 110lb cardstock into just these areas. Check out this STEAM-Infused STORM electric motorcycle made using lamination techniques. 110lb cardstock was used to construct the base of the motorcycle body, and then a layer of colored 65lb cardstock was glued on top to simultaneously fortify and decorate the motorcycle.
Sometimes I choose which materials to use in order to achieve a certain goal, and other times I decide what I want to build based on available materials. Experiment with as many kinds of paper and cardstock as you can, in whichever order your creative mind flows!
How are you using different kinds of paper with your Fab@School creations? In future posts, we'd love to share YOUR tips and ideas about how your'e using Fab@School Maker Studio. Send your photos to info@FableVisionLearning.com to have them featured in an upcoming FabFriday! For more FabFriday posts, click here.

FabFriday: I’m Thankful For… Shapes!
Welcome to FabFriday, a blog series that highlights tips and tricks for using Fab@School Maker Studio. Through this series, we will focus on different materials, design tips, and construction techniques to make the most out of your paper engineering experience. For more FabFriday posts, click here.
Shapes comprise almost everything you can see! Just look around you, your classroom, or your entire town. Which shape do you see the most? Breaking down everyday items into their base shapes is a fun and eye-opening exercise. You can also imagine and build with shapes!
I love shapes - you could say I am thankful for shapes! So, this Thanksgiving I am celebrating by making a festive turkey out of shapes with Fab@School Maker Studio.
Let’s begin by making a circle with the Shape Tool for the body.

Next is the turkey’s neck, which I design by combining two circles with the Weld Tool and the Edit Points Tool.


Now I need to make the face! It’s a lot of fun to experiment with how to make different expressions with shapes. Here I use a triangle for the beak, two circles for the eyes, and an oval for the “snood” draped over the turkey’s beak.

Now what turkey is complete without their magnificent feathers? I’m going to make the feathers for my turkey by creating an oval and stretching one control point with the Edit Points Tool to make a long feather-like shape.


I layered all of my shapes together to see what my turkey is going to look like once it is fabricated and assembled. When I turn on the X-Ray Tool, I can see how the overlapping shapes cause all of the red cut lines to intersect. If I were to send this project to the Silhouette cutter like this, it would cut the paper into tiny pieces!

In order to send my turkey to a Silhouette cutter, I’ll have to separate the shapes onto pages that can be cut. I made a lot of copies of the face shapes so I don’t waste paper on such tiny parts. Try using only a few sheets of paper to make enough eyes, beaks, or other parts for your entire class!


I can now fabricate my shapes to create a Fab-tastic Thanksgiving turkey! I fastened the body and neck together with a brad so that my final model can move!


How are you using shapes in your Fab@School Maker Studio creations? Share how you used these tips! Send your photos and ideas to info@FableVisionLearning.com, for a chance to have them featured in an upcoming FabFriday!

FabFriday: Add a Splash of Color to your Fab@School Maker Studio Projects!

Welcome to FabFriday, a blog series that highlights tips and tricks for using Fab@School Maker Studio. Through this series, we will focus on different materials, design tips, and construction techniques to make the most out of your paper engineering experience.
Color is a great way to add a creative flair to your Fab@School Maker Studio projects. There are plenty of colorful techniques to try, all with their own advantages.
Colored Cardstock
Cardstock paper comes in a wide variety of colors. Try fabricating ready-made and custom creations in your favorite colors. This is good for whenever your project has a large areas of flat color, or a simple color scheme. Layering and mixing different colors is a lot of fun, so make sure you have lots of different colors to experiment with!


Try cutting your page into two colors when fabricating to make parts in two colors at the same time! How can you position cut shapes in your workspace so that you can cut two colors at once?

Printing with Registration Marks
You can also print Fab@School Maker Studio projects before fabricating. This is key when including Library images and imported pictures in your projects. Remember to use registration marks when printing and fabricating. Learn more about registration marks with our Fabrication Quick Start Guide.


I used printing with registration marks to create this pizza box for Arno's Pizza. This Pizza Troll is from the award-winning math and logic game Zoombinis, developed in partnership with TERC, a not-for-profit leader in K-12 math and science education, the Learning Games Network, a not-for-profit game company, and FableVision Studios.
Hand Coloring
What’s more fun that drawing all over your creations? Give your projects a unique touch with pens, colored pencils, or markers. After all, it is paper! You can doodle on your prototypes to get new ideas, or add the finishing touch to completed projects!

Combine all Three!
Can you design a Fab@School Maker Studio creation that uses printed pictures, colored paper, and your own drawing? Combining different techniques and trying new things is Fab-tastic!

How are you adding color to your Fab@School Maker Studio creations? Share how you used these tips! Send your photos and ideas to info@FableVisionLearning.com, for a chance to have them featured in an upcoming FabFriday!